System Requirements
With the service interconnection fabric, you can easily stretch your compute environment from a private data center to a public cloud, over different public clouds, or across application clusters in the same cloud. This approach doesn’t require changes to your application code nor a long learning curve of public cloud APIs. Once you have deployed a fabric, you can easily move application services from one workload node to another, scale workload nodes in and out, or redirect traffic between clouds for failover and cost optimization.
To make the cloud migration process agile, secure and flexible, the service interconnection fabric deployment itself is designed to be highly automated and simple. You can deploy all service interconnection fabric components–VPCs and nodes (i.e., orchestrators, processors, and workloads)–either using the fabric manager software or your own automation tools.
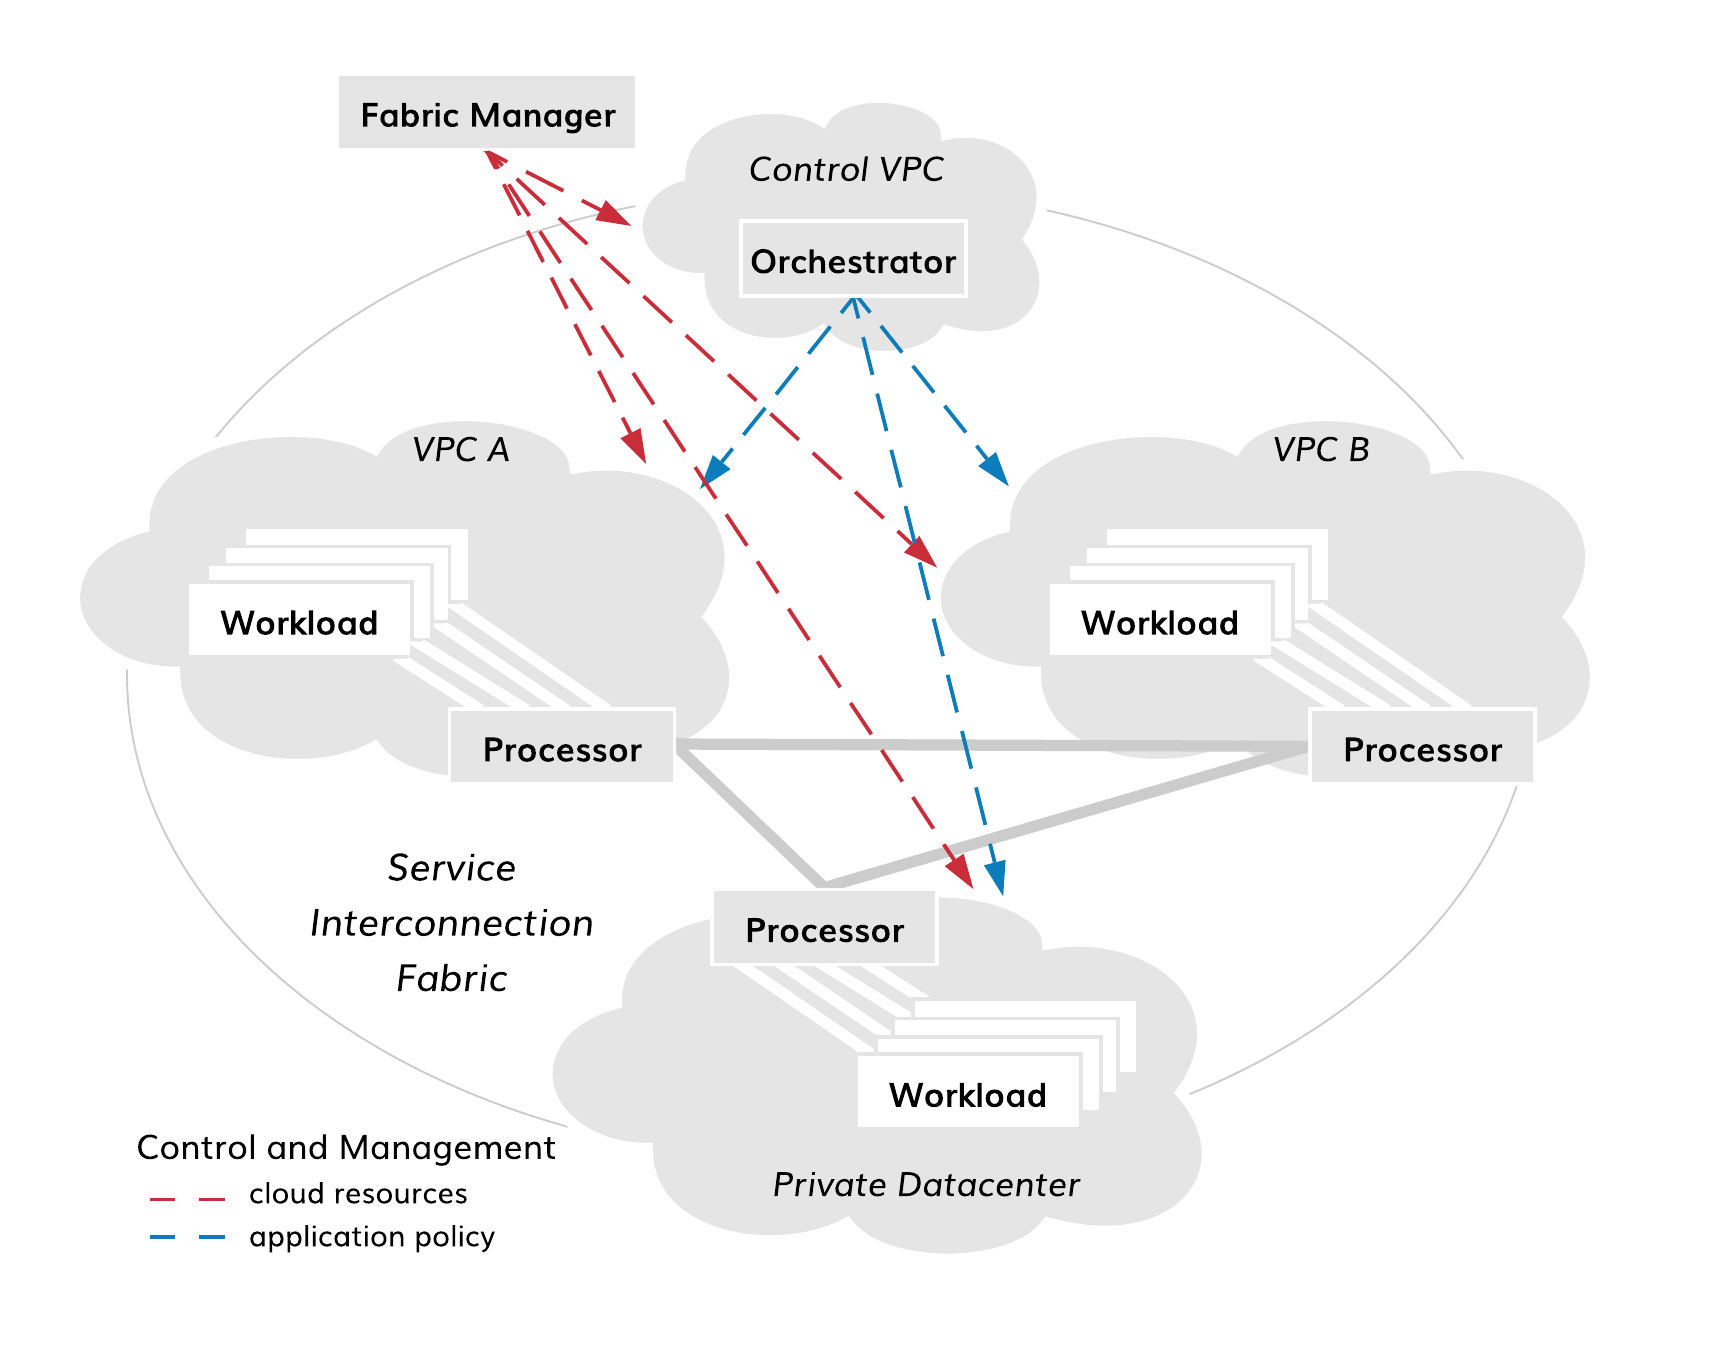
Fig. 116 Fabric Deployment Diagram
It is common to use the fabric manager for the deployment of all fabric components in the public clouds. In this case, you utilize public cloud automation in full and significantly simplify your deployment. All integration with cloud services and between fabric components is done automatically by the fabric manager.
In private data centers, the installation of processor and workload software components on already existing VMs or physical servers–without access from fabric manager–might be the only available option. The good news is that the installation and configuration of each component takes about a minute and can be easily added to your existing provisioning pipeline. However with this approach, the certificate, telemetry, events, and software management of the components–covered by the fabric manager in public clouds–should be added to your private data center automation tools.
Alternatively, you can get the best of both worlds with a deployment approach that combines the fabric manager automation power with the flexibility of your own VM management tools. If you are interested in bringing your own VMs to the fabric manager, we can do that also.
The following guides will discuss currently available options and lead you through all the steps of deploying:
- fabric manager in a public cloud,
- orchestrator in a public cloud,
- processor in a public cloud or a private data center,
- workload in a public cloud or a private data center.
Server Requirements
The fabric manager is supplied with default resource templates which specify types of virtual machines for each cloud based on their roles in the service interconnection fabric.
The following table lists minimum requirements for installing and operating service interconnection fabric components on virtual machines or physical servers.
| Component | OS | Proc Cores | RAM | Storage |
|---|---|---|---|---|
| Fabric Manager | Ubuntu 18.04 LTS or later | 2 | 4GB | 10GB |
| Orchestrator | Ubuntu 18.04 LTS or later [1] | 4 | 16GB | 1TB |
| Processor | Ubuntu 18.04 LTS or later RHEL 8 or later [2] |
2 | 4GB | 60GB |
| Workload | Ubuntu 18.04 LTS or later RHEL 8 or later [3] |
2 | 4GB | 10GB |
| [1] | Please note that the orchestrator is deployed in Docker containers and may run across one or more nodes. |
| [2] | Deploying the processor on RHEL 8 is supported starting with the fabric family version 1.4. |
| [3] | Deploying the processor on RHEL 8 is supported starting with the fabric family version 1.3. |
Firewall Settings
When you create a VPC and a VM in it with the fabric manager, all security groups set up automatically based on the VM role. In case you install service interconnection fabric components using your own automation tool, the tool must provision particular security rules to allow the components communicate within the service interconnection fabric.
There are five distinctive sets of security rules in the service interconnection fabric:
- fabric manager,
- orchestrator ingress proxy,
- orchestrator nodes,
- processor nodes,
- workload nodes.
The purpose of fabric manager and node groups is obvious. The ingress proxy security group contains the subset of ports open to the internet that are associated with the orchestrator. Today, ingress proxy is part of orchestrator’s controller node, in which case the ingress proxy security group and the orchestrator security group can both be applied to the controller node. The ingress proxy security group opens tcp/80, tcp/443, and tcp/5044 to the internet (as well as ICMP and tcp/22 from the fabric manager). The orchestrator security group should only open ports to the local subnet as required for Docker, telemetry, events, etc. (as well as icmp and tcp/22 from the fabric manager). In the future, you may deploy the ingress proxy on a separate VM within the orchestrator VPC/subnet, in which case the ingress proxy security would apply only to the ingress proxy node only.
The security group rules are summarized in table below.
Security Group Rules
| Protocol | Fabric Manager | Orchestrator Ingress Proxy | Orchestrator Nodes | Processor Nodes | Workload Nodes |
|---|---|---|---|---|---|
| SSH | from Internet | YES - from FM only | YES - from FM only | YES - from FM only | YES - from processors in the same VPC |
| ICMP | from Internet | YES - from FM only | YES - from FM only | YES - from FM only | YES - from processors in the same VPC |
| IPsec (udp/500; udp/4500) | NO | NO | NO | YES - from workloads in the same VPC and all processors | YES - from processors in the same VPC |
| HTTPS | NO | YES - from Internet | NO | NO | NO |
| HTTP | NO | YES - from Internet [4] | NO | NO | NO |
| Logs (tcp/5044) | NO | YES - from Internet | NO | NO | NO |
| [4] | Required for the Let’s Encrypt certificate setup only. |
Note
When you deploy service interconnection fabric components in your private data center, use the same security rules to provision your data center firewalls.
Public Cloud VM Setup
While the fabric manager sets up VMs fully automatically, there are a few details to keep in mind when configuring a VM in a public cloud for hosting processor and workload software components with your own automation tools. This next section comments on those points generally and subsequent sections reference public cloud providers more specifically.
This guide does not replace public cloud provider documentation. You should follow the steps provided by your cloud provider when spinning up a VM while ensuring VMs meet service interconnection fabric requirements.
Engine Installation Requirements
Policy engine, or simply engine, is a software component that makes your VM a processor node. The processor node secures one or multiple sets of workload nodes. All communication between workloads in different clouds happen through the processor nodes using IPsec with NAT traversal by default. The processor node communicates with the fabric orchestrator using HTTPS with mTLS to enforce resource policy. As such, the VM hosting the policy engine software must satisfy particular requirements.
Public IP Address
The orchestrator must be reachable by the policy engine via IP. If this is possible with a private IP address, a public IP address is not required.
Also, other policy engines must be reachable by the policy engine via IP. If this is possible with a private IP address, a public IP address is not required.
A policy engine VM’s public IP address must be static.
Private IP Address
The policy engine must be reachable by policy agents located in its security zones via IP. If this is possible with a private IP address, use it as a preferable method.
A policy engine VM’s private IP address must be static.
IP Forwarding
IP Forwarding must be enabled on all policy engine VMs.
Protocol Filtering
Ingress ports udp/4500 and udp/500 must be opened up on firewalls for all VMs hosting policy engines.
VM Name and Certificate
All VMs in the service interconnection fabric are identified by VM names specified in x509 node certificates (see Certificate Requirements). Modifying a cloud VM name–whenever it’s possible–requires processor node certificate to be regenerated and the node to be re-registered in the fabric.
Tips for Engine Installation
Amazon Web Services
Follow AWS instructions for using public and private IP addresses and opening firewall ports.
To enable IP Forwarding, select the VM instance then navigate to
Actions->Networking->Change Source/Dst. Check. Disable source/destination
Check.
Microsoft Azure
Follow Azure instructions for using public and private IP addresses and opening firewall ports.
Enable IP Forwarding after instance creation by selecting the interface and
going to its IP Configuration menu. Turn IP Forwarding ON.
Google Cloud Platform
GCP requires all recommended settings to be configured during instance creation.
Agent Installation Requirements
Policy agent, or simply agent, is a software component that makes your VM a workload node. The workload node secures communication for hosted application services. The workload node communicates with other workload nodes through processor nodes using IPsec with NAT traversal by default. Also, the workload node communicates with the fabric orchestrator using HTTPS with mTLS to enforce resource and application policy. As such, the VM hosting the policy agent software must satisfy particular requirements.
Public IP Address
The orchestrator must be reachable by the policy agent via IP. If this is possible with a private IP address, a public IP address is not required.
Any required public IP address may be dynamic.
Private IP Address
At least one policy engine must be reachable by the policy agent via IP. If this is possible with a private IP address, use it as a preferable method.
A policy agent VM’s private IP address must be static.
IP Forwarding
IP Forwarding is generally disabled by default on new images. VMs with policy agents do not require IP Forwarding so it should be disabled.
Protocol Filtering
Ingress ports udp/4500 and udp/500 must be opened up on firewalls for all VMs hosting policy agents.
VM Name
All VMs in the service interconnection fabric are identified by VM names specified in x509 node certificates (see Certificate Requirements). Modifying a cloud VM name–whenever it’s possible–requires workload node certificate to be regenerated and the node to be re-registered in the fabric.
Tips for Agent Installation
Amazon Web Services
Follow AWS instructions for using public and private IP addresses and opening firewall ports.
Microsoft Azure
Follow Azure instructions for using public and private IP addresses and opening firewall ports.
Google Cloud Platform
GCP requires all recommended settings to be configured during instance creation.
Private Datacenter VM Setup
You can install processor and workload software in your private data center on any machine that meets minimum requirements. The VM setup in a private data center is identical to the public VM setup for both processor and workload nodes.
A VM in private data center that hosts either policy engine or agent requires:
- a valid x509 node certificate (see Certificate Requirements);
- a static public IP if the machine communicates with service interconnection fabric nodes–processors or workloads–reachable via public IPs only;
- a static private IP if the machine communicates with service interconnection fabric nodes–processors or workloads–reachable via private IPs;
- ingress ports
udp/4500andudp/500opened on VM and network firewalls; - egress port
tcp/443opened on VM and network firewalls.
Certificate Requirements
All communication in the service interconnection fabric is based on service identity and resource identity. While service authorization tokens provide application-level security, x509 certificates secure communications at resource level.
By default, the fabric manager plays Root CA role. When you deploy the fabric interconnection components with the fabric manager, all required certificates are generated and provisioned automatically, including a Let’s Encrypt certificate for the orchestrator northbound interface.
If you want to use your own PKI system or to deploy policy engine or agent on a VM without access from the fabric manager, you can generate certificates by following these instructions.
Using Certificates
The service interconnection fabric relies on the certificates as follows:
- orchestrator NB-API certificate,
- orchestrator SB-API certificate,
- orchestrator Flow-Sign certificate,
- node certificate.
The orchestrator in the service interconnection fabric terminates TLS and mTLS sessions for the northbound and southbound interface respectively. Each interface requires a certificate associated with its FQDN:
- NBI –
orchestrator-<fabric>.<fm-name>.<company-domain> - SBI –
controller-<fabric>.<fm-name>.<company-domain>
In order to authorize data flows between application services, the orchestrator requires a Flow-Sign certificate. All processor and workload nodes use this Flow-Sign certificate to validate flow signature.
Each processor and workload node must possess a node certificate to operate in the service interconnection fabric. The node certificate is used to:
- identify node name and type,
- set up mTLS channel with orchestrator,
- set up IPsec link between nodes,
- discover adjacent nodes using Secure Neighbor Discovery (SeND),
- create node Cryptographically Generated Address (CGA).
The certificates can be provisioned using an existing PKI system or the fabric manager.
Note
When used as Root CA, the fabric manager generates an RSA key and an associated certificate signing request (CSR) on each node. Next, the fabric manager retrieves the CSR and returns a signed certificate back to the node. Private keys never leave the nodes, on which they have been generated.
Generating Node Certificate
Generating Key and CSR
Go to your processor or workload node and ensure you are in the certificate directory as specified in your agent or engine configuration. By default, it’s
~/opt/bayware/certs/:
]$ cd ~/opt/bayware/certs/
To generate an RSA key, run this command on your processor or workload node:
]$ openssl genrsa -out node.key 2048
To generate a certificate signing request, run this command on your processor
or workload node with the company name, fabric name, node role, and hostname as a
subject, in this example -
'/O=myorg2/DC=myfab2/DC=processor/CN=aws-p01-myfab2':
]$ openssl req -new -key node.key -out node.csr -subj '/O=myorg2/DC=myfab2/DC=processor/CN=aws1-p01-myfab2'
Warning
As a reminder, be sure to cross-check the input values for each subject field.
- O = company name from your fabric manager configuration;
- DC appears twice -
- DC = fabric name,
- DC = processor | workload | orchestrator;
- CN = hostname of the VM that issues the CSR.
Copy the CSR you have just generated–in this example node.csr –to your fabric manager.
Note
On the fabric manager, place the CSR in the fabric directory, in this example: ~/.bwctl/myfab2
Issuing Certificate
Go to your fabric manager and ensure you are in the correct fabric directory, in this example ~/.bwctl/myfab2:
]$ cd ~/.bwctl/myfab2
Note
The current working directory–in this example ~/.bwctl/myfab2 –should now contain node.csr file among others.
Run the following openssl command on your fabric manager node to generate the x509 certificate from the CSR:
]$ openssl x509 -req -in node.csr -sha256 -days 3650 -out node.crt -CAkey rootca.key -CA rootca.crt -CAcreateserial -CAserial node.srl -extfile usr_crt_extensions.ext
Example of expected output after running the command:
Signature ok
subject=O = myorg2, DC = myfab2, DC = processor, CN = aws-p01-myfab2
Getting CA Private Key
Deploying Key and Certificates
In the last step, copy the node and root CA certificates (in this example,
node.crt and rootca.crt) to the node–from which you received the CSR–in
the folder you have specified in the policy engine or agent configuration.
Also, move into this folder the RSA ke file (in this example, node.key) if
you happened to create it elsewhere.
Note
By default, the policy engine and agent works with the certificate and the private key located at ~/opt/bayware/certs/
This is the content of the folder on your processor or workload node you should see at this step:
-r-------- 1 ubuntu   ubuntu 1956 Oct  4 15:28 rootca.crt
-rw-rw-r-- 1 ubuntu   ubuntu 1696 Oct  4 15:28 node.crt
-rw------- 1 ubuntu   ubuntu 1675 Oct  4 15:28 node.key
node.crt (example)
Here is an example of a processor node certificate:
Certificate:
   Data:
      Version: 3 (0x2)
      Serial Number:
          a7:13:91:c4:dc:ec:e7:86
   Signature Algorithm: sha256WithRSAEncryption
       Issuer: O = "myorg2", DC = myfab2, CN = green-c0
       Validity
           Not Before: Mar 15 22:56:53 2019 GMT
           Not After : Mar 12 22:56:53 2029 GMT
       Subject: O = "myorg2", DC = myfab2, DC = processor, CN = aws1-p01-fab2
       Subject Public Key Info:
           Public Key Algorithm: rsaEncryption
               Public-Key: (2048 bit)
               Modulus:
                   00:de:fd:58:db:8b:4e:7e:fa:59:e3:0e:b1:21:1a:
                   a6:3f:f9:73:12:df:e4:46:e9:d7:f0:d4:88:f5:ad:
                   f2:81:16:18:98:53:87:b9:ae:37:e9:70:75:f2:24:
                   94:46:cd:56:db:29:4d:c4:a8:d8:93:77:d0:ac:2e:
                   fa:e1:43:11:c1:73:d6:1e:56:50:4e:15:03:ae:9e:
                   2f:fe:df:40:1e:da:aa:5e:e4:25:a0:29:1b:3f:87:
                   2c:81:48:cd:0b:40:78:9a:d4:f0:a5:4a:45:b8:50:
                   b2:7b:a5:43:a7:b9:10:40:d7:94:cd:fa:15:43:d2:
                   dd:54:bf:29:f3:a4:bf:9d:6d:56:2e:ca:3b:c3:82:
                   d3:c8:90:5a:4d:51:52:86:97:d9:85:51:44:62:55:
                   5b:06:dc:5c:2b:54:e3:a9:64:00:65:71:3d:8e:c3:
                   75:2a:9d:f0:94:47:7b:7b:e6:83:4a:6b:e5:09:59:
                   d2:8d:3f:46:32:cc:91:28:35:c5:4f:ae:bc:54:fb:
                   fe:7e:63:c7:d9:69:a6:ff:5b:d9:3a:32:9c:51:25:
                   15:61:a1:5c:95:bf:57:3a:62:f4:03:c1:f3:fc:bd:
                   ad:79:cd:e9:d9:62:ea:dd:c6:ad:65:d8:d8:73:46:
                   3e:38:e0:3e:23:62:b8:19:b2:44:e8:c4:ae:39:3c:
                   46:4d
               Exponent: 65537 (0x10001)
       X509v3 extensions:
           X509v3 Key Usage: critical
               Digital Signature, Key Encipherment
           X509v3 Extended Key Usage:
               TLS Web Server Authentication, TLS Web Client Authentication
           X509v3 Basic Constraints: critical
               CA:FALSE
           X509v3 Subject Key Identifier:
               DB:A2:5E:C8:32:4B:53:5B:D1:A0:49:78:18:B9:E7:71:FB:9D:6F:0B
           X509v3 Authority Key Identifier:
               keyid:50:C9:A4:B9:8E:8A:68:98:D6:AD:AB:6C:99:AB:72:29:C4:3B:98:CC
   Signature Algorithm: sha256WithRSAEncryption
        29:fc:07:b2:00:14:05:ea:22:22:c5:e7:6d:8e:8a:5e:8c:59:
        a7:c4:5d:54:94:a6:24:9e:02:1a:d9:58:25:c9:fa:69:77:bd:
        db:91:17:93:49:70:08:ae:af:c2:c1:9c:8a:35:b4:ce:ca:65:
        91:77:22:cf:89:42:17:ce:f3:f0:29:7a:38:3c:b6:f1:06:a0:
        b4:ae:5c:de:60:08:2a:e9:84:dd:5e:84:70:bf:5c:9e:1f:f7:
        5d:62:85:17:ba:10:2e:6d:34:75:3f:9f:70:e4:10:46:59:60:
        ff:93:b7:c7:22:6e:d2:3c:58:68:75:68:b7:fe:9b:7c:f2:69:
        64:83:af:15:80:80:04:35:c1:05:80:f9:a2:bd:1c:67:93:5d:
        3d:fc:1d:cd:86:fd:ae:6e:9b:3a:22:7a:ad:1d:c6:dc:b4:ee:
        ae:5c:69:0b:1a:1f:5b:e3:58:20:b8:bd:bf:ab:a7:bd:cb:e6:
        38:ee:12:ad:96:83:96:c8:2a:e7:55:47:68:b6:25:7a:be:1b:
        36:48:0d:da:4c:8f:79:7e:ef:4f:bf:fc:05:f7:01:7f:9c:e7:
        b1:13:f2:6e:c9:d1:6f:6a:85:16:f8:d1:5c:83:ff:f1:ba:70:
        89:9d:02:e6:54:e1:7f:5c:0e:a4:ef:7e:3d:9d:03:c3:6a:80:
        34:5c:6a:f6:52:0c:19:ba:98:08:b6:47:b5:91:7e:fd:98:d5:
        8e:9a:ba:b7:bf:39:11:52:4a:26:cb:26:56:65:a3:e0:ca:05:
        04:29:24:e4:86:88:3a:15:e6:d1:dd:48:e7:f1:f6:31:68:3e:
        2d:81:8a:05:a1:1f:31:12:a8:6d:a0:38:ed:af:9e:d2:a4:c0:
        40:bf:49:d1:e5:d5:ee:28:c7:8d:4d:23:27:ee:74:d5:ca:4b:
        ae:ff:61:22:21:07:75:6d:db:de:b3:6c:46:f3:fb:11:6f:28:
        e4:98:fa:f7:b0:6e:64:a1:be:0d:ee:e6:64:73:90:e9:bc:b6:
        4d:3b:94:e6:c7:71:5c:9c:1b:67:c2:d0:19:89:1d:f1:76:16:
        ca:f0:b9:39:81:e2:96:7d:fa:7a:cd:9f:90:7a:1b:f7:3e:7d:
        db:43:bb:c4:79:d0:d9:0c:0c:f5:39:93:63:46:ba:5b:af:8e:
        5d:32:f4:1d:b1:84:cc:bc:45:5c:57:4c:c9:15:e0:fa:f2:37:
        23:fb:f8:3a:de:83:1c:c9:0b:8f:80:b0:10:b3:fc:03:e4:e6:
        f3:e1:8a:77:73:44:c2:71:7f:52:d9:c1:a6:b2:a6:63:f6:97:
        f2:c1:de:c1:06:d8:ae:de:1f:2b:4d:c1:c0:2f:88:2d:c4:1b:
        37:bd:c2:2f:2e:2e:9a:2f