Resource Connectivity Management
This document describes the management functions necessary for configuring resource connectivity policy with the BWCTL-API command-line tool or via a web interface.
To set up a connectivity policy for the processor and workload nodes, all you need to do is put nodes in security zones and connect zones when needed.
The steps below will guide you through the creation of zones and links between them.
Declare Location
A group of workloads is assigned to a security zone via a workload location. It allows the workloads to automatically build links with the processors assigned to the same zone.
The fabric manager automatically assigns a workload to a location at the workload configuration step.
Note
By default, the fabric manager uses the prefix of the workload VPC name as its location name, for example: vpc-name: azr2-vpc-myfab5 ==> location-name: azr2
After configuration, the workload registers with the orchestrator. A workload always provides its location to the orchestrator during the registration step. The orchestrator automatically adds a newly received location name to its resource database.
To set up a zone policy before your workloads are registered, you need to declare a location.
Using Web Interface
To declare a location, click Add Location in the Admin > Locations section.

Fig. 134 Add New Location
Fill out the fields on the New Location page:
- location name
- desired location name;
- description
- add description for location;
- zone
- select zone for location–leave None to make decision later.
Submit the new location configuration. You should see the location appear in
the list on the Admin > Locations page.

Fig. 135 List of Locations
Using BWCTL-API
To declare a location, run this command with the desired location name–in this
example azr3 –as an argument:
]$ bwctl-api create location azr3
You should see output similar to this:
[2019-10-17 22:48:34.362] Location 'azr3' created successfully
Note
When options are not specified on the command line, BWCTL-API applies default configuration settings. See BWCTL-API CLI Manual for specific details.
To check the location configuration, run this command with the location name–in
this example azr3 –as an argument:
]$ bwctl-api show location azr3
You should see a new location specification:
---
apiVersion: policy.bayware.io/v1
kind: Location
metadata:
  description: azr3
  name: azr3
spec: {}
Create Zone
Once you have deployed resources–in this example a VPC with one processor and three workload nodes–open the resource graph page and verify that the workload nodes are not connected to the processor node.
You need to set up a resource policy that permits the workload nodes to connect to the processor.

Fig. 136 Resource Graph before Policy Setup
Note
To set up a resource policy for workloads, you need to create a zone and assign the location with workload nodes and at least one processor to this zone.
Set Up Zone
Using Web Interface
To add a new zone, click Add Zone in the Admin > Zones section.
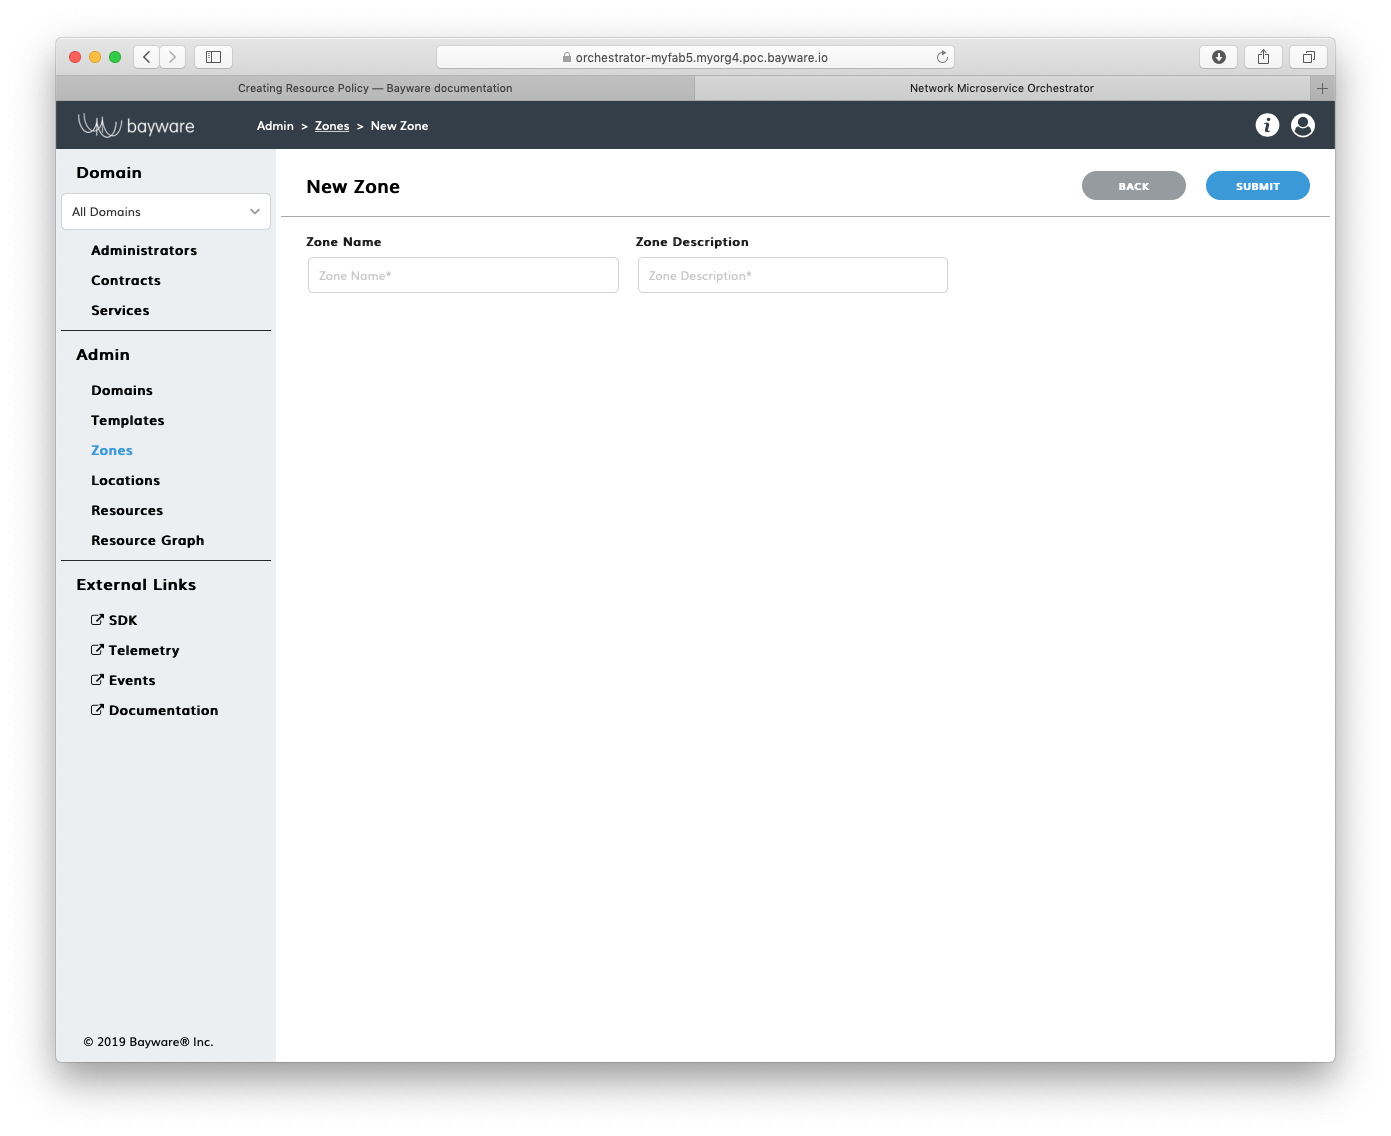
Fig. 137 Add New Zone
Fill out the fields on the New Zone page:
- zone name
- desired zone name;
- description
- add description for zone.
Submit the new zone configuration. You should see the zone appear in the list
on the Admin > Zones page.

Fig. 138 List of Zones
Using BWCTL-API
To create a new zone, run this command with a desired zone name (any string
without spaces)–in this example azure-eastus –as an argument:
]$ bwctl-api create zone azure-eastus
You should see output similar to this:
[2019-10-17 22:58:33.609] Zone 'azure-eastus' created successfully
Note
When options are not specified on the command line, BWCTL-API applies default configuration settings. See BWCTL-API CLI Manual for specific details.
Check a new zone configuration by running this command with the zone name–in
this example azure-eastus –as an argument:
]$ bwctl-api show zone azure-eastus
You should see a new zone specification:
---
apiVersion: policy.bayware.io/v1
kind: Zone
metadata:
  description: azure-eastus
  name: azure-eastus
spec:
  locations: []
  processors: []
Add Processor to Zone
Using Web Interface
To add a processor to the zone, click on the zone name in the Admin > Zones
section–in this example azure-eastus. On the zone page, click Add Processor.
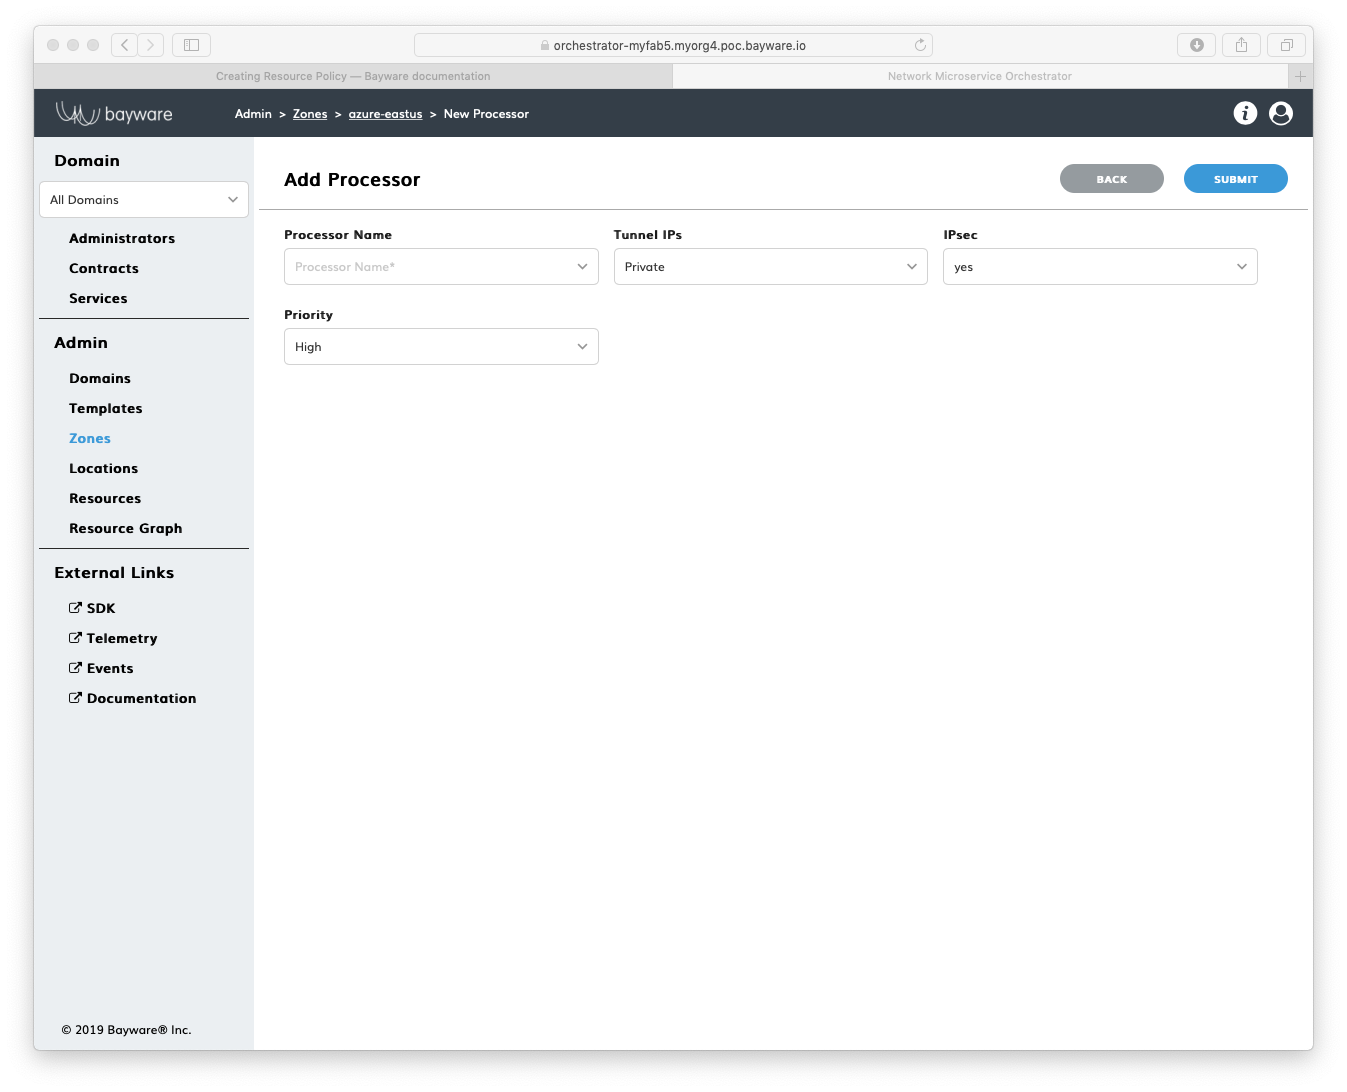
Fig. 139 Add Processor to Zone
Fill out the fields on the New Processor page:
- processor name
- name of the processor that will secure workloads in the zone;
- tunnel IPs
- type of IP addresses–
PrivateorPublic–the processor will use to communicate with workloads in the zone; - IPseс
- to encrypt communication–
yesorno–between the processor and workloads in the zone; - priority
- processor usage priority–
HighorLow–for workloads in the zone.
Submit the configuration. You should see the processor appear in the list of
zone processors on the Admin > Zones > azure-eastus page.
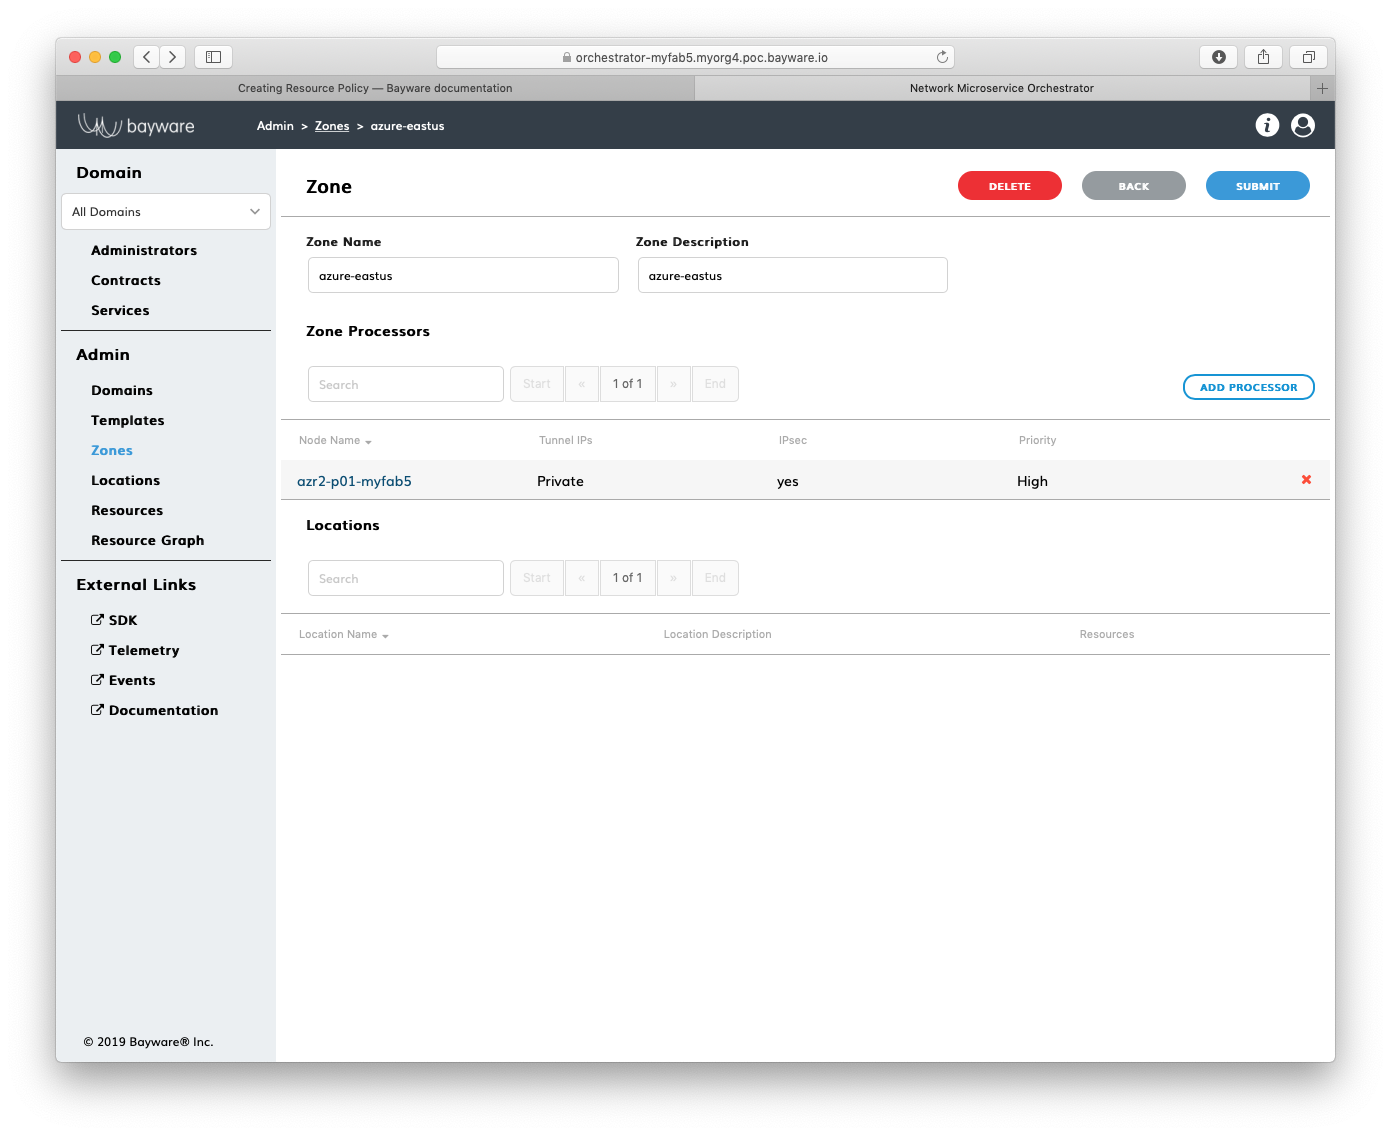
Fig. 140 List of Zone Processors
Using BWCTL-API
To assign a processor to the zone, run this command with the processor name–in
this example azr2-p01-myfab5 –as an argument:
]$ bwctl-api update zone azure-eastus -a azr2-p01-myfab5
You should see output similar to this:
[2019-10-17 23:05:25.307]  Processor 'azr2-p01-myfab5' assigned to zone 'azure-eastus'
[2019-10-17 23:05:25.307]  Zone 'azure-eastus' updated successfully
Note
When options are not specified on the command line, BWCTL-API applies default configuration settings. See BWCTL-API CLI Manual for specific details.
Check a new zone configuration by running this command with the zone name–in
this example azure-eastus –as an argument:
]$ bwctl-api show zone azure-eastus
You should see that the zone specification now includes the processor:
---
apiVersion: policy.bayware.io/v1
kind: Zone
metadata:
  description: azure-eastus
  name: azure-eastus
spec:
  locations: []
  processors:
  - ipsec_enable: true
    name: azr2-p01-myfab5
    tunnel_ip_type: private
Add Workload to Zone
Using Web Interface
You will use a location to add a workload to a zone.
To add a location with your workload nodes to the zone, click on the location
name in the Admin > Locations section–in this example azr2. On the location
page, click on the dropdown menu titled Zone.
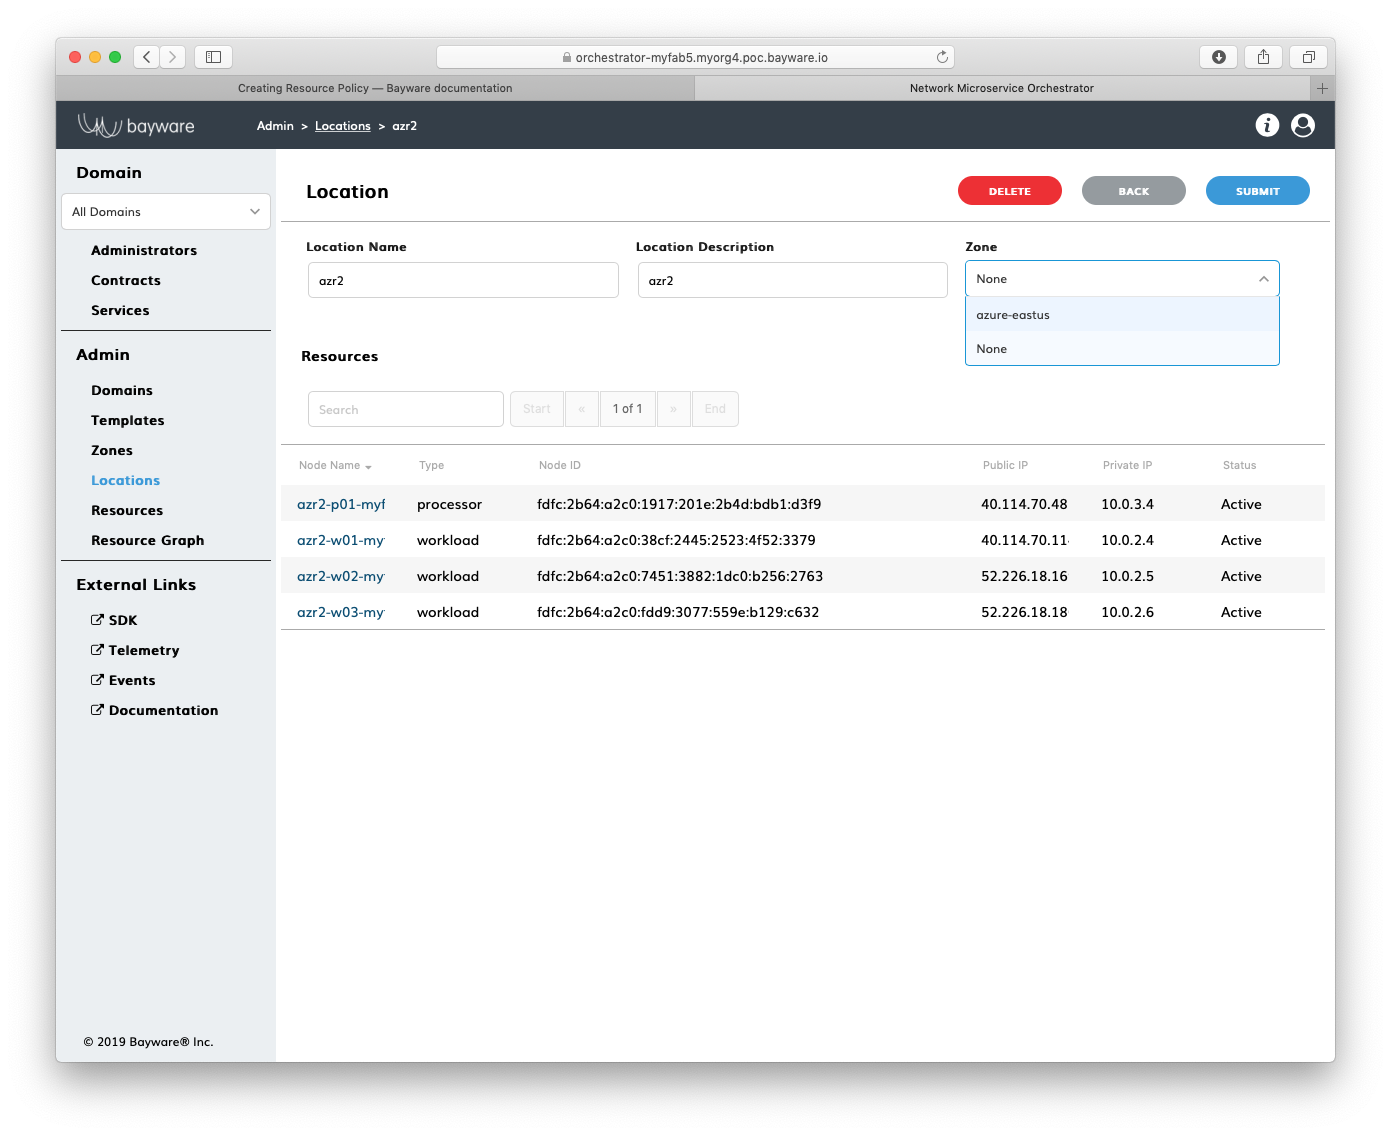
Fig. 141 Add Location to Zone
Select the zone–in this example azure-eastus –and submit the configuration.
To verify, go to the Admin > Zones > azure-eastus page and find the
location name in the list of zone locations.
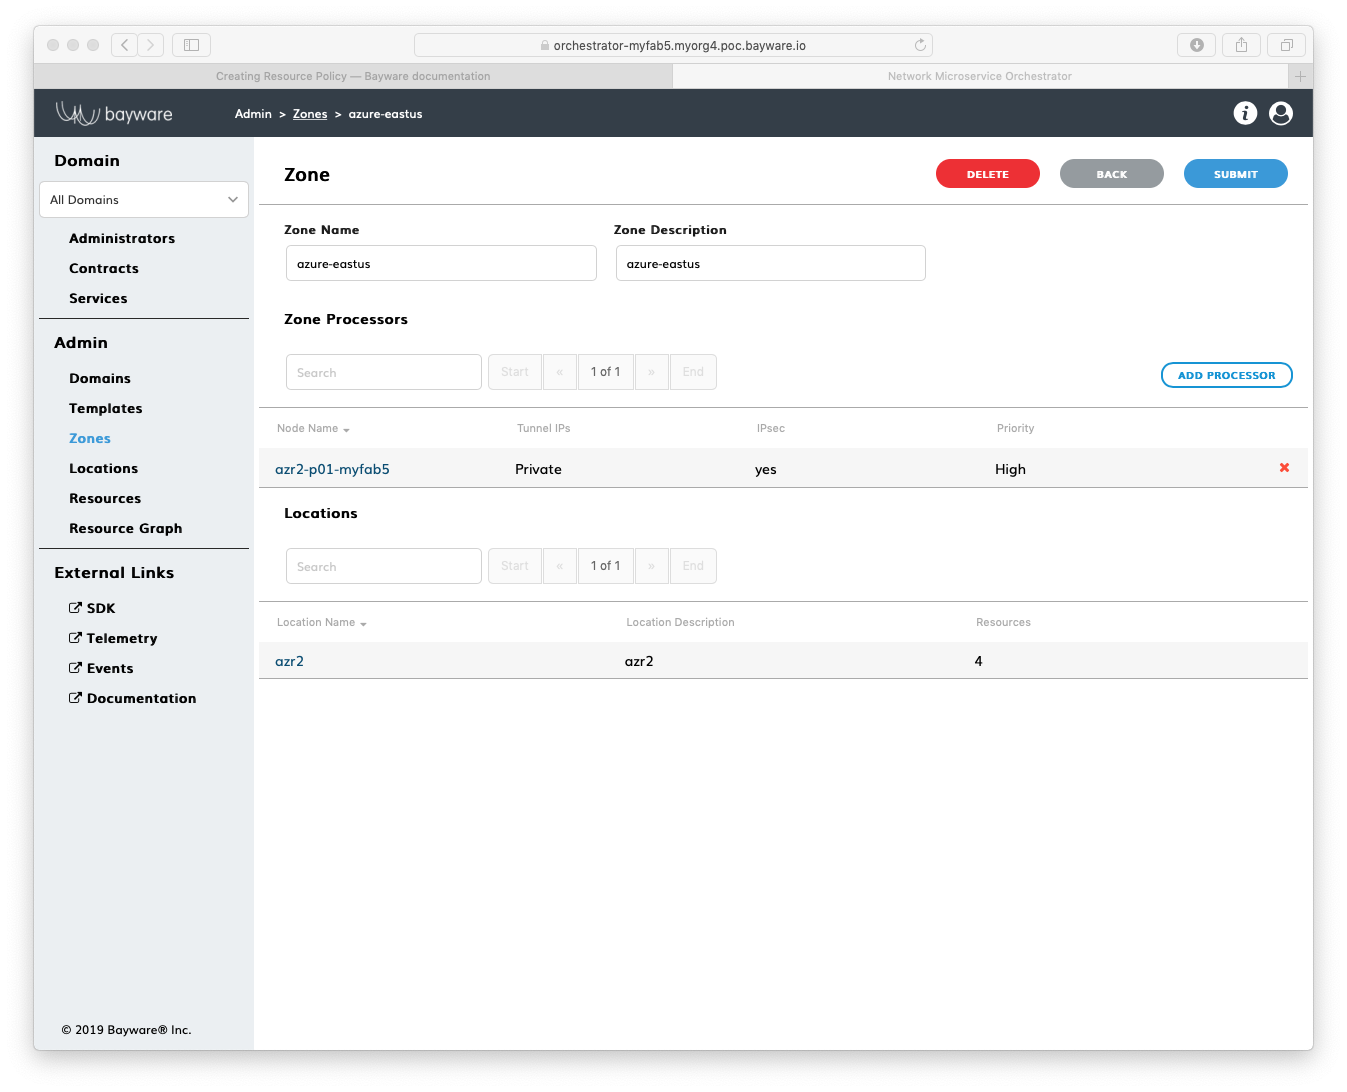
Fig. 142 List of Zone Locations
Using BWCTL-API
To assign a location with your workload nodes to the zone, run this command
with the location name–in this example azr2 –as an argument:
]$ bwctl-api update location azr2 -z azure-eastus
You should see output similar to this:
[2019-10-17 23:32:54.982] Location 'azr2' updated successfully
Check the zone configuration by running this command:
]$ bwctl-api show zone azure-eastus
You should see that the zone specification now includes the location:
---
apiVersion: policy.bayware.io/v1
kind: Zone
metadata:
  description: azure-eastus
  name: azure-eastus
spec:
  locations:
  - name: azr2
  processors:
  - ipsec_enable: true
    name: azr2-p01-myfab5
    tunnel_ip_type: private
At this point, you can open the resource graph page and see that the workloads now are connected to the processor.
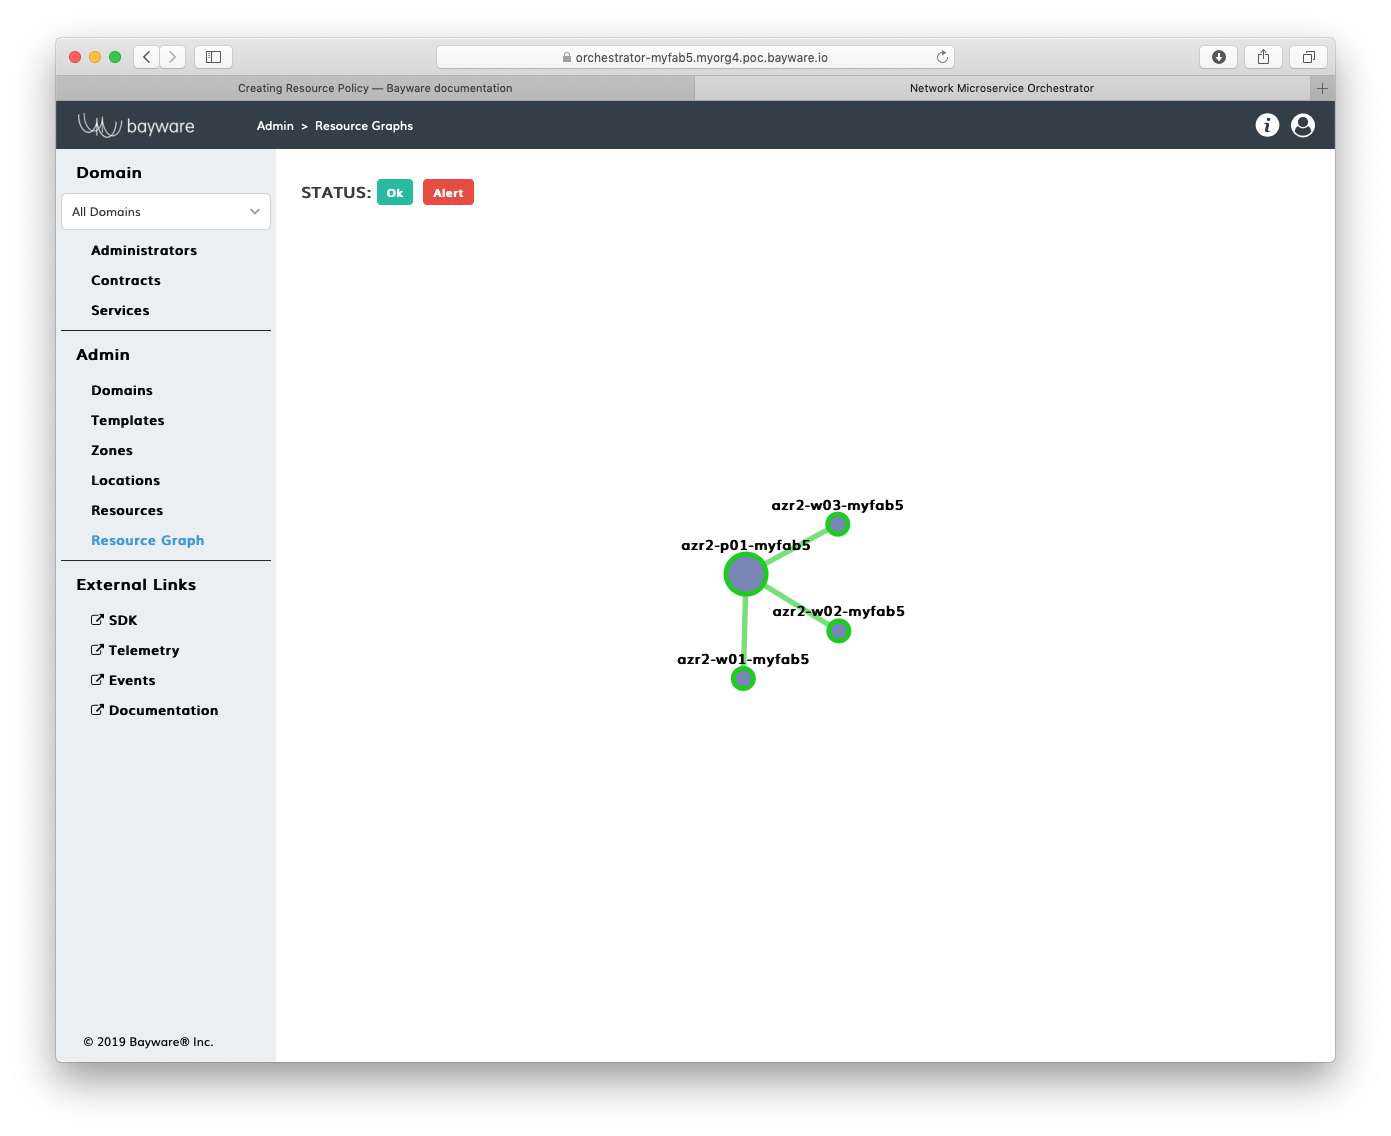
Fig. 143 Resource Graph after Zone Configured
Connect Zones
Declare Processor
To connect two zones, you need to set up a link between the processors serving these zones.
You can describe a link between existing processors or processors you are planning to spin up, but haven’t yet created. If a processor doesn’t exist yet, you need to declare it before configuring the link.
Using Web Interface
To declare a processor, click Add Resource in the Admin > Resources section.
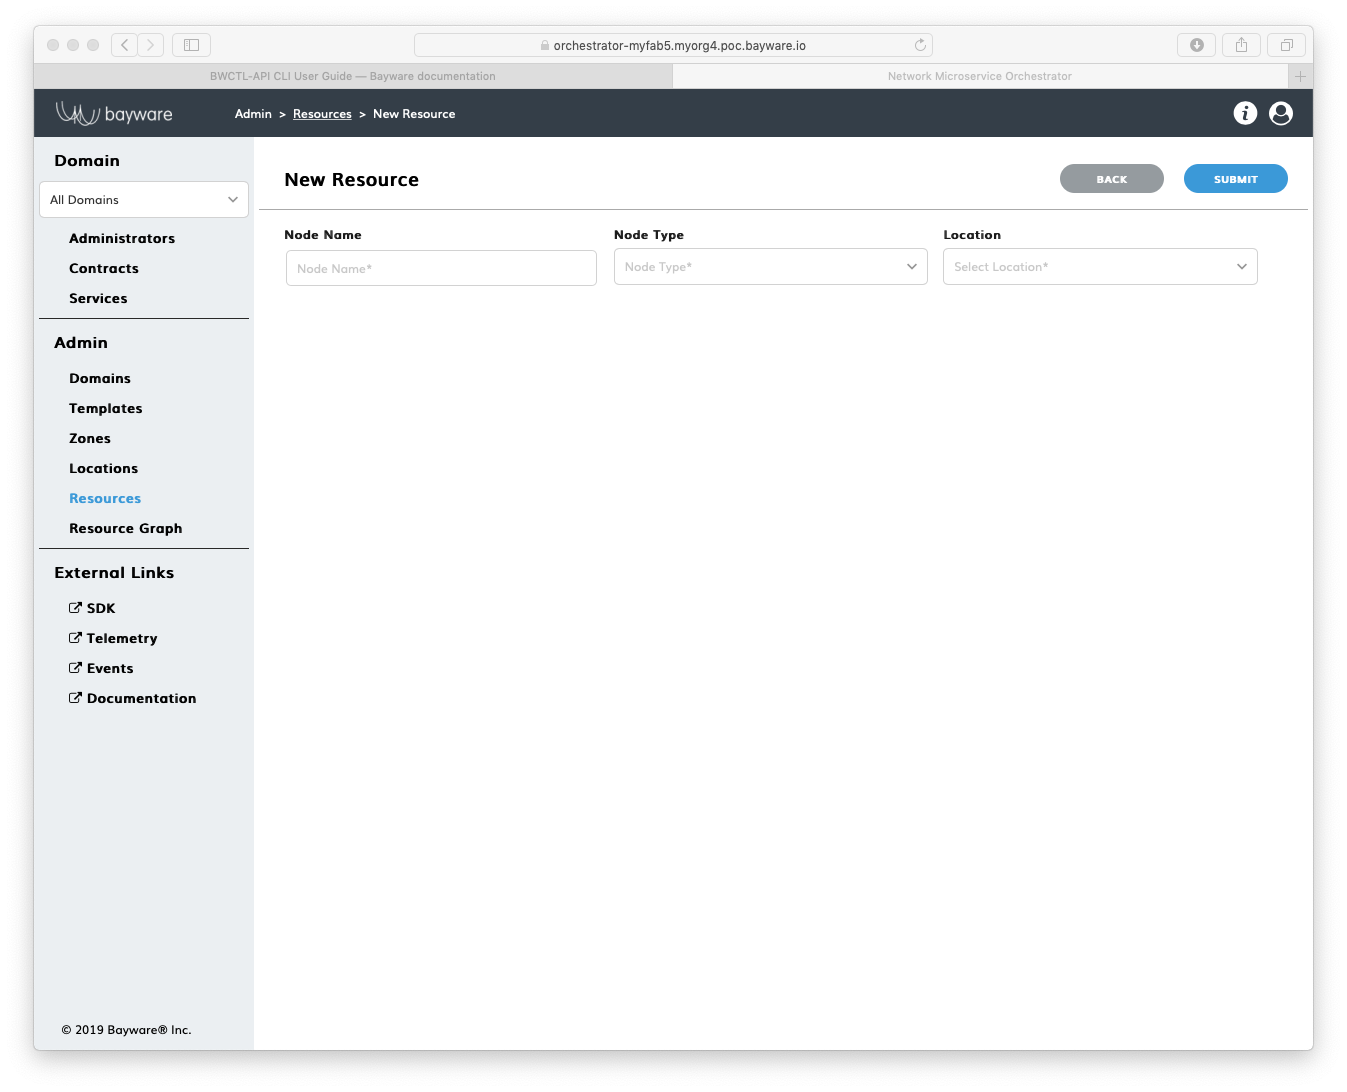
Fig. 144 Add New Resource
Fill out the fields on the New Resource page:
- node name
- desired name of node;
- node type
- type of node–
processororworkload; - location
- expected node location.
Submit the configuration. You should see the processor appear on the Admin >
Resources page with the status Init.
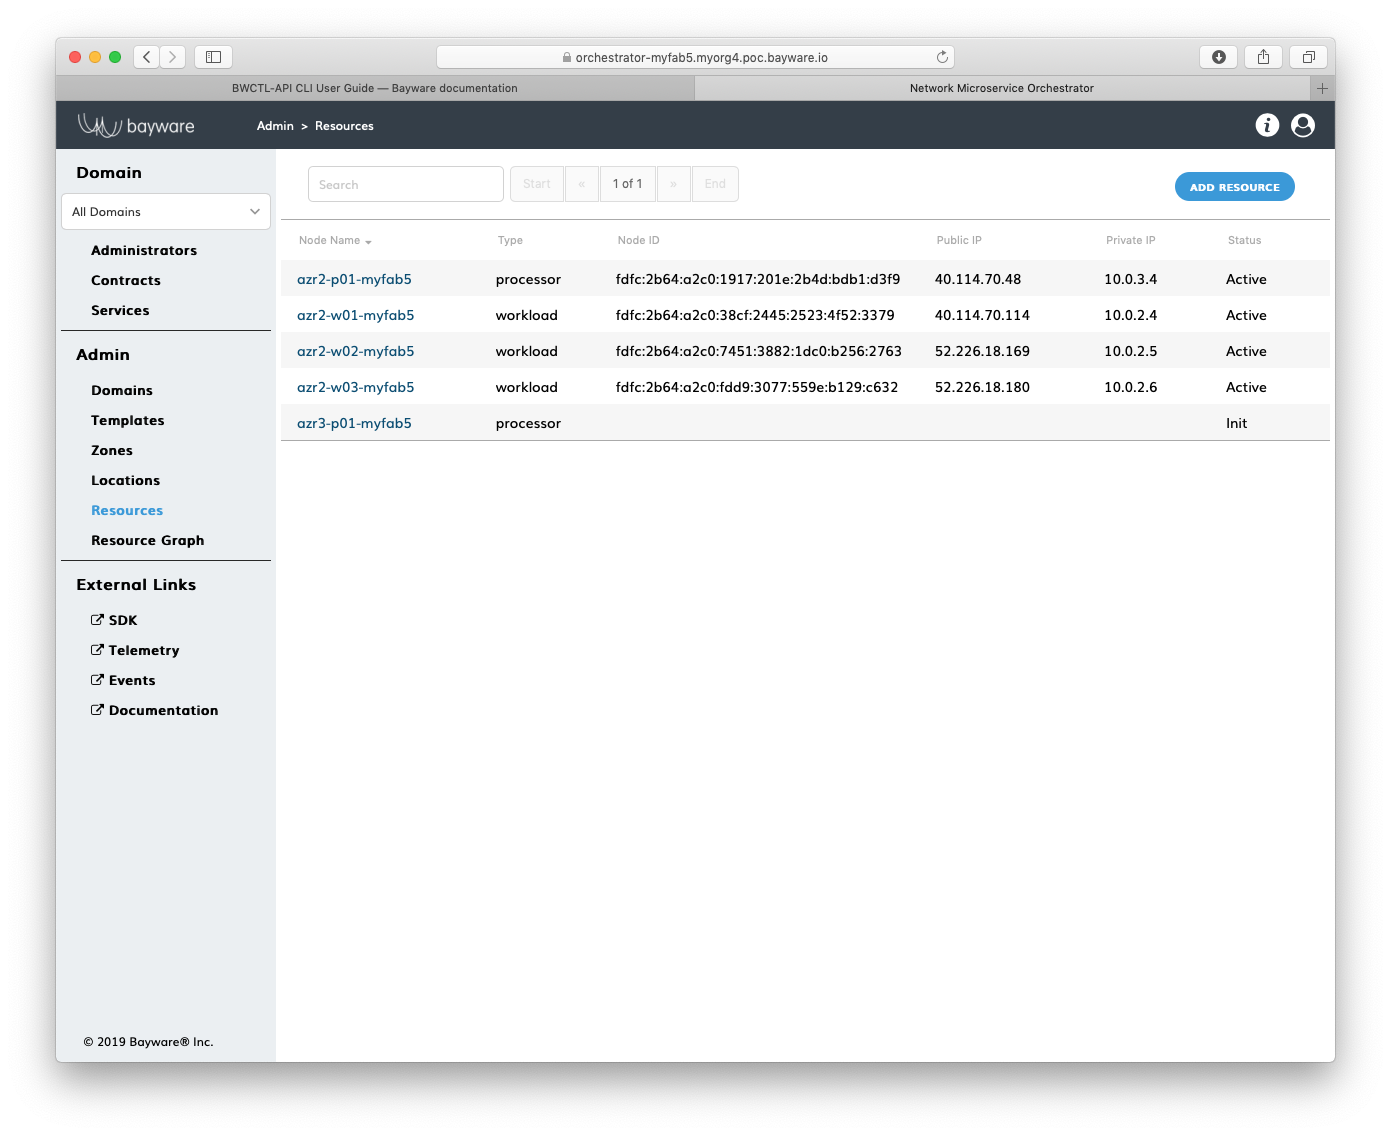
Fig. 145 List of Resources
Using BWCTL-API
To declare a processor, run this command with the expected node name and its
location–in this example gcp1-p01-myfab2 and azr3 respectively–as arguments:
]$ bwctl-api create resource azr3-p01-myfab5 -type processor -l azr3
You should see output similar to this:
[2019-10-18 17:03:00.261] Resource 'gcp1-p01-myfab2' created successfully
Check the resource configuration by running this command:
]$ bwctl-api show resource azr3-p01-myfab5
You should see that the zone specification now includes the location:
---
apiVersion: policy.bayware.io/v1
kind: Resource
metadata:
  name: azr3-p01-myfab5
spec:
  location: azr3
  type: processor
  status: Init
Specify Link
Using Web Interface
To specify a link between processors, click Add Link in the Admin > Resources >
azr2-p01-myfab5 section.
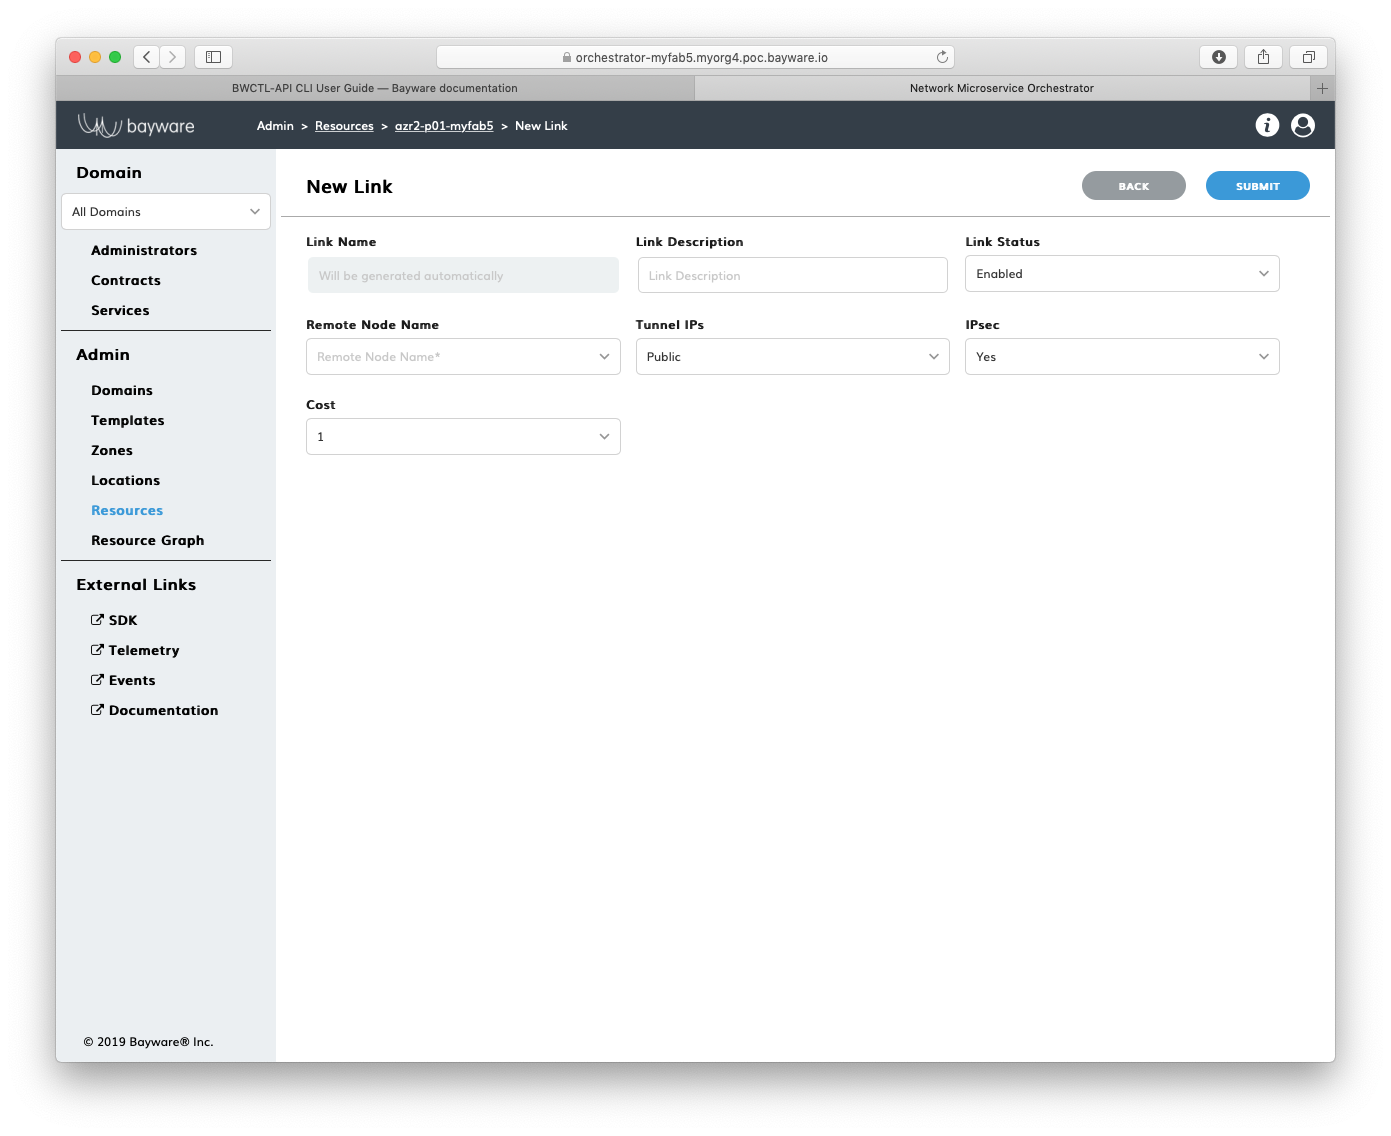
Fig. 146 Add New Link
Fill out the fields on the New Link page:
- link name
- will be auto generated after you click Submit;
- link description
- add description to link;
- link status
- administrative status of link–
EnabledorDisabled; - remote node name
- name of remote processor;
- tunnel IPs
- type of IP addresses–
PrivateorPublic–the processor will use to communicate with another processor;
IPseс
to encrypt communication– yes or no –between the processors;
cost link cost from 1 to 10.
Submit the configuration. You should see the link appear on the Admin >
Resources > azr2-p01-myfab5 page.

Fig. 147 List of Links
Using BWCTL-API
To specify a link between processors, run this command with the source and
target processor node names–in this example azr2-p01-myfab5 and
azr3-p01-myfab5 –as arguments:
]$ bwctl-api create link -s azr2-p01-myfab5 -t azr3-p01-myfab5
You should see output similar to this:
[2019-09-26 19:30:52.559] Link 'azr2-p01-myfab5_azr3-p01-myfab5' created successfully
Note
When options are not specified on the command line, BWCTL-API applies default configuration settings. See BWCTL-API CLI Manual for specific details.
Note
The auto-generated link name is always built as follows: node-name1_node-name2, wherein node names in the string are placed in alphabetical order.
Check the link configuration by running this command with the link
auto-generated name–in this example azr2-p01-myfab5_azr3-p01-myfab5 –as an
argument:
]$ bwctl-api show link azr2-p01-myfab5_azr3-p01-myfab5
You should see a new link specification:
---
apiVersion: policy.bayware.io/v1
kind: Link
metadata:
  name: azr2-p01-myfab5_azr3-p01-myfab5
spec:
  admin_status: true
  cost: 1
  ipsec_enable: true
  source_node: azr2-p01-myfab5
  status: active
  target_node: azr3-p01-myfab5
  tunnel_ip_type: public
Working with Batches
To set up a resource policy, you can also use batch files.
Export the resource policy from an existing zone and replace the existing entity names with the names allocated for the new zone.
Export the existing zone policy by running this command with the zone and
output file names–in this example azr2 and new-resource-policy respectively–as
arguments:
]$ bwctl-api show zone azure-eastus > new-resource-policy.yml
Open the file in your favorite editor, e.g. nano:
]$ nano new-resource-policy.yml
Add location, resource, and link specifications to the new zone specification.
Note
While editing, you need to provide new zone, location, and processor names.
After editing, your file should have content similar to:
---
apiVersion: policy.bayware.io/v1
kind: Batch
metadata:
  name: New Resource Policy
spec:
- kind: Location
  metadata:
    description: azr3
    name: azr3
  spec:
    count_resources: 0
- kind: Resource
  metadata:
    name: azr3-p01-myfab5
  spec:
    location: azr3
    type: processor
    status: Init
- kind: Zone
  metadata:
    description: azure-westus
    name: azure-westus
  spec:
    locations:
    - name: azr3
    processors:
    - ipsec_enable: true
      name: azr3-p01-myfab5
      tunnel_ip_type: private
- kind: Link
  metadata:
    name: azr2-p01-myfab5_azr3-p01-myfab5
  spec:
    admin_status: true
    cost: 1
    ipsec_enable: true
    source_node: azr2-p01-myfab5
    status: active
    target_node: azr3-p01-myfab5
    tunnel_ip_type: public
Now, run the policy deployment using the batch file name–in this example
new-resource-policy.yml –as an argument:
]$ bwctl-api create batch new-resource-policy.yml
You should see output similar to:
[2019-10-18 19:18:13.212]  Location 'azr3' created successfully
[2019-10-18 19:18:13.405]  Resource 'azr3-p01-myfab5' created successfully
[2019-10-18 19:18:13.745]  Zone 'azure-westus' created successfully
[2019-10-18 19:18:13.745]  Location 'azr3' updated in zone 'azure-westus'
[2019-10-18 19:18:13.745]  Processor 'azr3-p01-myfab5' assigned to zone 'azure-westus'
[2019-10-18 19:18:14.076]  Link from  'azr2-p01-myfab5' to 'azr3-p01-myfab5' created successfully
Note
At this point, you can deploy resources in the new zone. Each workload will automatically connect to a zone processor. Also, the new processor will automatically build a link with the existing processor.