Service Connectivity Management
This document describes the management functions necessary for configuring service connectivity policy with the BWCTL-API command-line tool or via a web interface.
To set up an application policy, all you need to do is upload a communication rule template and describe an application service graph.
The steps below will guide you through the uploading of a template and the creation of a service graph.
Upload Template
Using Web-interface
To create a new template, сlick Add Template in the Admin > Templates section.
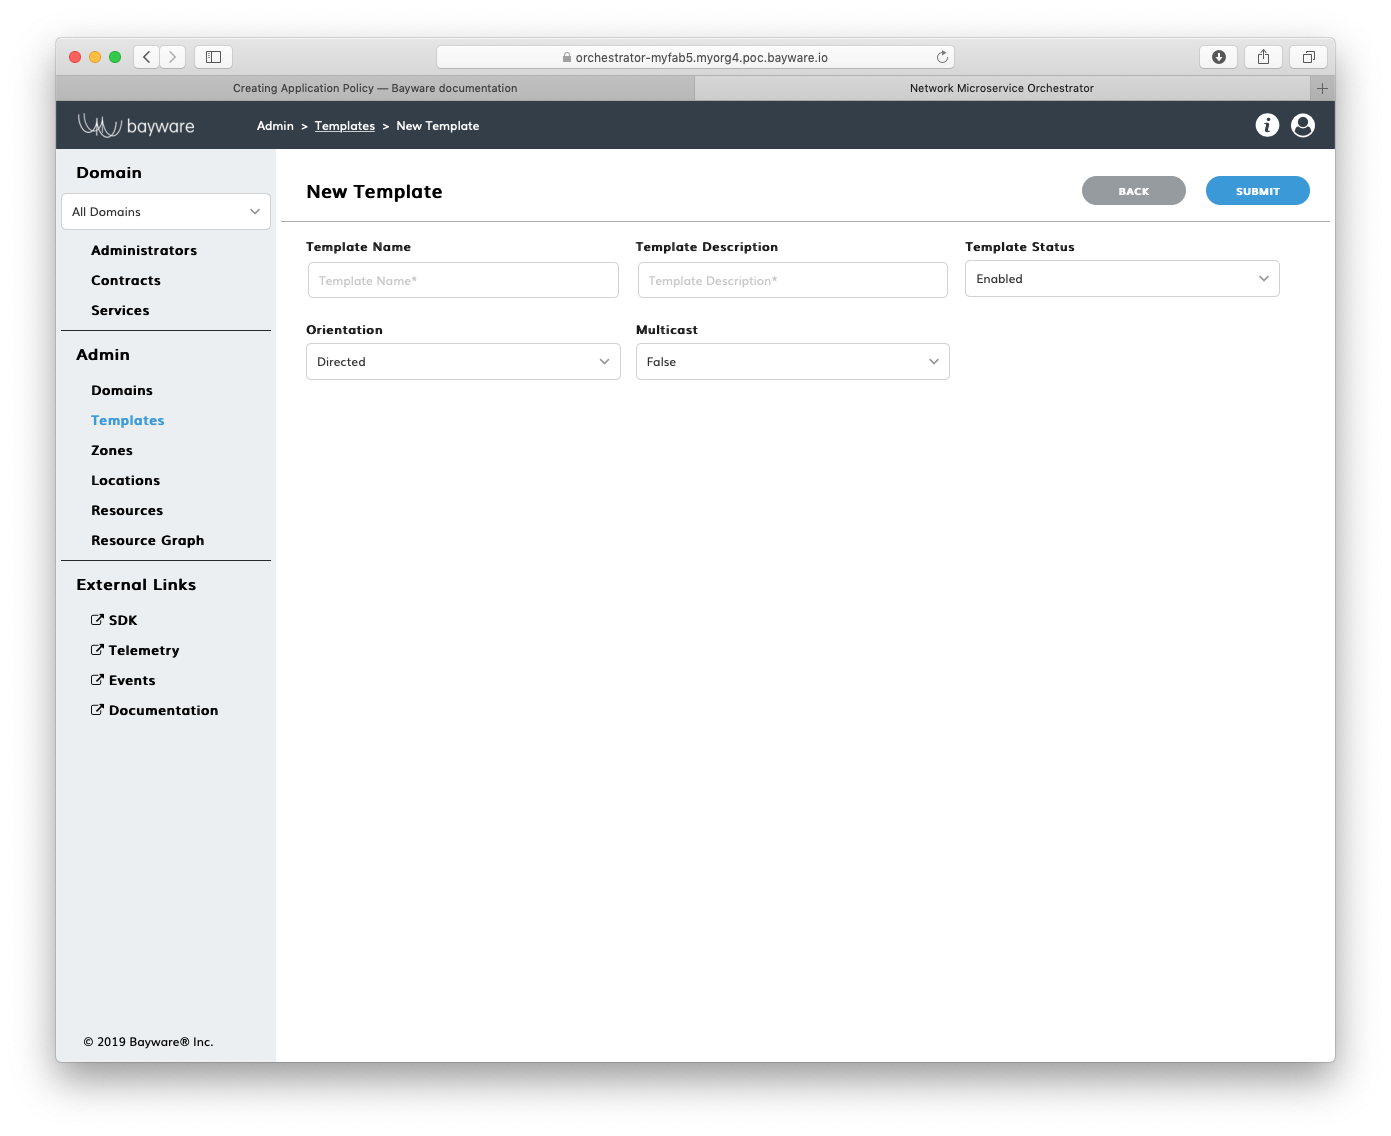
Fig. 148 Add New Template
Fill out the fields on the New Template page:
- template name
- desired template name;
- description
- add description for template;
- status
- select template administrative status–
EnabledorDisabled; - orientation
- select orientation–
DirectedorUndirected–to describe the relationships between two template roles,Directedwill be represented as an arrow on a service graph; - multicast
- is multicast–
FalseorTrue.
Submit the new template. You should see the template appear in the list on the
Admin > Templates page.

Fig. 149 List of Templates
Note
At this point, you would need to configure two template roles. Click on the template name and set up each role. See the SDK documentation for specific details.
Using BWCTL-API
To upload a default template that comes with BWCTL-API, run this command:
]$ bwctl-api create template default
You should see this output:
[2019-10-18 22:01:02.939] Template 'default' created successfully
Note
To find more templates available for upload, go to the SDK section of the orchestrator.
Check the template specification by running this command with the template
name–in this example default –as an argument:
]$ bwctl-api show template default
You should see the default template specification:
---
apiVersion: policy.bayware.io/v1
kind: Template
metadata:
  description: Exchange data between originators and responders from any VPCs
  name: default
spec:
  domains: []
  enabled: true
  is_multicast: false
  orientation: 1
  roles:
  - code_binary: 409C470100E7846300E000EF0A700793C11C004000EF409C470500E7846300C000EF579DC11C004000EF409C00178713C0989002
    code_map:
      originator: 0
    description: null
    id: 3
    ingress_rules_default:
    - {}
    name: originator
    path_binary: '000000000001'
    path_params_default: {}
    program_data_default:
      params:
      - name: hopsCount
        value: 0
      ppl: 0
    propagation_interval_default: 5
    role_index: 0
  - code_binary: 409C470100E7846300E000EF0A700793C11C004000EF409C470500E7846300C000EF579DC11C004000EF409C00178713C0989002
    code_map:
      responder: 0
    description: null
    id: 4
    ingress_rules_default:
    - {}
    name: responder
    path_binary: '000000000001'
    path_params_default: {}
    program_data_default:
      params:
      - name: hopsCount
        value: 0
      ppl: 0
    propagation_interval_default: 5
    role_index: 1
Create Service Graph
Create Domain
Using Web-interface
To create a namespace for your application policy, сlick Add Domain in the Admin > Domains section.

Fig. 150 Add New Domain
Fill out the fields on the New Domain page:
- domain name
- desired domain name;
- domain description
- add description for domain;
- type
- select domain type–
ApplicationorAdministrative; - auth method
- select authentication method for domain administrators–
LocalAuthorLDAP.
Submit the new domain configuration. You should see the domain appear in the
list on the Admin > Domains page.
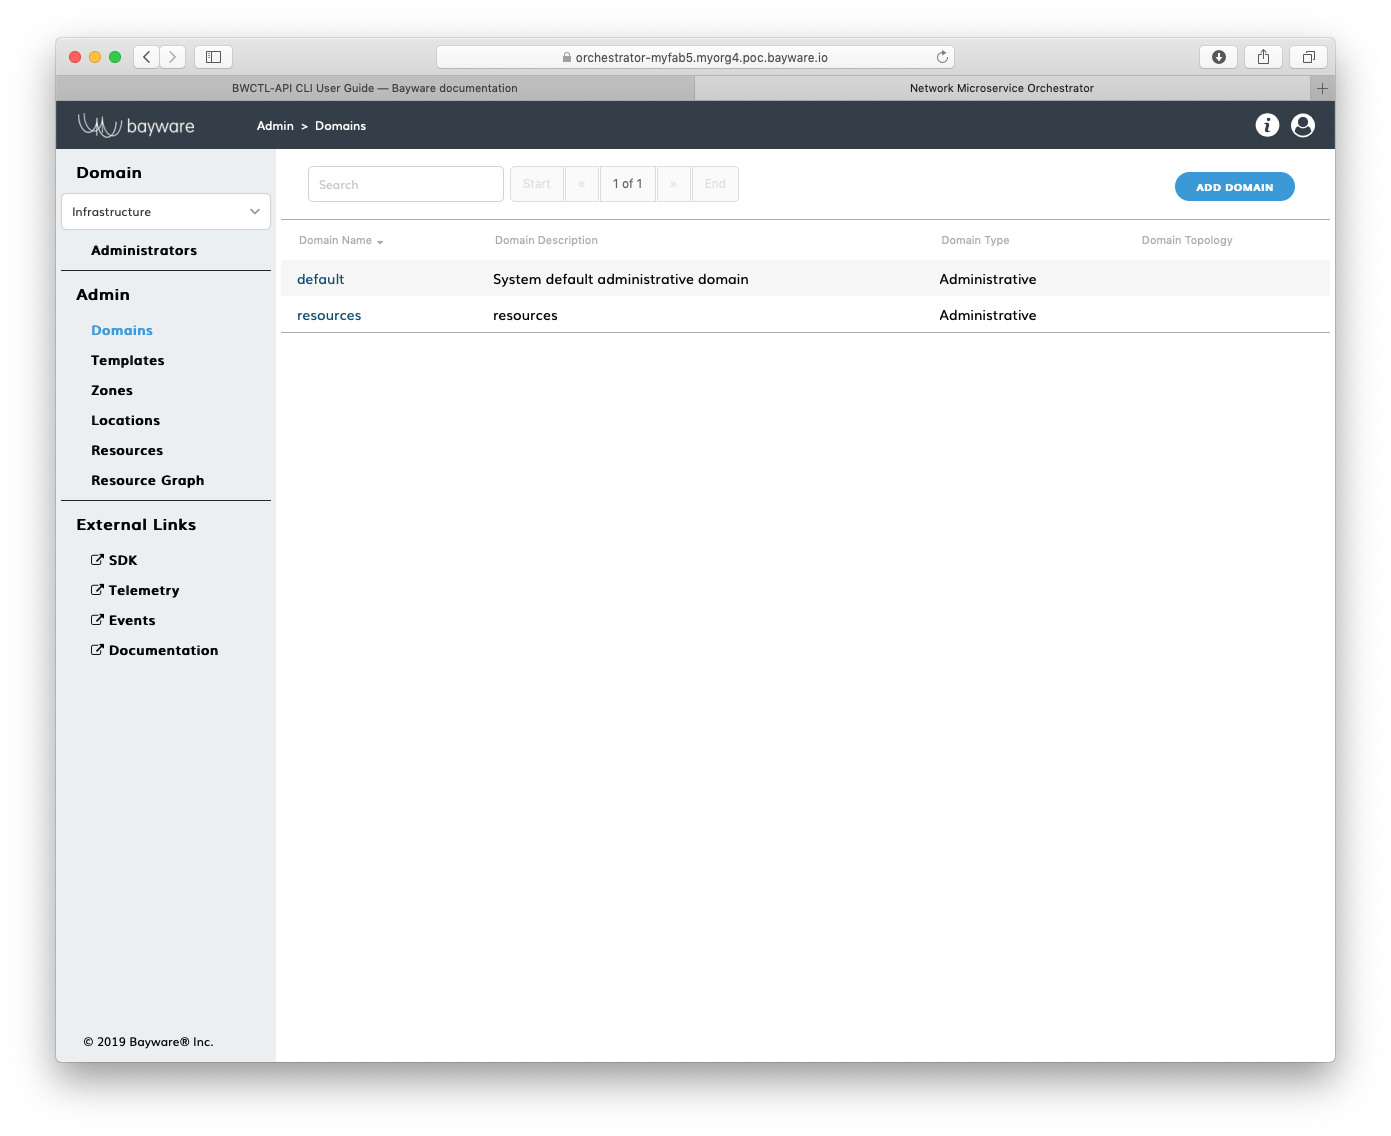
Fig. 151 List of Domains
Using BWCTL-API
To create a namespace for your application policy, run this command with the
desired domain name (any string without spaces)–in this example myapp –as an
argument:
]$ bwctl-api create domain myapp
You should see output similar to this:
[2019-10-19 00:34:45.616] Domain 'myapp' created successfully
Note
When options are not specified on the command line, BWCTL-API applies default configuration settings. See BWCTL-API CLI Manual for specific details.
To check the domain configuration, run this command with the domain name–in
this example myapp –as an argument:
]$ bwctl-api show domain myapp
You should see a new domain specification:
---
apiVersion: policy.bayware.io/v1
kind: Domain
metadata:
  domain: myapp
  domain_description: myapp
spec:
  auth_method:
  - LocalAuth
  domain_type: Application
Specify Contract
Using Web-interface
To specify a security segment for your application, сlick Add Contract in the
myApp > Contracts section.

Fig. 152 Add New Contract
Fill out the fields on the New Contract page:
- contract name
- desired contract name;
- contract description
- add description for contract;
- contract status
- in which status contract to be created–
EnabledorDisabled; - domain
- select domain for contract;
- template
- select template for contract.
Submit the new contract configuration. You should see the contract appear in
the list on the myApp > Contracts page.
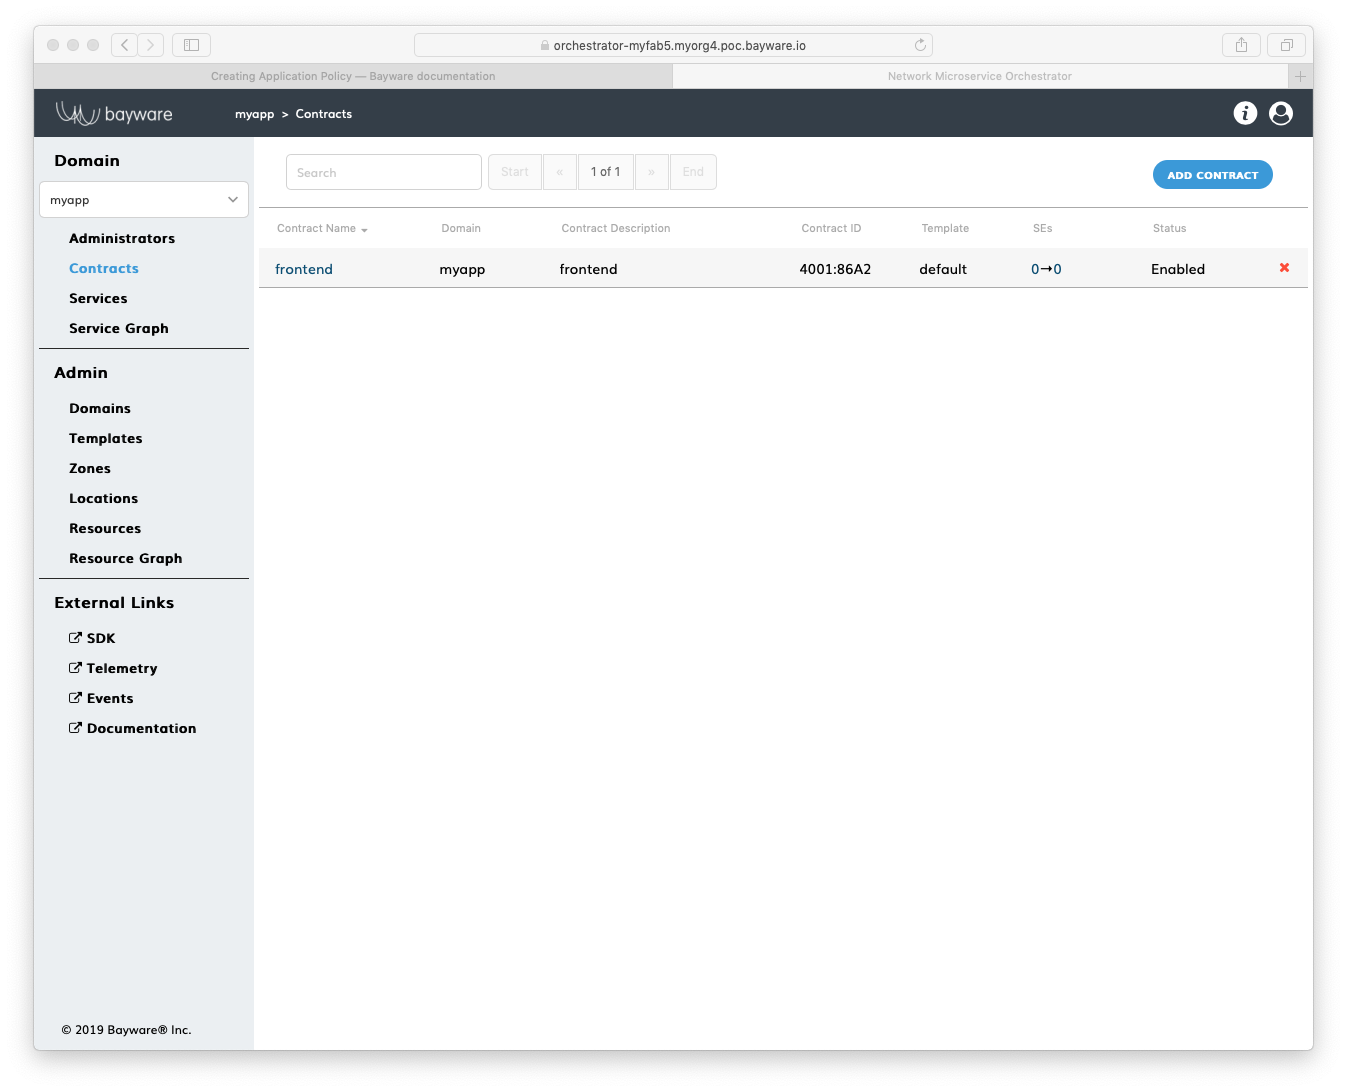
Fig. 153 List of Contracts
Using BWCTL-API
To specify a security segment for your application, run this command with a
desired contract name (any string without spaces) preceding the domain name–in
this example frontend@myapp –as an argument:
]$ bwctl-api create contract frontend@myapp
You should see output similar to this:
[2019-10-19 00:36:51.590] Contract 'frontend@myapp' created successfully
Note
When options are not specified on the command line, BWCTL-API applies default configuration settings. See BWCTL-API CLI Manual for specific details.
To check the contract configuration, run this command with the
contract@domain –in this example frontend@myapp –as an argument:
]$ bwctl-api show contract frontend@myapp
You should see a new contract specification:
---
apiVersion: policy.bayware.io/v1
kind: Contract
metadata:
  description: frontend
  domain: myapp
  name: frontend
spec:
  contract_roles:
  - cfg_hash: 69141fa83039b5ee8d18adf364dd2835
    description: null
    id: 1
    ingress_rules:
    - {}
    name: originator
    path_params: {}
    port_mirror_enabled: false
    program_data:
      params:
      - name: hopsCount
        value: 0
      ppl: 0
    propagation_interval: 5
    role_index: 0
    service_rdn: originator.frontend.myapp
    stat_enabled: false
  - cfg_hash: ff5f3105716821fdbdfb2a6260d6d274
    description: null
    id: 2
    ingress_rules:
    - {}
    name: responder
    path_params: {}
    port_mirror_enabled: false
    program_data:
      params:
      - name: hopsCount
        value: 0
      ppl: 0
    propagation_interval: 5
    role_index: 1
    service_rdn: responder.frontend.myapp
    stat_enabled: false
  enabled: true
  template: default
Name Service
Using Web-interface
To specify a new application service, сlick Add Service in the myApp > Services section.

Fig. 154 Add New Service
Fill out the fields on the New Service page:
- service name
- desired service name;
- service description
- add description for service;
- service status
- in which status service to be created–
EnabledorDisabled; - domain
- select domain for service.
Submit the new service configuration. You should see the service appear in the
list on the myApp > Services page.
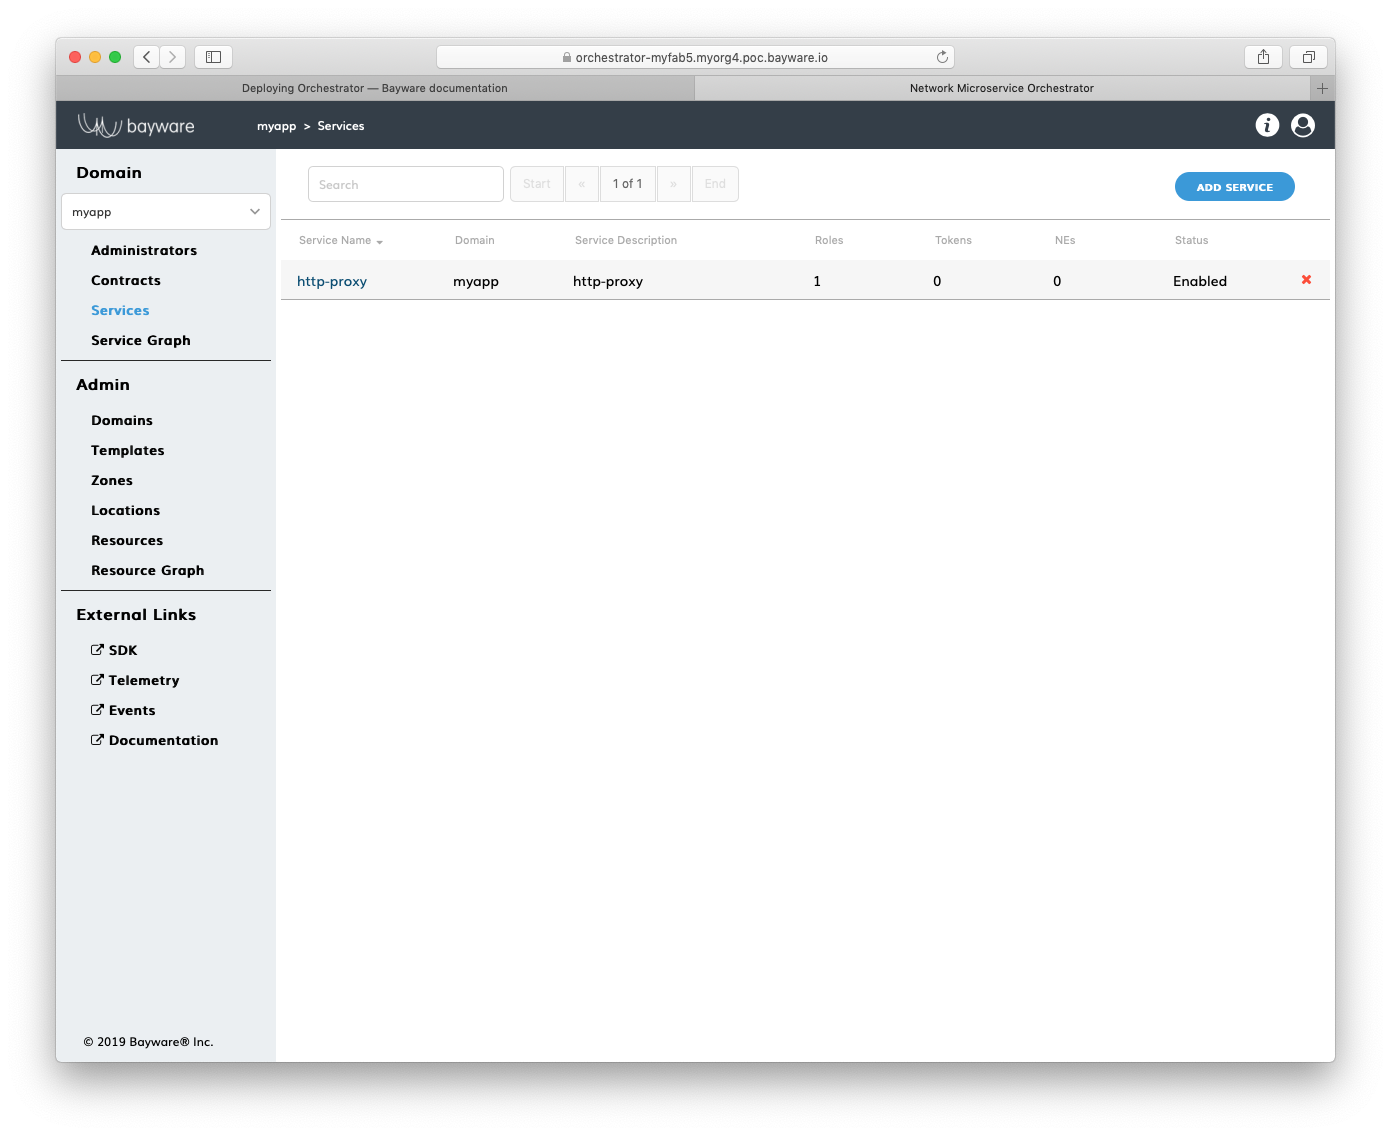
Fig. 155 List of Services
Using BWCTL-API
To specify a new application service, run this command with a desired service
name (any string without spaces) preceding the domain name–in this example
http-proxy@myapp –as an argument:
]$ bwctl-api create service http-proxy@myapp
You should see this output:
[2019-10-19 00:37:19.873] Service 'http-proxy@myapp' created successfully
Note
When options are not specified on the command line, BWCTL-API applies default configuration settings. See BWCTL-API CLI Manual for specific details.
To check the service configuration, run this command with the service@domain–in
this example http-proxy@myapp –as an argument:
]$ bwctl-api show service http-proxy@myapp
You should see a new service specification:
---
apiVersion: policy.bayware.io/v1
kind: Service
metadata:
  description: http-proxy
  domain: myapp
  name: http-proxy
spec:
  contract_roles: []
  enabled: true
Authorize Service
Using Web-interface
To authorize an application service to access the security segment, сlick on
the service name in the myApp > Services section–in this example http-proxy.
Now, click Add Role on the myApp > Services > http-proxy page.
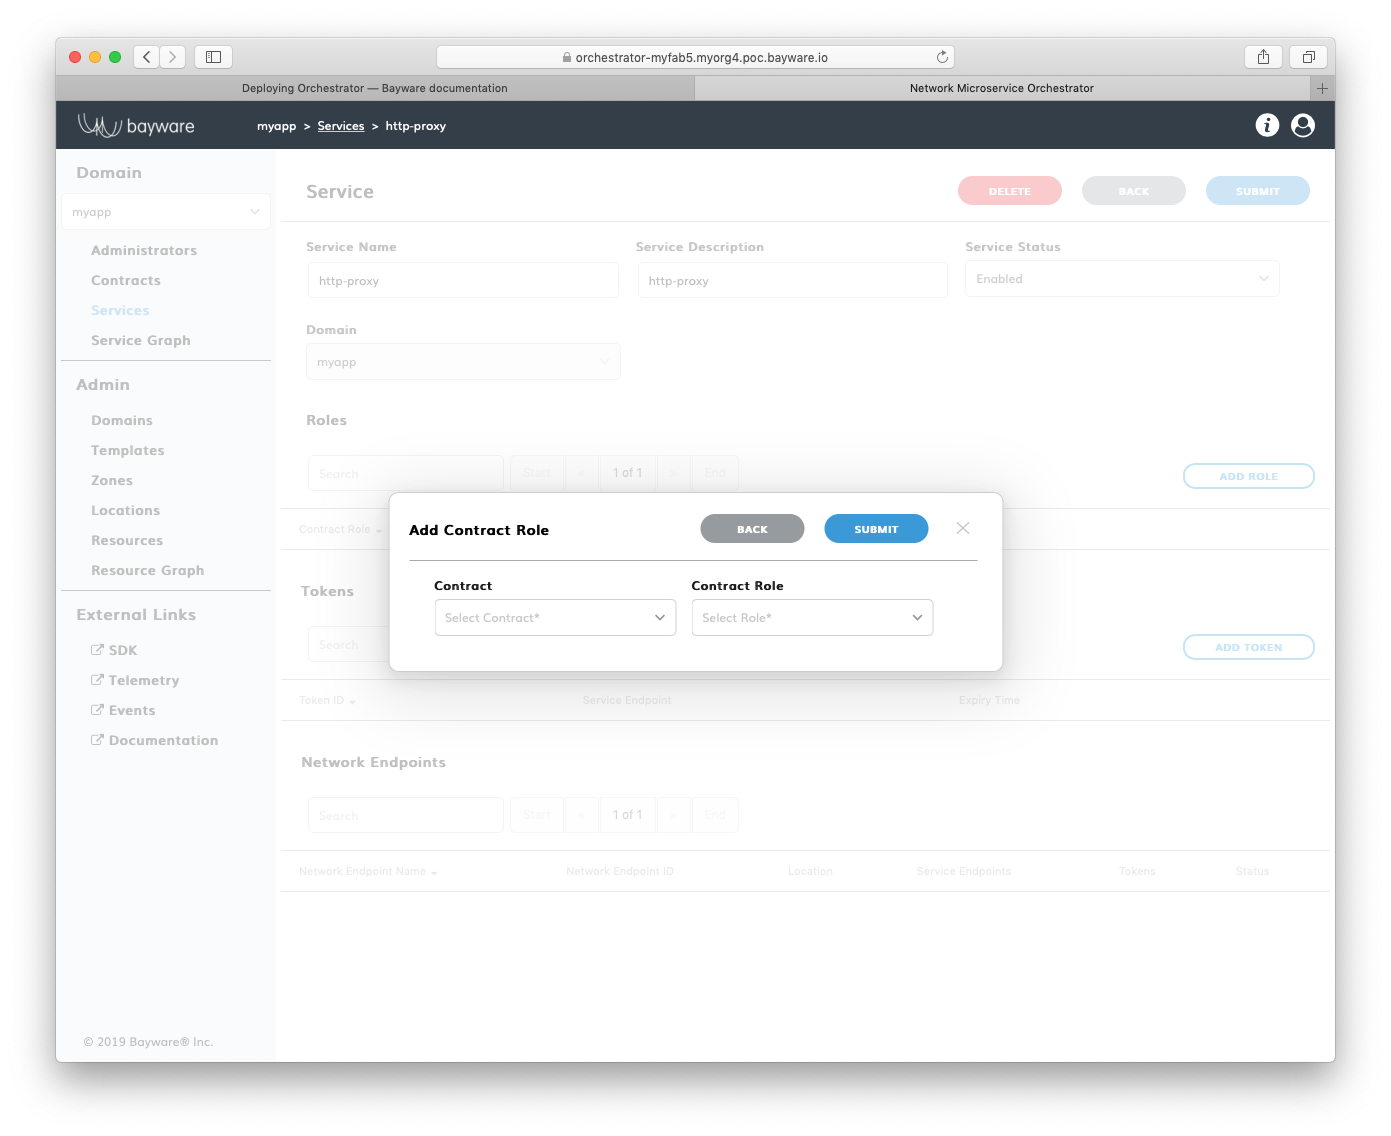
Fig. 156 Add New Role
Fill out the fields in the Add Contract Role pop-up window:
- contract
- select contract for an application service;
- contract role
- select contract role for an application service.
Submit the new role configuration. You should see the role appear in the list
of Roles on the myApp > Services > http-proxy page.
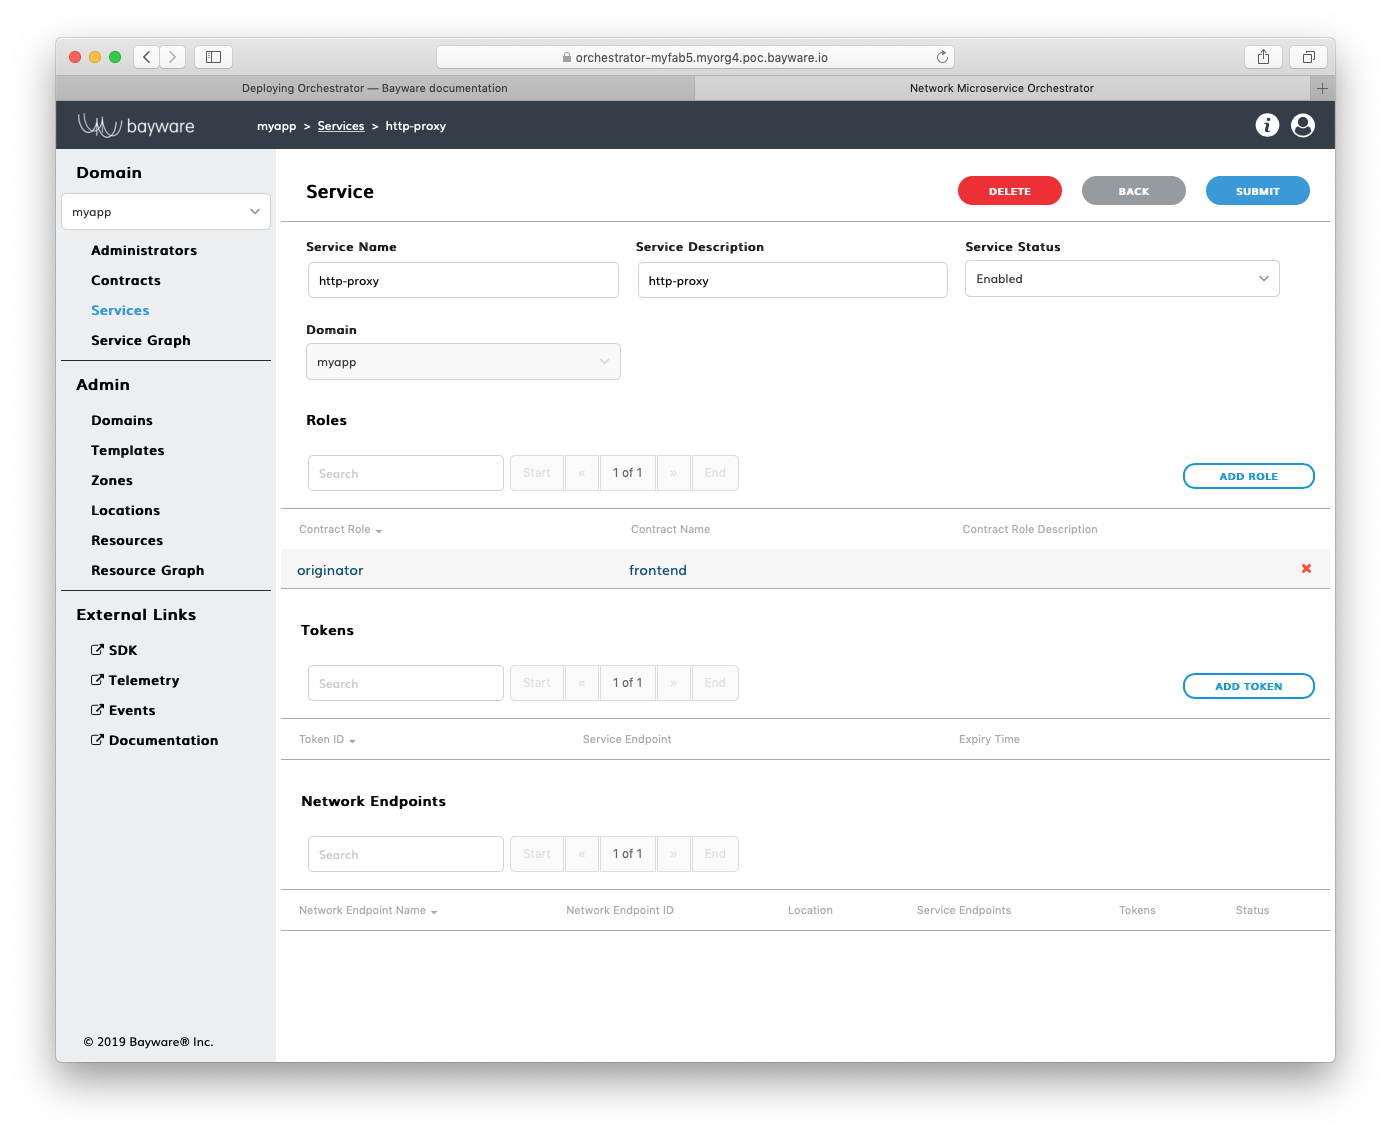
Fig. 157 List of Roles
Using BWCTL-API
To authorize an application service to access the security segment, you have to assign the service a role in the contract.
To check available roles, run this command with the contract name–in this
example frontend@myapp –as an argument:
]$ bwctl-api show contract frontend@myapp
You should see output similar to this:
---
apiVersion: policy.bayware.io/v1
kind: Contract
metadata:
  description: frontend
  domain: myapp
  name: frontend
spec:
  contract_roles:
  - cfg_hash: c40f2ddc0843e983a4ea4088e2ea0f8e
    description: null
    id: 1
    ingress_rules:
    - {}
    name: originator
    path_params: {}
    port_mirror_enabled: false
    program_data:
      params:
      - name: hopsCount
        value: 0
      ppl: 0
    propagation_interval: 5
    role_index: 0
    service_rdn: originator.frontend.myapp
    stat_enabled: false
  - cfg_hash: 84dcec61d02bb315a50354e38b1e6a0a
    description: null
    id: 2
    ingress_rules:
    - {}
    name: responder
    path_params: {}
    port_mirror_enabled: false
    program_data:
      params:
      - name: hopsCount
        value: 0
      ppl: 0
    propagation_interval: 5
    role_index: 1
    service_rdn: responder.frontend.myapp
    stat_enabled: false
  enabled: true
  template: default
Note
The contract specification always includes two roles. A unique role identifier is built using this notation – <role_name>:<contract_name>.
To assign a contract role to the service, run this command with the service
name and the contract role–in this example originator:frontend –as an argument:
]$ bwctl-api update service http-proxy@myapp -a originator:frontend
You should see output similar to this:
[2019-10-19 00:38:36.246] Service 'http-proxy@myapp' updated successfully
Working with Batches
To set up an application policy, you can also use batch files.
Create a new application policy file in your favorite editor, e.g. nano:
]$ nano new-app-policy.yml
Add template, domain, contract and service specifications to the file.
After editing, your file should have content similar to:
---
apiVersion: policy.bayware.io/v1
kind: Batch
metadata:
  name: New App Policy
spec:
- kind: Template
  metadata:
    name: default
  spec:
    is_multicast: false
    orientation: directed
    roles:
    - name: originator
      code_binary: 409C470100E7846300E000EF0A700793C11C004000EF409C470500E7846300C000EF579DC11C004000EF409C00178713C0989002
      propagation_interval_default: 5
      program_data_default:
        ppl: 0
        params:
        - name: hopsCount
          value: 0
      code_map:
        originator: 0
      path_binary: 000000000001
    - name: responder
      code_binary: 409C470100E7846300E000EF0A700793C11C004000EF409C470500E7846300C000EF579DC11C004000EF409C00178713C0989002
      propagation_interval_default: 5
      program_data_default:
        ppl: 0
        params:
        - name: hopsCount
          value: 0
      code_map:
        responder: 0
      path_binary: 000000000001
- kind: Domain
  metadata:
    domain: myapp
  spec:
   auth_method:
    - LocalAuth
    domain_type: Application
- kind: Contract
  metadata:
    domain: myapp
    name: frontend
  spec:
    template: default
    contract_roles:
    - template_role: originator
    - template_role: responder
- kind: Service
  metadata:
    name: http-proxy
    domain: myapp
  spec:
    contract_roles:
    - contract: frontend
      contract_role: originator
Now, run the policy deployment using the batch file name–in this example
new-app-policy.yml –as an argument:
]$ bwctl-api create batch new-app-policy.yml
You should see output similar to:
[2019-10-19 23:36:15.317]  Template 'default' created successfully
[2019-10-19 23:36:15.376]  Domain 'myapp' created successfully
[2019-10-19 23:36:15.840]  Contract 'frontend@myapp' created successfully
[2019-10-19 23:36:16.201]  Service 'http-proxy@myapp' created successfully
To verify that your application policy is now in place, go to orchestrator,
select your application domain–in this example myapp –and click Service Graph.
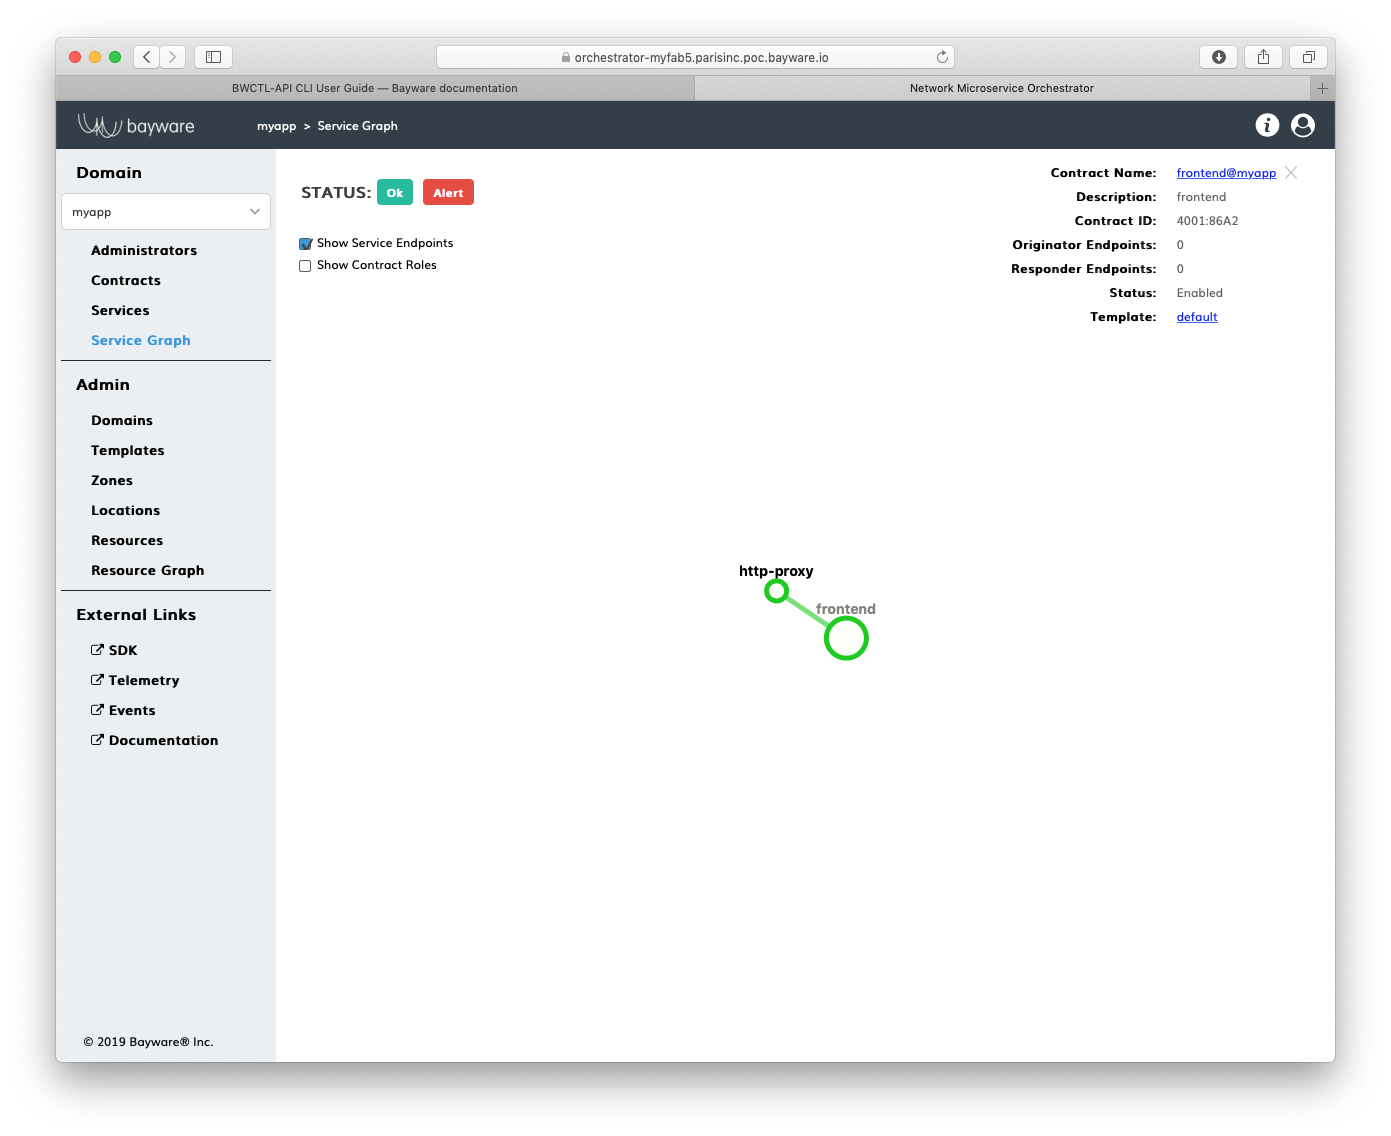
Fig. 158 Application Service Graph
Note
At this point, you can start deploying application services in the fabric. See the next section for service authorization and deployment details.