Application Infrastructure
Requirements
The required infrastructure must be geographically-distributed, preferably among different public cloud providers. It must have enough VMs to function as workload nodes to run five unique microservices, with three of the five duplicated, for a total of eight.
The Service Interconnection Fabric fulfills these requirements by creating VPCs and VMs, as described in the next section.
Service Interconnection Fabric
One can operate in isolated networks in public clouds by creating Virtual Private Clouds (VPCs). Within a VPC, one can create virtual machines (VMs) giving a virtual computing instance running its own operating system.
A Service Interconnection Fabric (SIF) is comprised of a set of VPCs (in a single public cloud, in multiple public clouds, or in public clouds and private data centers) whose VMs inter-communicate only through SIF processors. Generally, one SIF processor is deployed on one VM in each VPC.
We collectively refer to VMs used as SIF processors and VMs used to run application microservices as nodes.
In the remainder of this section, you will create VPCs and nodes.
Fabric Manager Tool: bwctl
This tutorial uses infrastructure components in AWS, Google Cloud, and Azure. The components in AWS are pre-installed; you will create the components in GCP and Azure using your fabric manager’s tool called bwctl.
AWS Infrastructure
…on the Orchestrator
The AWS VPC contains two workload nodes and a processor node to connect it to the service interconnection fabric. You can see this on the orchestrator.
Return to your browser tab with the open orchestrator GUI. (Recall that you can find the orchestrator button and credentials on the SIS attachment from your welcome email.) Click Resource Graph in the sidebar navigation menu. You should see one large green circle representing the processor node and two smaller green circles representing the workload nodes as shown in Fig. 66.

Fig. 66 AWS Infrastructure on the Orchestrator
…and from the FM CLI
Fabric Manager’s command-line interface, bwctl, was used to create the AWS infrastructure just as you will be using it to create additional infrastructure in GCP and Azure in the following sections. You can use bwctl both interactively and from the Linux prompt. Let’s take a look at the AWS infrastructure from within bwctl by issuing a show command.
To do this, return to your terminal window where you are logged into FM and
type bwctl at the Linux prompt to start an interactive session.
]$ bwctl
You should be at the bwctl prompt
(none) bwctl>
This prompt shows you are operating outside of a fabric (or namespace) with
the word none. Determine the name of the fabric pre-installed for you
by typing
(none) bwctl> show fabric --list-all
You will see output similar to
FABRIC
protof
In this example, the name of the pre-installed fabric is protof. Now enter
the namespace of your fabric by typing the following (using your own fabric name)
at the bwctl prompt
(none) bwctl> set fabric protof
You should now see output similar to
[2019-05-10 00:04:19.624] Active fabric: 'protof'
Notice that your bwctl prompt has changed, now showing the active fabric
(protof) bwctl>
Now show the components of your fabric by entering
(protof) bwctl> show fabric
Take some time to scroll up and scan through the components in your fabric. At the bottom you’ll see the AWS VPCs. A little further up you’ll see six nodes: three of these comprise the orchestrator, two are used as workloads, and another is used as a processor node.
In the next section you’ll examine a YAML file that is used as input to the bwctl tool in order to create infrastructure.
For now, simply quit out of the interactive bwctl session by typing
(protof) bwctl> quit
You should now be back at the Linux prompt.
ubuntu@jsmith-c0:~$
GCP Infrastructure
In this section you will add components from GCP: one VPC, one processor node, and three workload nodes. The tool will add a small piece of software to the processor node to create an engine. The engine provides communication and policy enforcement among VPCs and workloads. The tool will also add a small piece of software to the workload nodes called the agent. The agent acts as a daemon for communicating with engines and the orchestrator.
BWCTL Batch Processing
While you could issue commands interactively at the bwctl prompt to add each component to the fabric, it will be more expedient to use a bwctl batch command and have the tool do everything in one shot.
bwctl batch commands are issued at the Linux prompt and operate on an input file in YAML format that describes the desired infrastructure. As an example, consider the following
1 2 3 4 5 6 7 8 9 10 11 12 13 14 15 16 17 18 19 20 21 22 23 24 25 26 27 28 29 30 31 32 33 34 35 36 37 38 | ---
apiVersion: fabric.bayware.io/v1
kind: Batch
metadata:
name: backend-infra-and-config-template
description: 'Creates VPC, processor, and three workloads'
spec:
- kind: Fabric
metadata:
description: 'optional description'
name: 'protof'
spec:
companyName: acmeinc
credentialsFile:
aws: /home/ubuntu/credentials/aws-cred.yaml
azr: /home/ubuntu/credentials/azr-cred.yaml
gcp: /home/ubuntu/credentials/gcp-credentials.json
ssh: {}
s3: /home/ubuntu/credentials/s3-cred.yaml
- kind: Node
metadata:
description: 'optional description'
fabric: 'protof'
name: 'gcp1-p01-protof'
spec:
properties:
type: 'processor'
vpc: 'gcp1-vpc-protof'
- kind: Vpc
metadata:
description: 'optional description'
fabric: 'protof'
name: 'gcp1-vpc-protof'
spec:
cloud: 'gcp'
properties:
zone: 'us-east4'
|
This YAML file specifies three components: a fabric (or namespace) called
protof, a node for a processor, and a VPC in GCP. When executed, the tool
determines which components already exist and adds the remaining components to
bring the current state of the fabric in line with the YAML description.
GCP Infrastructure YAML Description
To see the components that you will add in GCP, you can view the YAML file
description using the popular Linux cat command. The file is
located in the ~ubuntu home directory, which is where you should be in the
terminal session open on your FM node if you’ve been following along. Type the
following at the Linux prompt
]$ cat gcp-infra-batch.yml
The contents of the file will be displayed on the screen. You can use the scroll feature of your terminal window to see the entire file if it doesn’t fit on your screen.
GCP Infrastructure: create batch
Now you’ll actually execute the command to add the GCP infrastructure. Again,
in the ~ubuntu home directory, type the following
]$ bwctl create batch gcp-infra-batch.yml
This command kicks off a series of Terraform and Ansible instructions that interact with Google Cloud and with the newly-created virtual machines. The whole process takes approximately 10 minutes.
Continue with the tutorial once the command completes.
GCP Infrastructure: on the Orchestrator
Now return to the browser tab that has the open orchestrator GUI. Click on the Resource Graph button in the navigation menu. If everything went well, you should now see an additional processor node (a large green circle) and three additional workload nodes (small green circles). The new processor node should have a connection to the processor node in AWS and the three new workload nodes should be connected to the GCP processor node, as shown in Fig. 67.
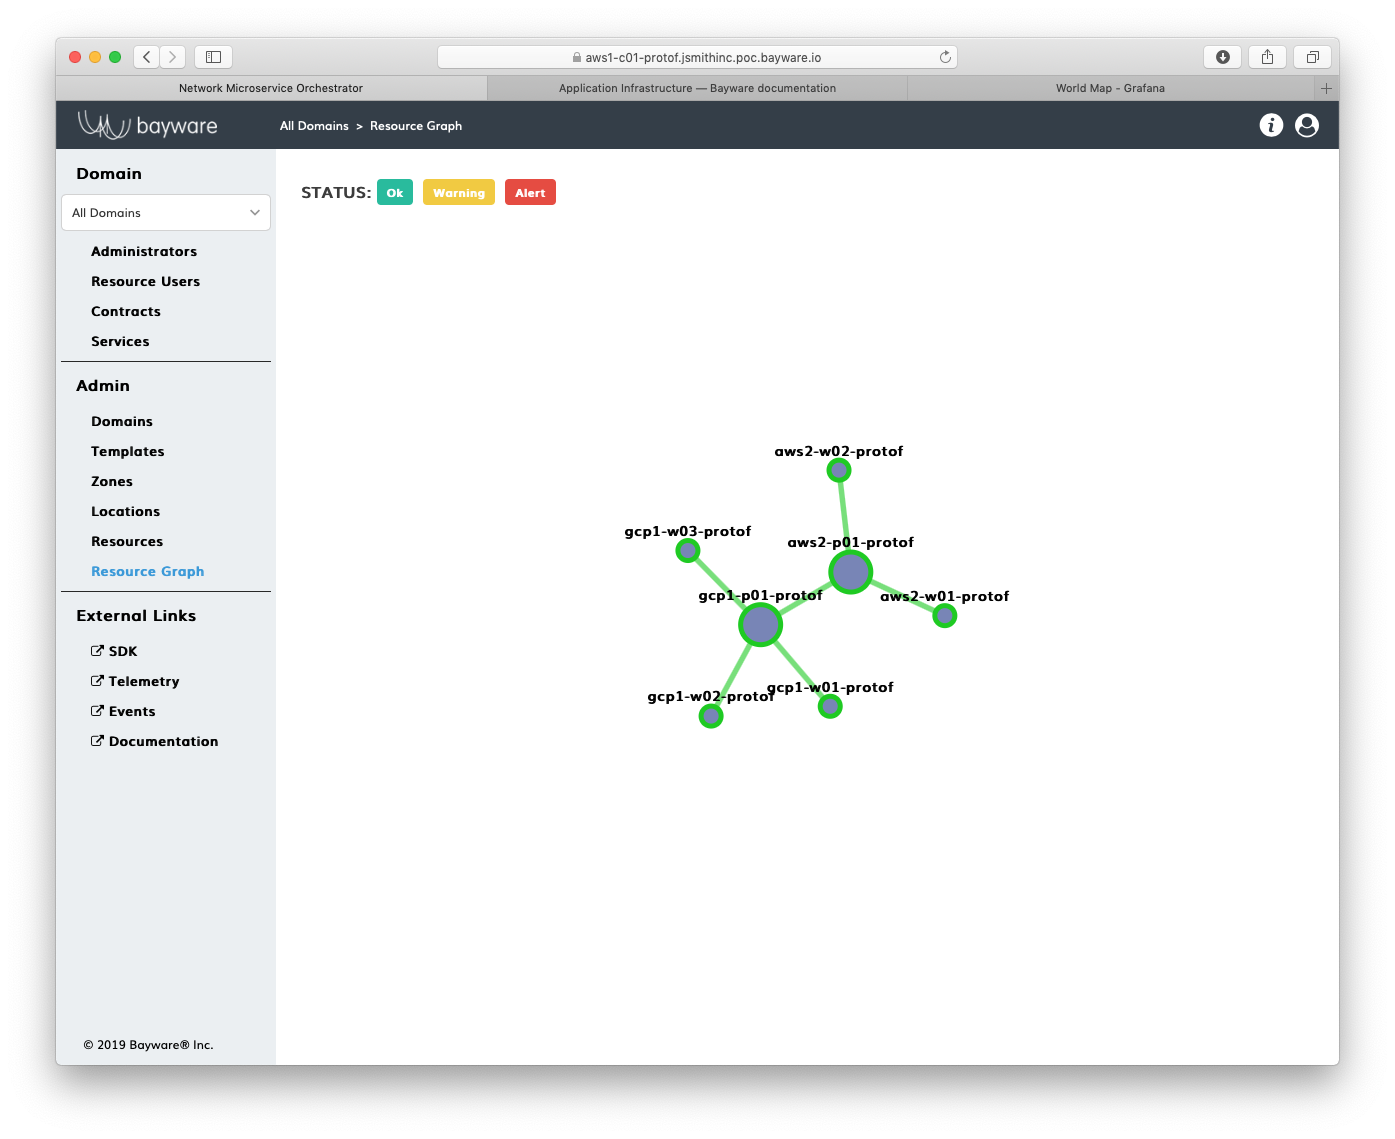
Fig. 67 AWS & GCP Infrastructure Resource Graph
Azure Infrastructure
Similar to GCP, you will now create one VPC, one processor node, and three workload nodes in Microsoft’s Azure. You will do this in a similar manner, using a bwctl batch command with a YAML description of the resources.
Azure Infrastructure YAML Description
Creating infrastructure in Azure uses the same type of YAML description that you used in GCP. In fact, the two files are nearly identical. Take a look at the Azure YAML infrastructure description using the cat command
]$ cat azr-infra-batch.yml
As you scan through the file, notice that only the name of the cloud provider has changed and the region-specific information.
Azure Infrastructure: create batch
Go ahead and execute the command
]$ bwctl create batch azr-infra-batch.yml
As before, wait approximately 12 minutes for this to complete before continuing.
Azure Infrastructure: on the Orchestrator
Now that the tool has completed adding the Azure components, return to the orchestrator browser window’s Resource Graph page. The additional Azure processor should be present and connected to both the GCP and AWS processors and the new Azure workload nodes should be connected to the Azure processor, as shown in Fig. 68.
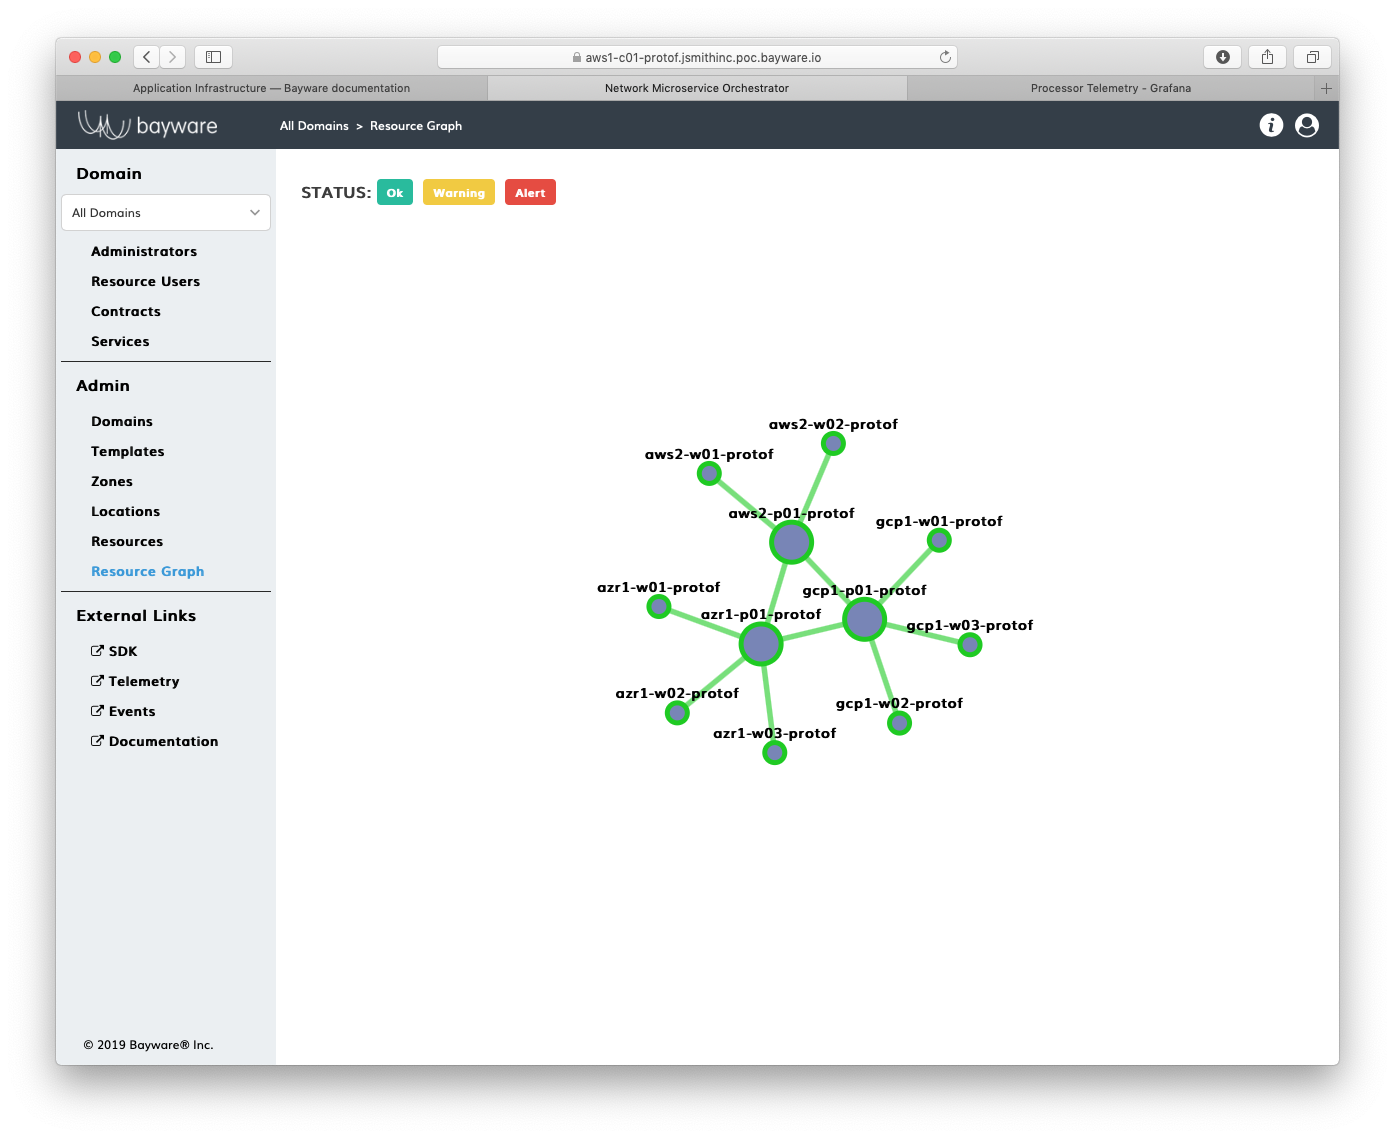
Fig. 68 AWS & GCP & Azure Infrastructure Resource Graph
Completed Infrastructure
Before moving on, use bwctl interactively once more to show
all the components in your fabric as you did in AWS Infrastructure
above. That is, first type bwctl at the Linux prompt
]$ bwctl
which should put you at the bwctl command line. This should look similar
to
(protof) bwctl>
but your fabric name will be different. Then type show fabric
(protof) bwctl> show fabric
As you scroll through the output, notice the newly-created components in GCP and Azure.
Don’t forget to quit out of the interactive bwctl session by
typing quit at the bwctl prompt:
(protof) bwctl> quit
You should now be back at the Linux prompt.
ubuntu@jsmith-c0:~$
Summary
In this section you used your fabric manager’s infrastructure command-line tool, bwctl, both interactively, to show fabric infrastructure, and in batch mode, to create new infrastructure. The YAML batch file descriptions demonstrated how creating the same components in different cloud providers is nearly as simple as doing a search-and-replace. You also used the orchestrator GUI to track components as they registered themselves with the controller.
Next up: use fabric manager’s bwctl-api command-line tool to interact with the orchestrator’s controller via an API.