Application Microservices
Requirements
Getaway’s first two tiers should be deployed in AWS and the back-end data tier should be deployed in a geo-redundant matter, in this case, both in GCP and Azure as shown in Fig. 72.
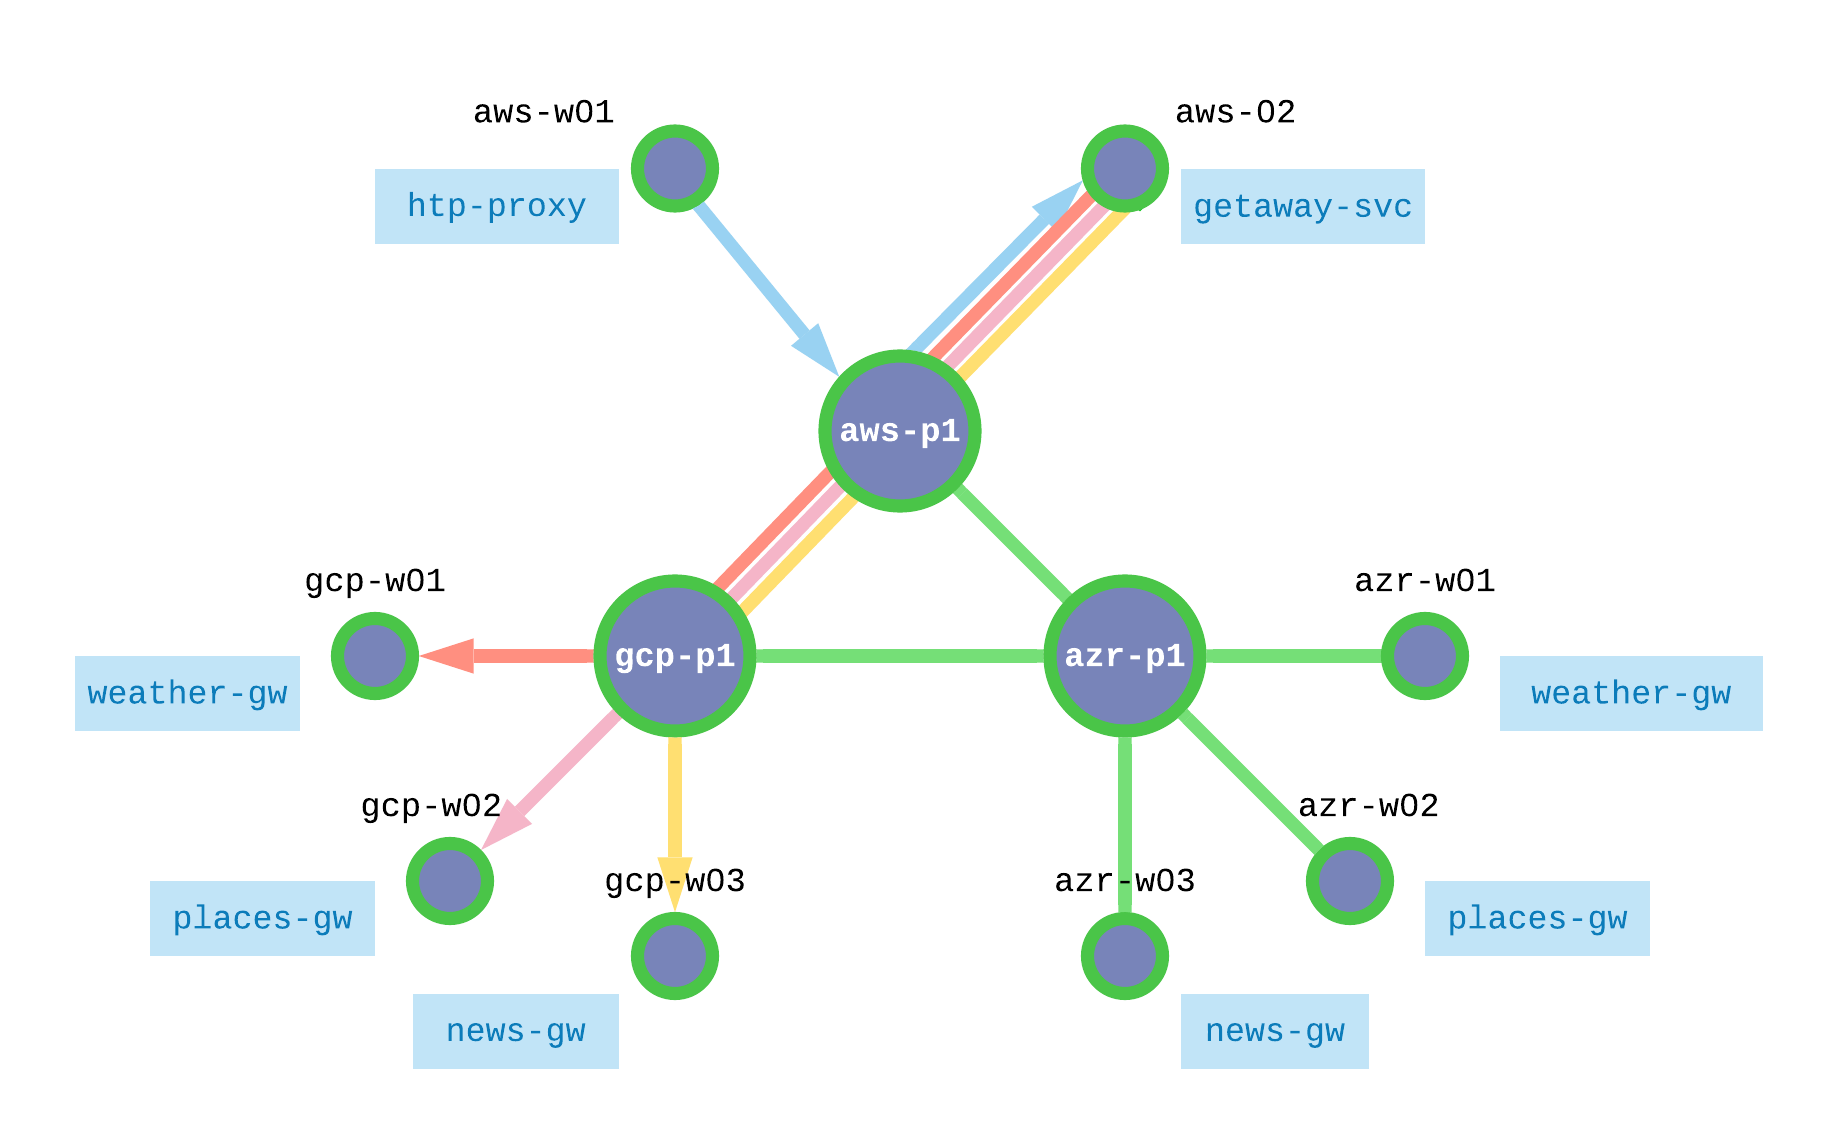
Fig. 72 Geo-redundant Application
Each workload node should be authorized to operate within the service interconnection fabric and the microservices should be installed and started.
Authorized Microservices
The service interconnection fabric authorizes workloads (VMs or containers) to operate using tokens. Authorization tokens for a given service may be generated using the orchestrator GUI or the orchestrator API, as you did in the last section. The tokens must then be installed on each workload before that workload can communicate over the fabric.
When operating in a VM environment, the user configures the agent running on a workload with the required token. This can be done manually or using orchestration software, such as Ansible.
When operating in a container environment, a call from kublete to the CNI triggers the SIF plugin to request a token from the Kubernetes server, which has them stored as pod annotations.
Workload Orchestration
Recall that in Application Infrastructure you were introduced to the fabric manager’s bwctl command-line tool in order to interact with public cloud services and create the infrasturcture for Getaway. In Application Policy you were introduced to FM’s bwctl-api command-line tool in order to interact with the orchestrator to create policy and authorization for Getaway.
The success in this section, however, is up to the devOps engineer. It’s up to him or her to decide how and where to deploy microservices and then use the service tokens to authorize the chosen containers or virtual machines to communicate over the fabric. This would typically be done with a workload orchestrator, such as Kubernetes for containers or Ansible for VMs.
Our example application, Getaway, runs on virtual machines. You will use an Ansible playbook to interact with the workloads.
The Ansible playbook needs to do two things
- configure the workload Agent to use a service token
- install and start Getaway’s microservices
These functions have been wrapped into a single playbook.
Back in your terminal session on FM, ensure that you are in th ~ubuntu home
directory
]$ cd
Now change into the directory that contains the Ansible playbook
]$ cd application
Notice that your Linux prompt, which contains the current path, has changed. Previously, it looked similar to
]$ ubuntu@jsmith-c0:~$
but now it should look more like
]$ ubuntu@jsmith-c0:~/application$
Execute the following playbook from this directory by typing
]$ ansible-playbook deploy-app.yml
This playbook shouldn’t take longer than a minute or so to complete since the tasks are relatively quick, although it does touch eight workload nodes.
Once the playbook completes, you can continue with the tutorial.
Back at the Ochestrator
Let’s ensure that your workloads have been properly authorized at the orchestrator. To do that, we will introduce one more term, network endpoint. Fig. 73 shows the relationship between network endpoint, service endpoint, and your workloads.
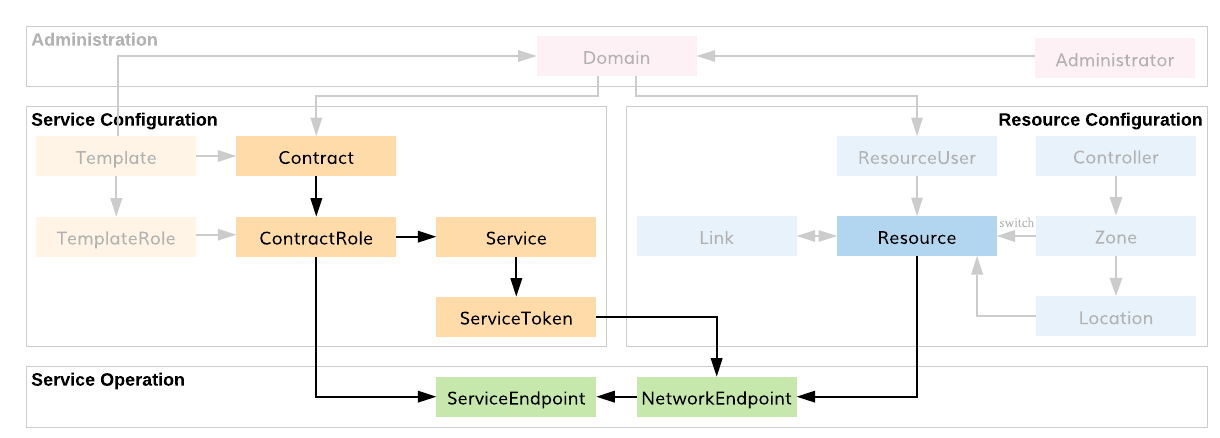
Fig. 73 SEs, NEs, & Workloads
When you used the Ansible playbook above to install a token on a given workload, a network endpoint and a service endpoint were added to that workload. Each service has its own service endpoint. If multiple services exist on a workload, they all communicate through the same network endpoint.
Return to the orchestrator GUI open in your browser. Click on
Services in the sidebar navigation menu and then click on
weather-gw. Scroll to the bottom. Here you should see two network
endpoints, gcp1-w01-protof and azr1-w01-protof: the weather service
has been installed and authorized on one node in GCP and one node in Azure.
This is highlighted in Fig. 74.
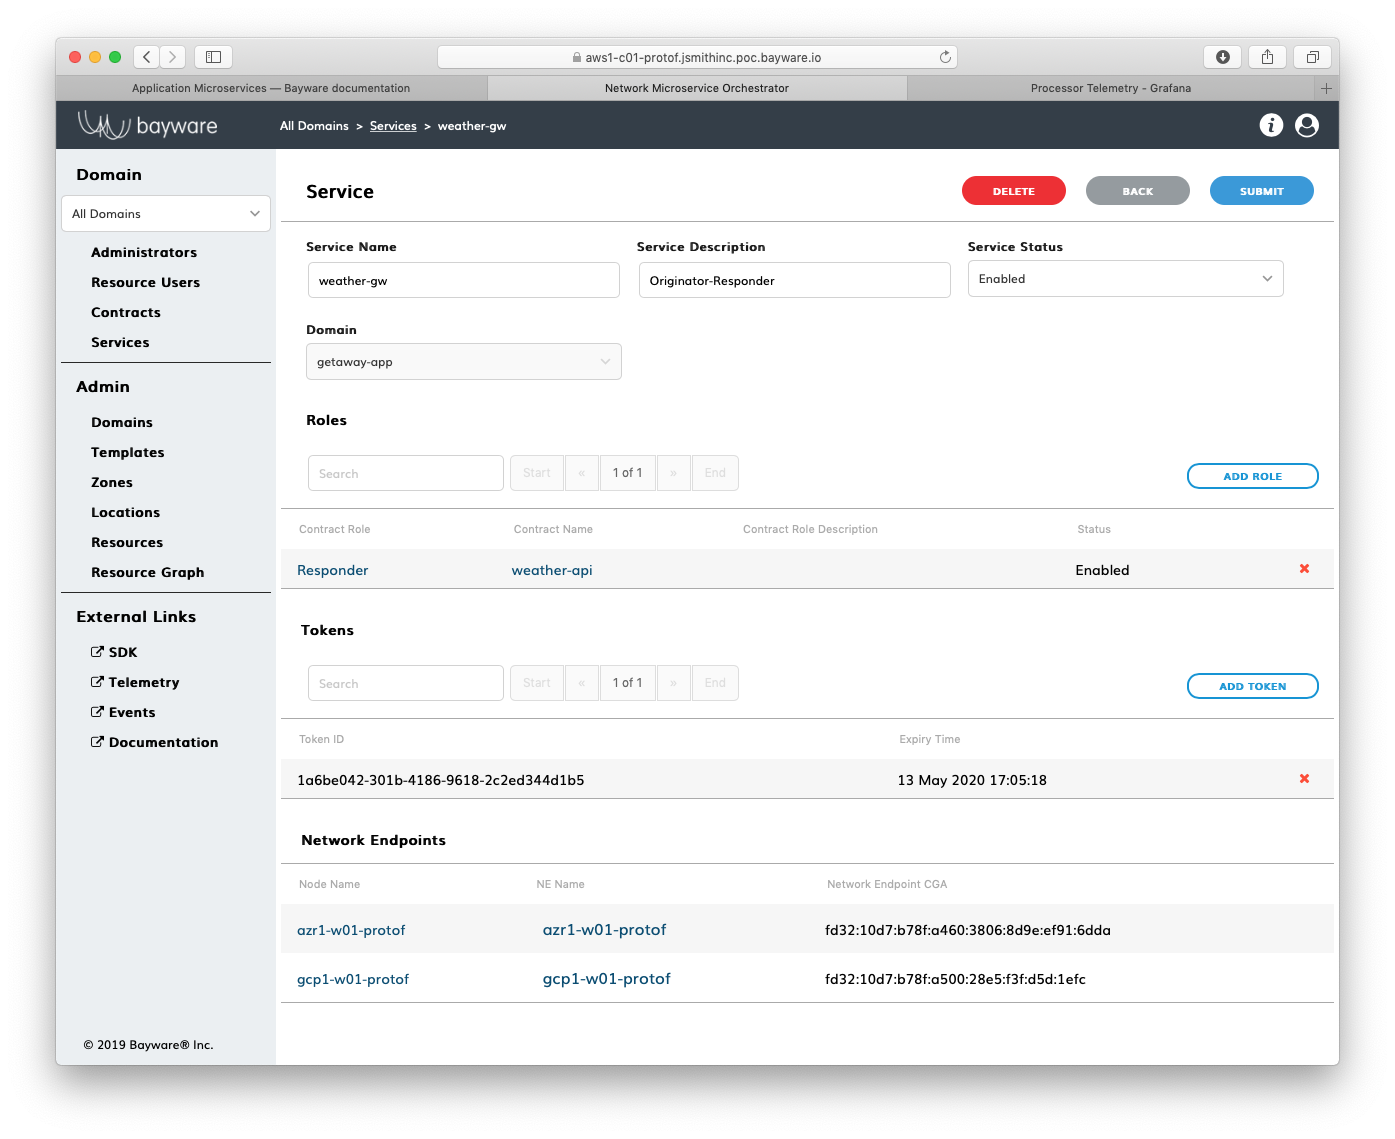
Fig. 74 Network Endpoints for weather-gw Service
Recall from the Getaway service graph
that getaway-svc service communicates with four other services:
http-proxy, weather-gw, news-gw, and places-gw. Click on
Services again, but this time select getaway-svc. At the
bottom of the page you should see a single network endpoint: getaway-svc
is running on aws2-w02-protof workload. Click NE Name.
A pop-up dialog box shows the service endpoints communicating through
this network endpoint. There are four.
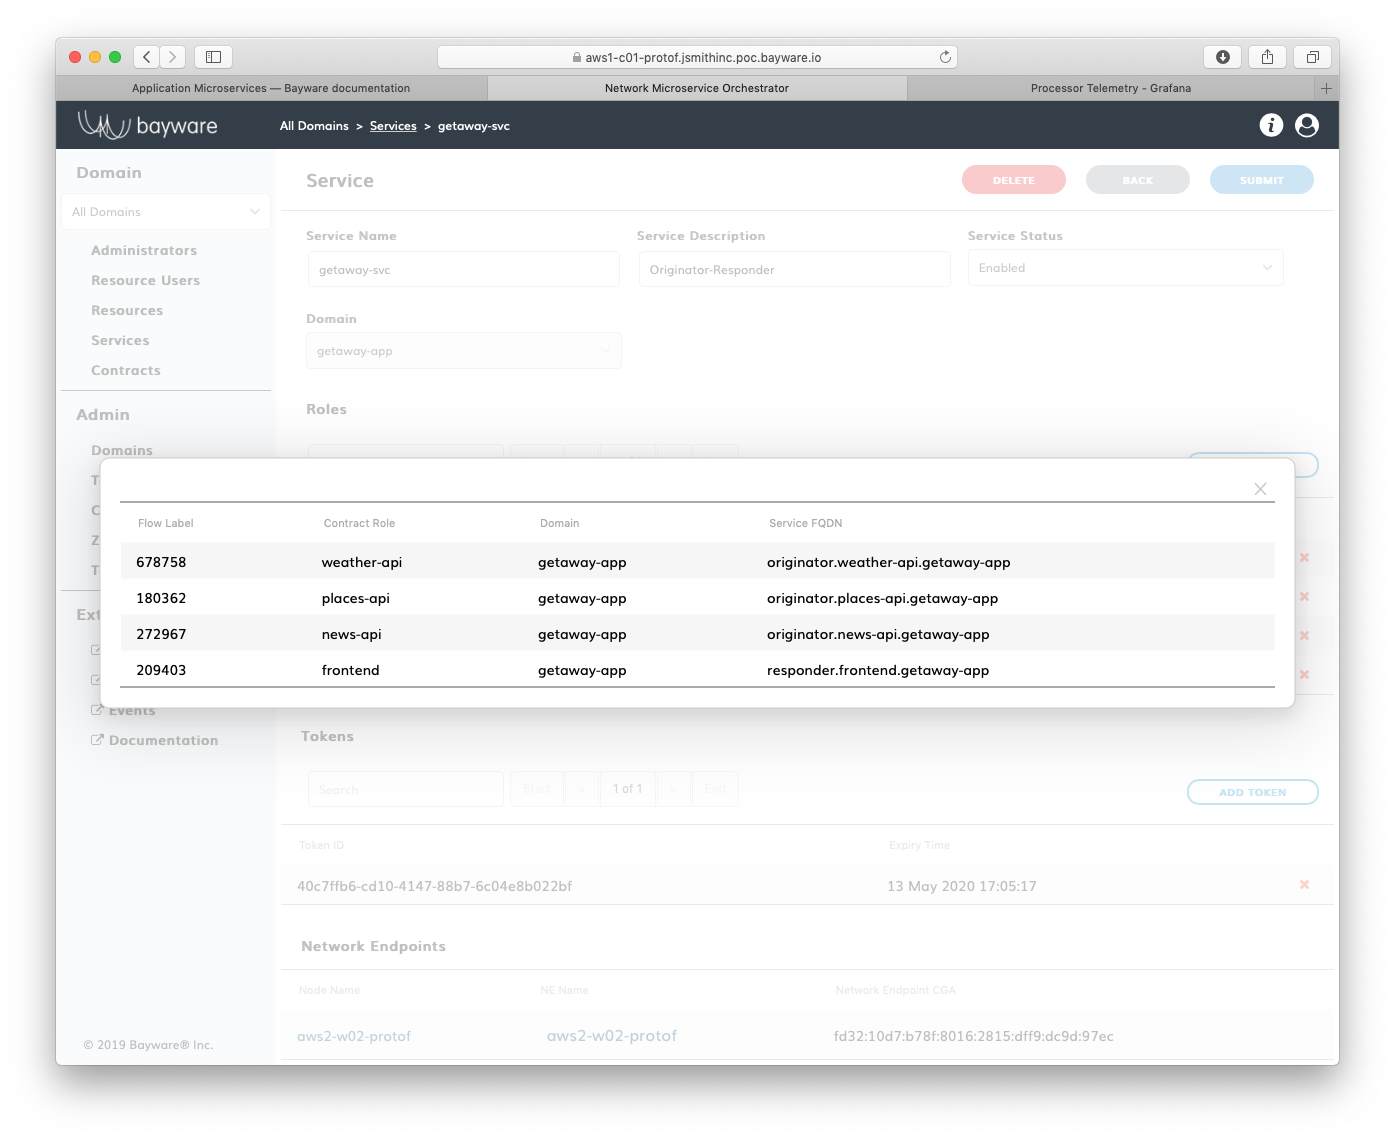
Fig. 75 Service Endpoints for getaway-svc
Getaway Application
Finally, click on the Getaway button on the SIS attachment that was included in your welcome email to launch Getaway in a browser window. You should see weather, places, and news for the city selected at the top of the app. Each pane in the browser displays the node on which it is running. The geo-redundant microservices should all be running in Azure at this point in the tutorial. See Fig. 76 below.

Fig. 76 Getaway App
Summary
In this section you learned how application microservices are authorized to use the service interconnection fabric to communicate with policy dictated by the user. Tokens created in the last section are installed on VMs or containers with the help of commonly-used workload orchestration software, such as Ansible and Kubernetes. You learned how SIF network and service endpoints are related to authorization tokens and where these are displayed in the orchestartor. Finally, you saw and interacted with Getaway running in your browser.
Next up: With Getaway installed over a service interrconnection fabric, you will discover some cool features that help ensure a resilient application.