Application 1 - Getaway App
A Microservice-Based Application & Its Components
Service Graph
Your applications are the lifeblood of your organization. Whether you are supporting internal or external customers, when an app is down your company is losing money. But now that you’ve deployed Bayware’s service interconnection fabric, deploying your application is a snap.
You need to deploy a travel application called Getaway App for your customers. This microservice-based application can be represented with the following service graph.
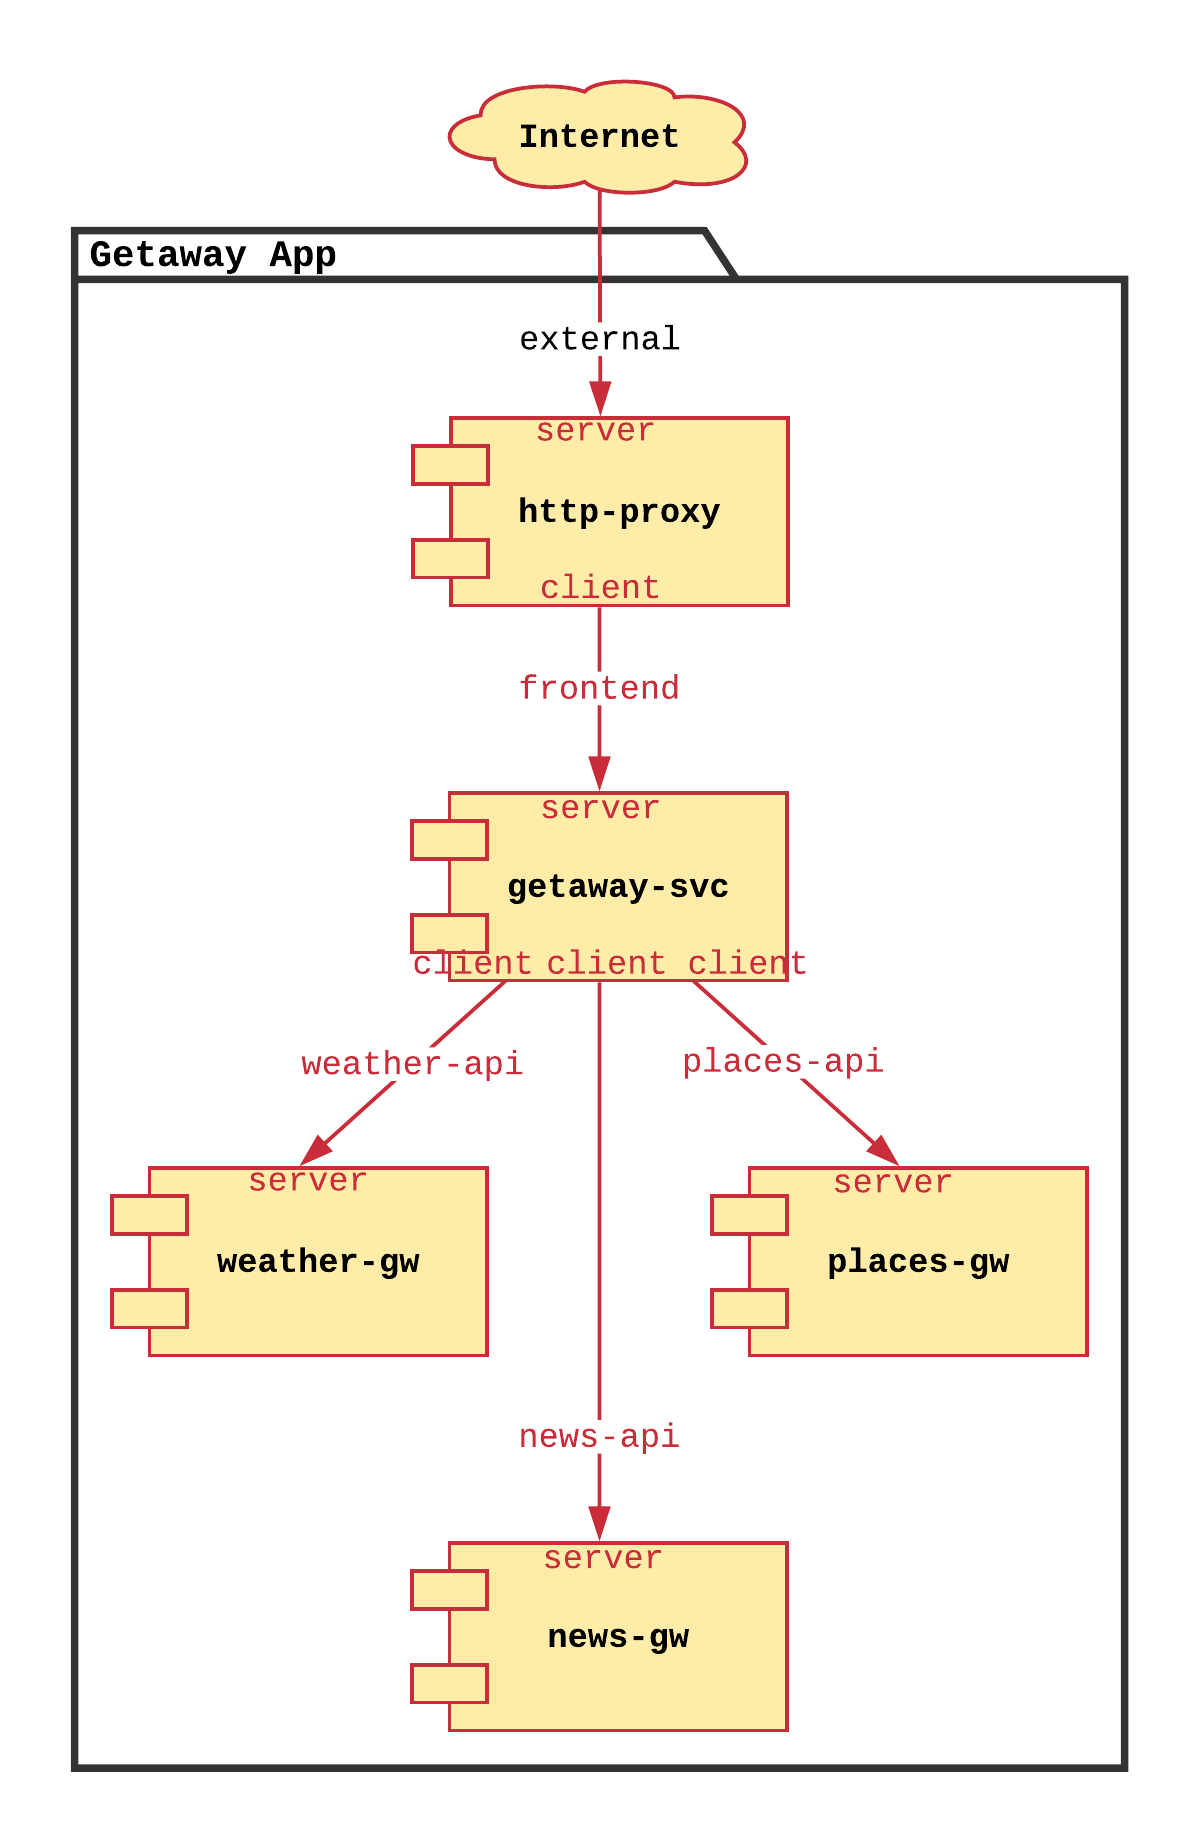
Fig. 30 Getaway App Service Graph
Your users, armed with their smart phones and web browsers, first hit the
http-proxy microservice in front of the firewall. The
http-proxy requests information from the getaway-svc
that, in turn, collates data collected from news-gw,
places-gw, and weather-gw and returns the information to
http-proxy for display to the customer.
Nodes & Host Owners
What does this mean for your service interconnection fabric? It’s simple. You need to deploy the five Getaway App microservices on five different VMs in your cloud infrastructure. Next to each microservice, you will install a Linux interface and a small daemon called the Bayware agent. The Bayware agent handles registration, authentication, and microcode delivery in conjunction with the orchestrator for your microservice. The agent uses the new Bayware interface to communicate with the service interconnection fabric.
So before we actually login to your VMs and deploy code, we need to tell the orchestrator about your service graph so all the registration, authentication, and microcode delivery is handled properly.
To that end, each service graph node (microservice-agent pair) requires a Resource User with a role of hostOwner. Go back to the orchestrator tab on your web browser and click Resource Users in the left-side navigation bar to see a list of resource users that have been pre-populated in your system as shown in Fig. 31.
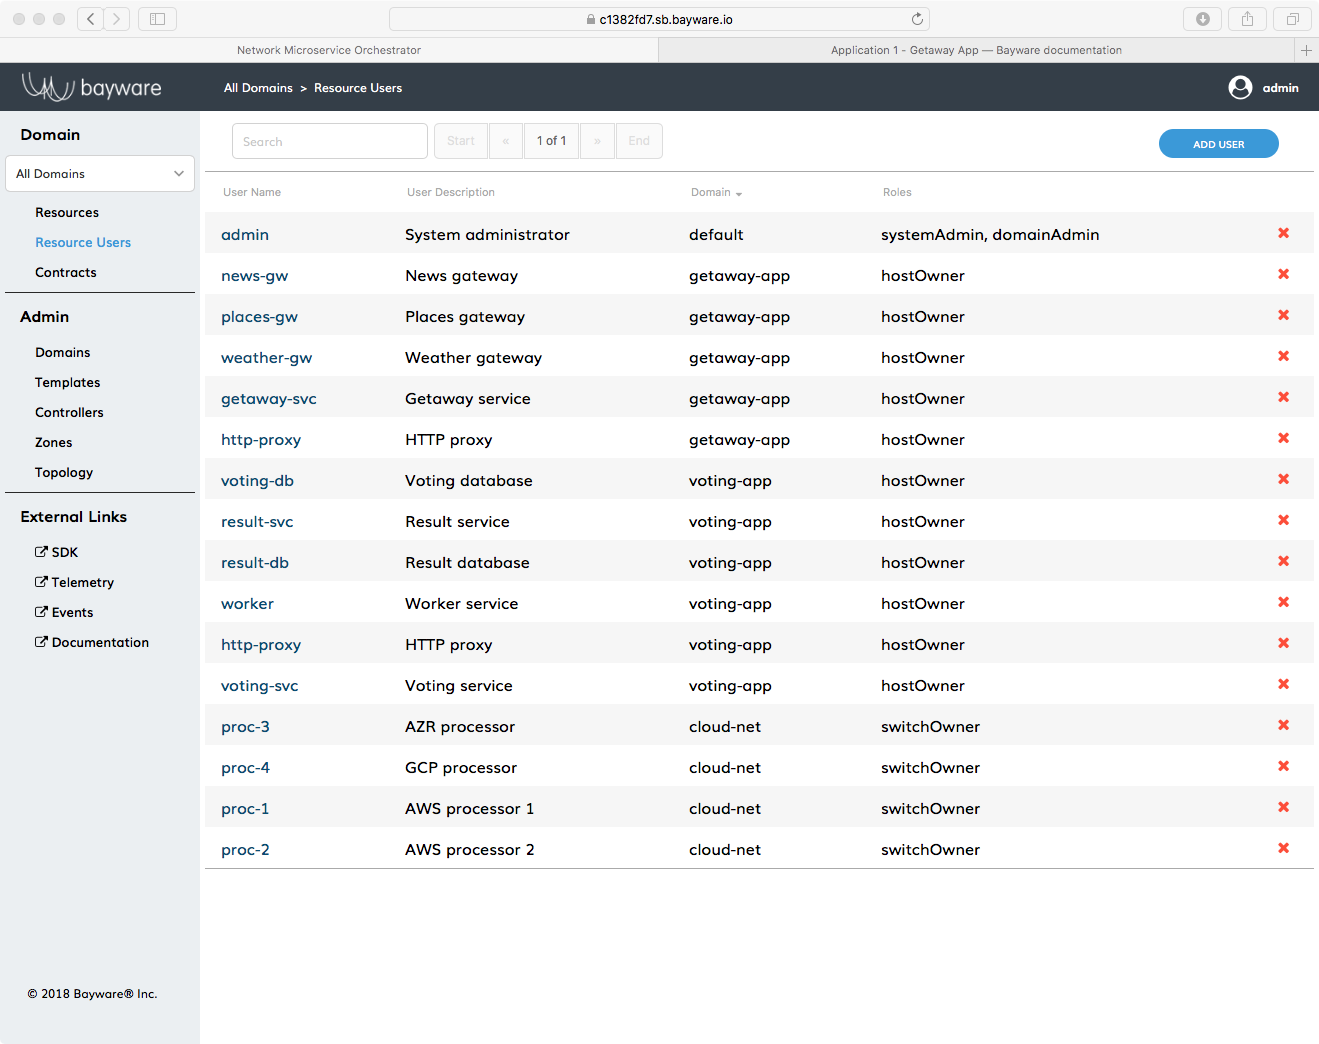
Fig. 31 A List of Resource Users Pre-Populated on the Orchestrator
During Getaway App installation, you will be using the five resource users of type hostOwner with the usernames shown here
http-proxygetaway-svcnews-gwplaces-gwweather-gw
and all are in the domain getaway-app.
It’s no coincidence, then, that these usernames, along with their passwords, are shown again in rows 23 through 27 of the table in your SIS. You’ll need this information once we start installing.
Important
The nodes in a service graph map to host owners on the Bayware orchestrator.
Edges & Contracts
With host owners defined above, your microservices now have a place to live, but they still don’t have any way to communicate. A service graph needs edges in addition to nodes.
The edges in your service graph define the communicative relationships between your microservices. At Bayware, we call these communicative relationships Contracts.
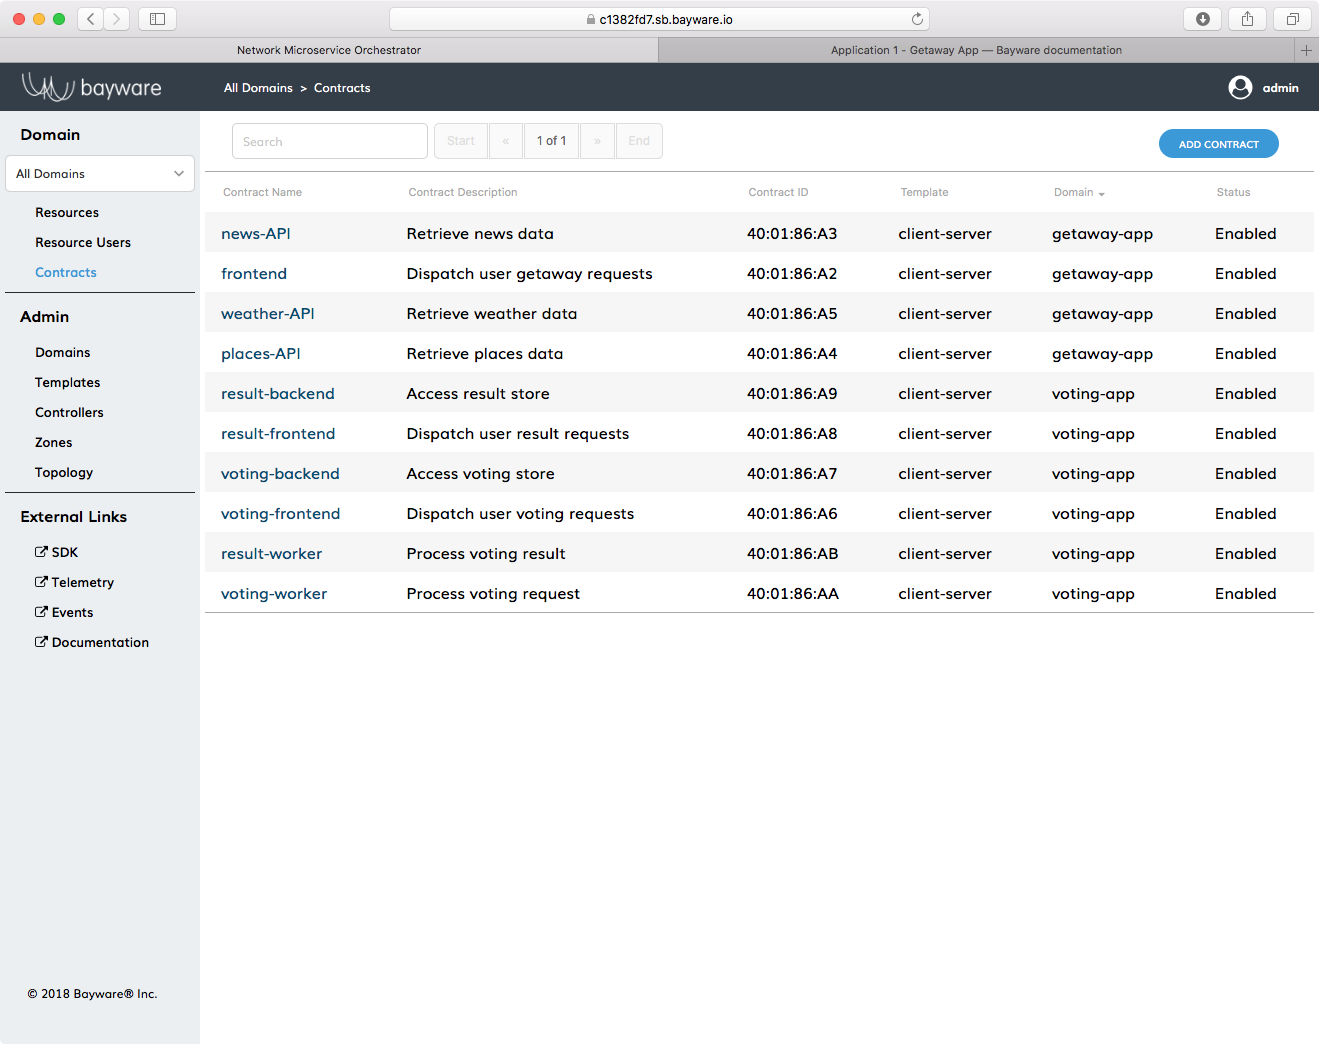
Fig. 32 Contracts Used in this Tutorial
As the Getaway App has four edges, your deployment has four contracts. Back on
the orchestrator in your web browser, click on Contracts in the left-side
navigation bar. You’ll find four Contract Names that reside in the
getaway-app domain as shown in Fig. 32. These are
frontendnews-APIplaces-APIweather-API
The contracts have been pre-populated for your convenience, but they are easily generated on the fly. We won’t do it now, but one would simply click Add Contract and fill in a few fields. The chosen Template determines the allowed Roles in the contract–although, you can add additional Roles later. Once you have submitted the contract, you assign Roles by clicking on the contract name in the Contracts pane and clicking on the Roles in the bottom of the window.
Go ahead and do a little exploring now so you can see how the relationships in
your service graph have shaped the contracts on the orchestrator. Your
contract roles are related to your microservices using the
hostOwner names described in the previous section. Note that all
Getaway App contracts use the client-server template, which have
role client and role server.
| Contract Name | Client Role | Server Role |
|---|---|---|
frontend |
http-proxy |
getaway-svc |
news-API |
getaway-svc |
news_gw |
places-API |
getaway-svc |
places_gw |
weather-API |
getaway-svc |
weather_gw |
Important
The edges in a service graph map to contracts on the Bayware orchestrator.
Authentication, Registration, & Microcode
Now that you understand host owners and contracts (nodes and edges), let’s take a look at what’s going to happen behind the scenes.
As described above, after installing a microservice on a VM, an interface and
small daemon known as the Bayware interface and agent are installed next to the
microservice. During agent configuration, the user supplies the host owner’s
domain, username, and password previously created on the
orchestrator. The agent then reaches out to the orchestrator, but is
redirected to the identity service, which authenticates the agent. After
successful authentication, the agent obtains tokens that enable access to
orchestrator services.
The orchestrator now supplies the agent with a net prefix from which the agent generates its own host identifier–a Cryptographically Generated Address (CGA) in the format of an IPv6 address. Using this CGA, the agent requests registration at the orchestrator, which kicks off the node discovery protocol that ultimately attaches the VM to the service interconnection fabric through the Bayware interface.
The orchestrator, at this point, has also pushed microcode associated with contract roles described above to the agent. The agent, sitting between the microservice and the Bayware interface, embeds the microcode into the data stream to create self-steering flows.
Installation
Fig. 33 shows how you will deploy Getaway App microservices.
As shown, aws-11 and aws-12 will attach to the processor running on
aws-p1 and run the http-proxy and getaway-svc microservices
respectively. The places-gw, weather-gw, and news-gw will be deployed
on aws-21, aws-31, and aws-41 respectively. These three nodes
are all attached to the processor running on aws-p2.
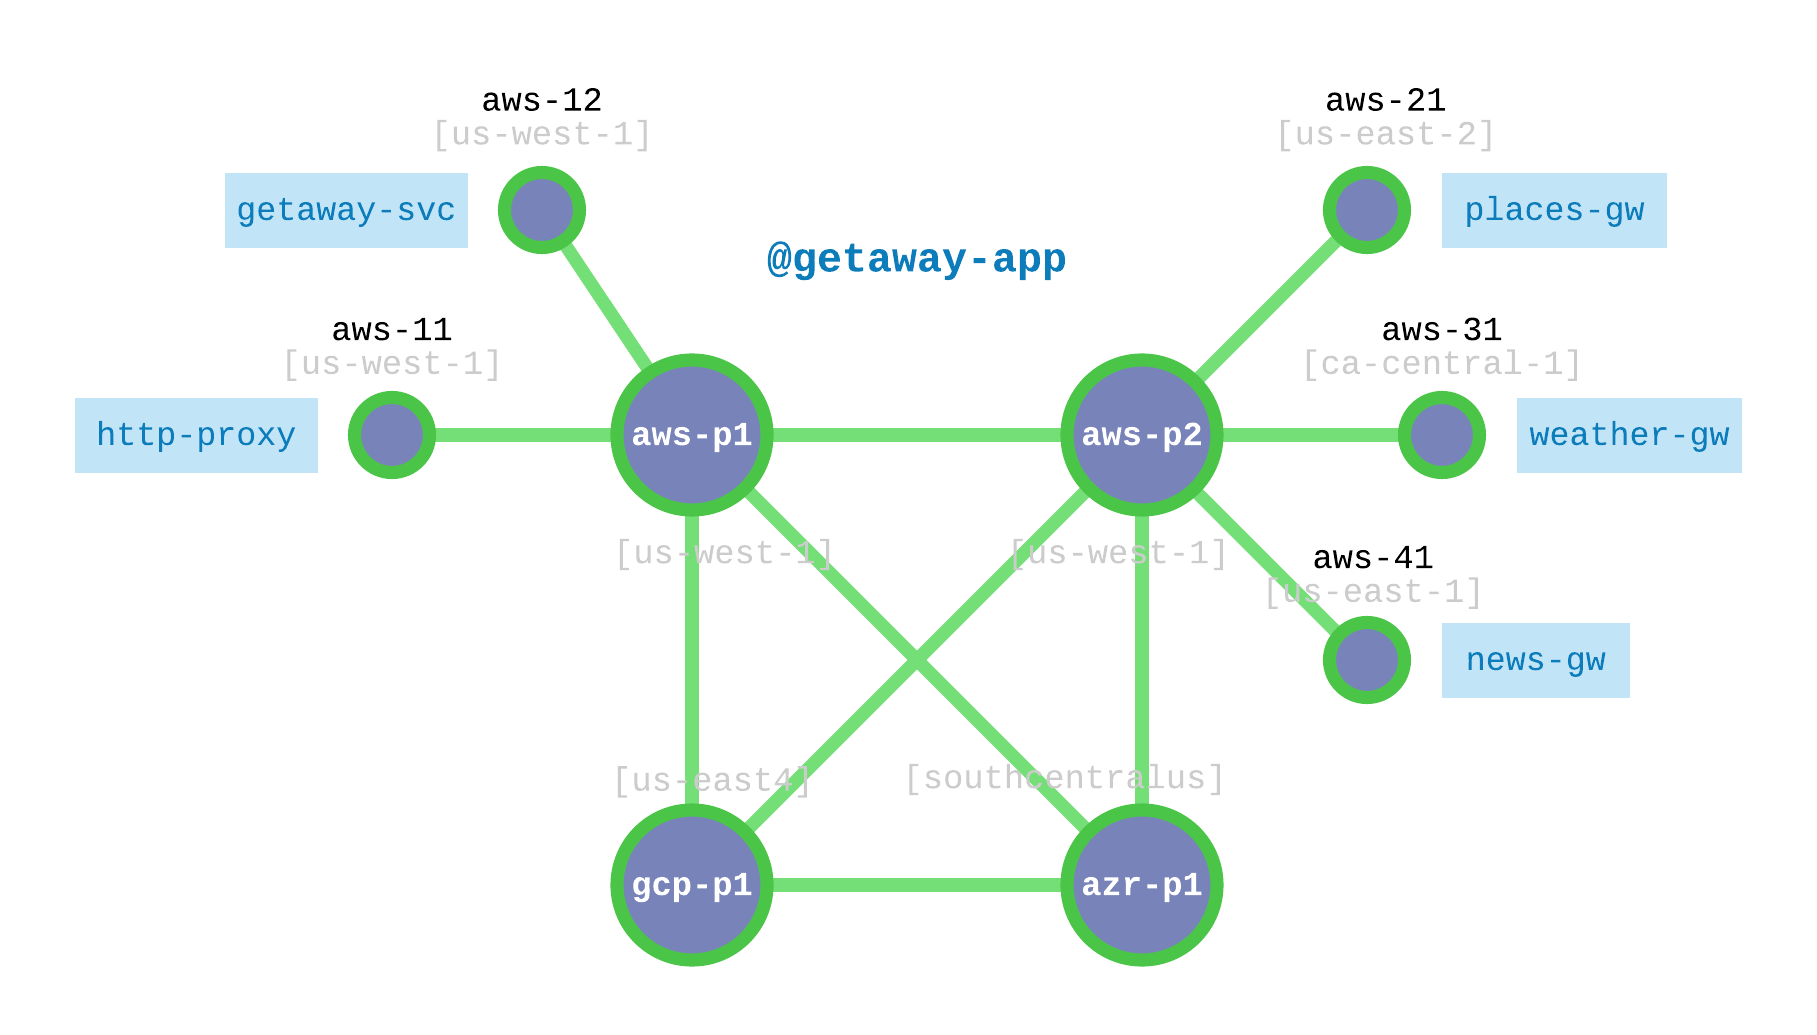
Fig. 33 Getaway Microservices Nodes and the Interconnection Fabric
Each of the five microservices runs alongside an instance of the Bayware agent, which connects to the service interconnection fabric through the Bayware interface. Each microservice runs as a service unit under the RHEL 7 systemd system and service manager. Installation steps are provided in detail below.
But wait. Here’s a detail that will become interesting later once you get to Hybrid Cloud - Moving Microservices. Fig. 33 and Table 4 reveal that you will be running all your microservices in AWS. Make a mental note of that.
| Microservice | VM | Service Unit |
|---|---|---|
http-proxy |
aws-11 |
getaway-proxy |
getaway-svc |
aws-12 |
getaway-service |
news-gw |
aws-41 |
getaway-news |
places-gw |
aws-21 |
getaway-places |
weather-gw |
aws-31 |
getaway-weather |
To deliver the microservices to their VMs, you’ll perform the following steps
- Login to a workload VM’s OS
- Install, configure, & start agent
- Install and start service unit
- Repeat 1 - 3 for remaining microservices
- Interact with Getaway App
Before you begin, take a look at the Resources page again on the orchestrator. You should only see four nodes all of type switch. Once you add workloads, they will also appear under Resources, but as type host.
Step 1: SSH to VM
Let’s start with the http-proxy microservice, which needs to be installed on
aws-11. Starting from the prompt on your Command Center, login to
aws-11.
]$ ssh centos@aws-11
You should now see a prompt on aws-11 similar to
[centos@aws-11-382fd7 ~]$
The following commands all require super-user credentials, so become root
[centos@aws-11-382fd7 ~]$ sudo su -
You should now see a prompt on aws-11
[root@aws-11-382fd7 ~]#
(The root prompt above is abbreviated simply as ]# in the commands that follow.)
Step 2: Install, configure, & start agent and interface
Installation of the agent and interface requires access to the
bayware-repo and the epel-release repository. These have been
preinstalled on your virtual machines.
Execute the following command at the root prompt to install the agent
on aws-11:
]# yum install -y ib_agent
Similar to configuring the processors in your interconnection fabric in the SIF Deployment chapter, you will now run the configuration script interactively in order to configure the agent that will run next to the microservice and its new Linux interface.
First, to save some typing, let’s cd to the directory that contains the script
]# cd /opt/ib_agent/bin
The script is called ib_configure. You can display the usage instructions by typing
]# ./ib_configure -h
usage: ib_configure [-h] [-i] [-o OUTFILE] [-s] [-c ORCHESTRATOR] [-d DOMAIN]
                [-l USERNAME] [-p PASSWORD] [-a IP_ADDR] [-t TCP_PORT]

Configure the Bayware Agent.

optional arguments:
  -h, --help            show this help message and exit
  -i, --interactive     set up configuration parameters interactively
  -o OUTFILE, -f OUTFILE, --outfile OUTFILE
                        create text file listing all configuration parameters
  -s, --ipsec           set up IPsec for this Agent
  -c ORCHESTRATOR, --orchestrator ORCHESTRATOR
                        orchestrator FQDN or IP address
  -d DOMAIN, --domain DOMAIN
                        domain in which host owner of this node was created on
                        the orchestrator
  -l USERNAME, --username USERNAME
                        username for the host owner of this node that was
                        configured on the orchestrator
  -p PASSWORD, --password PASSWORD
                        password associated with the username of the host
                        owner of this node that was configured on the
                        orchestrator
  -a IP_ADDR            IPv4 address of REST interface on which Agent listens
  -t TCP_PORT           TCP port of REST interface on which Agent listens
When you run the script in interactive mode, you will be prompted for
orchestrator FQDN, and the domain, username, and password
assigned to the http-proxy microservice.
- orchestrator IP or FQDN: use
c1382fd7.sb.bayware.ioas shown in the URL table at the top of the SIS. Your FQDN prefix will be different thanc1382fd7shown here. Do not include thehttps://that is present in the URL.- node
domain: use thehttp-proxydomainfrom agent login credentials, row 23- node
username: use thehttp-proxyusernamefrom agent login credentials, row 23- node
password: use thehttp-proxypasswordfrom agent login credentials, row 23- configure IPsec: answer
YES
Note that, for convenience, the username is the same as the name of the
microservice.
With that information in hand, execute the following command and follow the prompts.
]# ./ib_configure -i
Now start and enable the agent
]# systemctl start ib_agent
]# systemctl enable ib_agent

Fig. 34 Agent Installed on aws-11 in Getaway App
If all went well, you should see a small, green circle appear on the
Topology page of the orchestrator as shown in
Fig. 34. The agent should also automatically form a
link with your processor, aws-p1-382fd7, in your service
interconnection fabric. As you install agents on your workload nodes and their
small, green circles appear in the Topology window, clicking on a
circle brings up overlay information related to the node. The
Owner information at the bottom of the overlay shows the host owner
and domain used on the given resource.
Step 3: Install and start service unit
As shown in Table 4, you need to install the
microservice http-proxy on aws-11. The package (service unit) associated
with this microservice is called getaway-proxy. While you’re still signed
in as root execute the following three commands
]# yum install -y getaway-proxy
]# systemctl start getaway-proxy
]# systemctl enable getaway-proxy
Step 4: Repeat 1 - 3 for remaining microservices
Easy, right?
One down, four to go… finish installing the remaining components of your application
by following steps 1 through 3 above for the microservices getaway-svc, news-gw,
places-gw, and weather-gw. Remember to follow the microservice-to-VM mapping
shown in Getaway Microservices VM Mapping above.
Hint
It’s like a test, right? Even if it’s open-book and you can scroll back through the detailed descriptions above (and you probably should if you want to recall why you’re typing something), we’ve created a CHEAT SHEET to help you install the remaining four microservices without scrolling. Just be sure to have your personal SIS open for the ib_configure part as you’ll need to lookup the login credentials for the host owner user names hinted at. The CHEAT SHEET assumes you are starting from your CCC.
CHEAT SHEET - GETAWAY APP INSTALL

hint: use elements in the lists [] below for each iteration

]$ ssh centos@aws-12               hint: [ aws-12, aws-41, aws-21, aws-31 ]
]$ sudo su -
]# yum install -y ib_agent
]# cd /opt/ib_agent/bin
]# ./ib_configure -i               hint: [ getaway-svc, news-gw, places-gw, weather-gw ]
]# systemctl start ib_agent
]# systemctl enable ib_agent
]# yum install -y getaway-service      hint: [ getaway-service, getaway-news, getaway-places, getaway-weather ]
]# systemctl start getaway-service     hint: [ getaway-service, getaway-news, getaway-places, getaway-weather ]
]# systemctl enable getaway-service    hint: [ getaway-service, getaway-news, getaway-places, getaway-weather ]
]# exit
]$ exit
When you’re finished installing all microservice components, take a look again at the Topology page and ensure that there are five microservices and that each is connected to one of the processors as shown in Fig. 35. (You can get overlay information about a green circle on the Topology page by clicking it.)
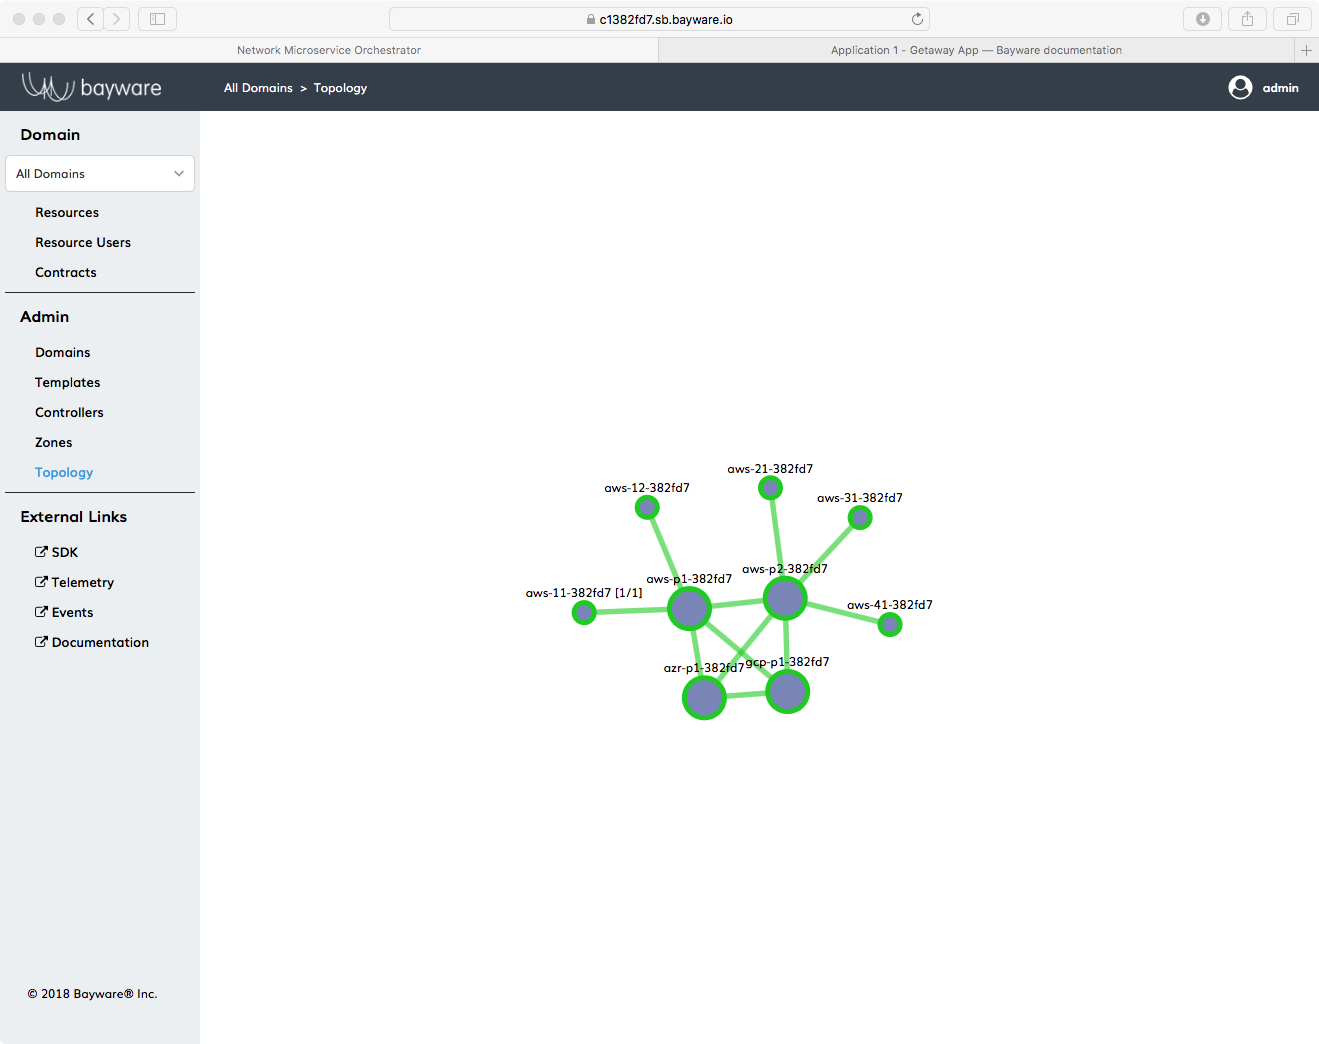
Fig. 35 Orchestrator Topology for Getaway App
Step 5: Interact with the Getaway App
Getaway App
Now your Getaway App–and all its microservices–is up and running on Bayware technology. In the next section, you will have an opportunity to play with some of the innovative features this brings to your application.
But first, let’s spend some time with the Getaway App itself since, in the end, that is the whole point of application deployment.
Open a new tab in your browser and type in the web address for the Getaway App
Entry Point shown in the URL table at the top of your
SIS, similar to
https://ap382fd7.sb.bayware.io/getaway.
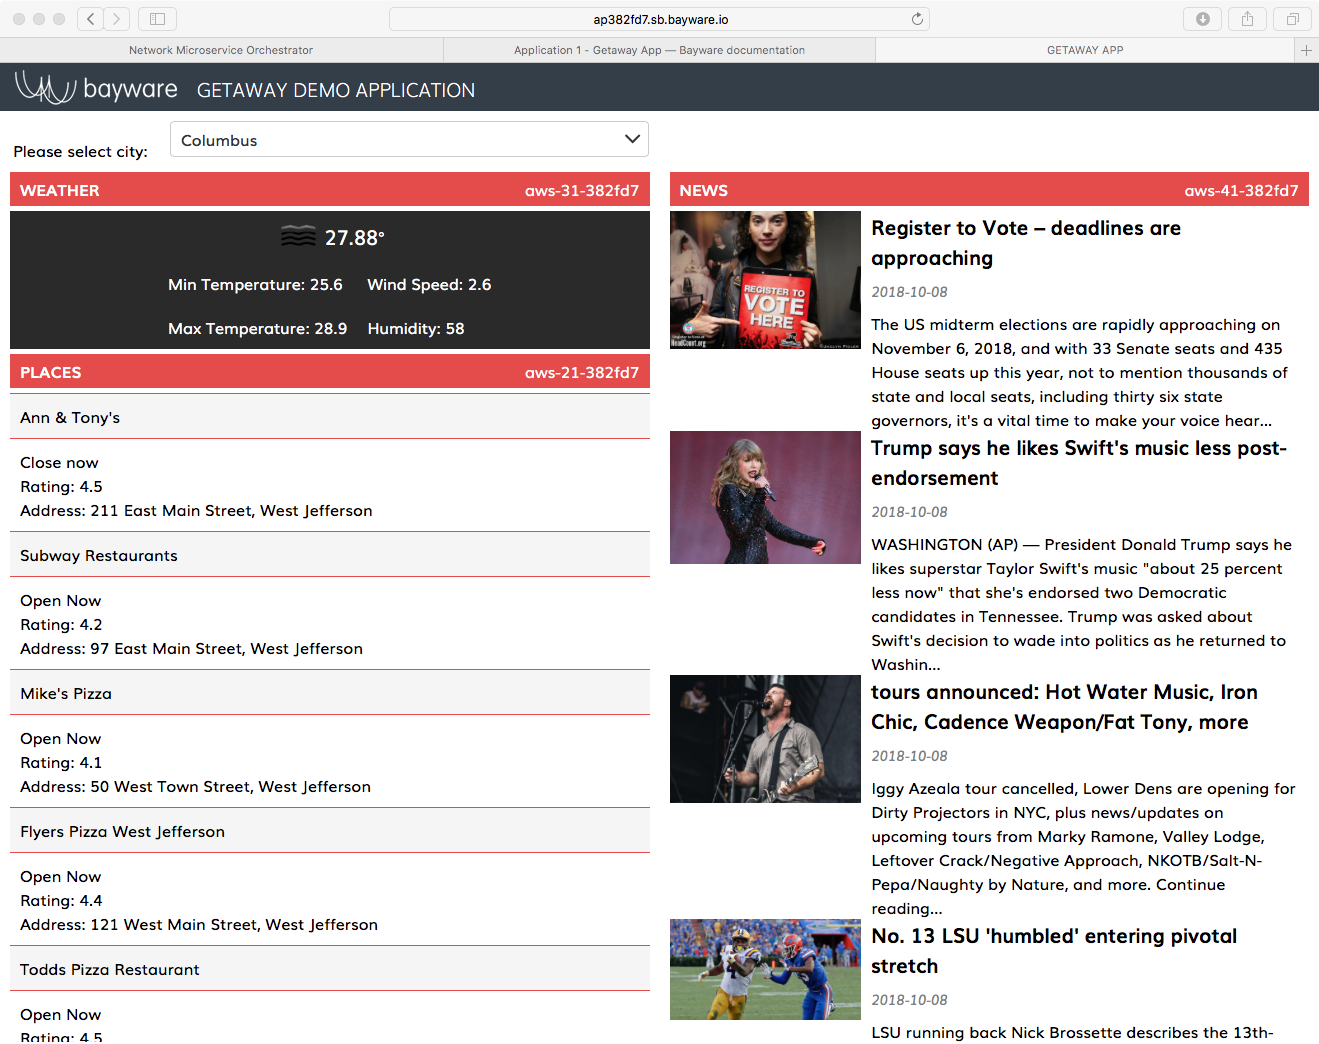
Fig. 36 Getaway App Running in a Browser
As shown in Fig. 36, three panes show weather, places,
and news (operated by the microservices weather-gw, places-gw, and
news-gw respectively) for a particular city. You can choose the city using
the drop-down selector box at the top of the page.
Of primary interest to the devOps professional–and irrelevant to a real end
user–is the notation on the right end of each title bar for
WEATHER, PLACES, and NEWS that shows the VM
on which the given microservice is running. If you followed the tutorial to
this point, you should see NEWS running on gcp-11-382fd7,
PLACES running on aws-21-382fd7, and WEATHER
running on aws-31-382fd7. In the next section, we’ll show how easy
it is to direct microservice requests to a different VM no matter the public
cloud provider.
Service Graph Revisited
With all the security inherent in running Getaway App over a Bayware service interconnection fabric, the orchestrator knows which microservices (host owners) are installed and their communicative relationships (contracts). As described in Service Graph and Nodes & Host Owners and Edges & Contracts, one starts by adding hostOwners and Contracts to the orchestrator that correlate to the application service graph nodes and edges.
Now that you’ve installed all your Getaway App components, you can do a quick
sanity check to ensure that you correctly entered host owners and contracts into
the orchestrator. Back on the orchestrator, click on Domains in the
left-side navigation menu. Of the four domain names that are displayed, now
click on getaway-app. At the bottom of the getaway-app domain window,
click on Domain Topology. You should see Getaway App service graph
recreated by the orchestrator as shown in Fig. 37.

Fig. 37 Getaway App Service Graph Generated By Orchestrator
Telemetry
Now might be the right time to revisit telemetry. We introduced Grafana in the first section of this tutorial to confirm that 17 virtual machines were really up and running. Now they’re actually doing something.
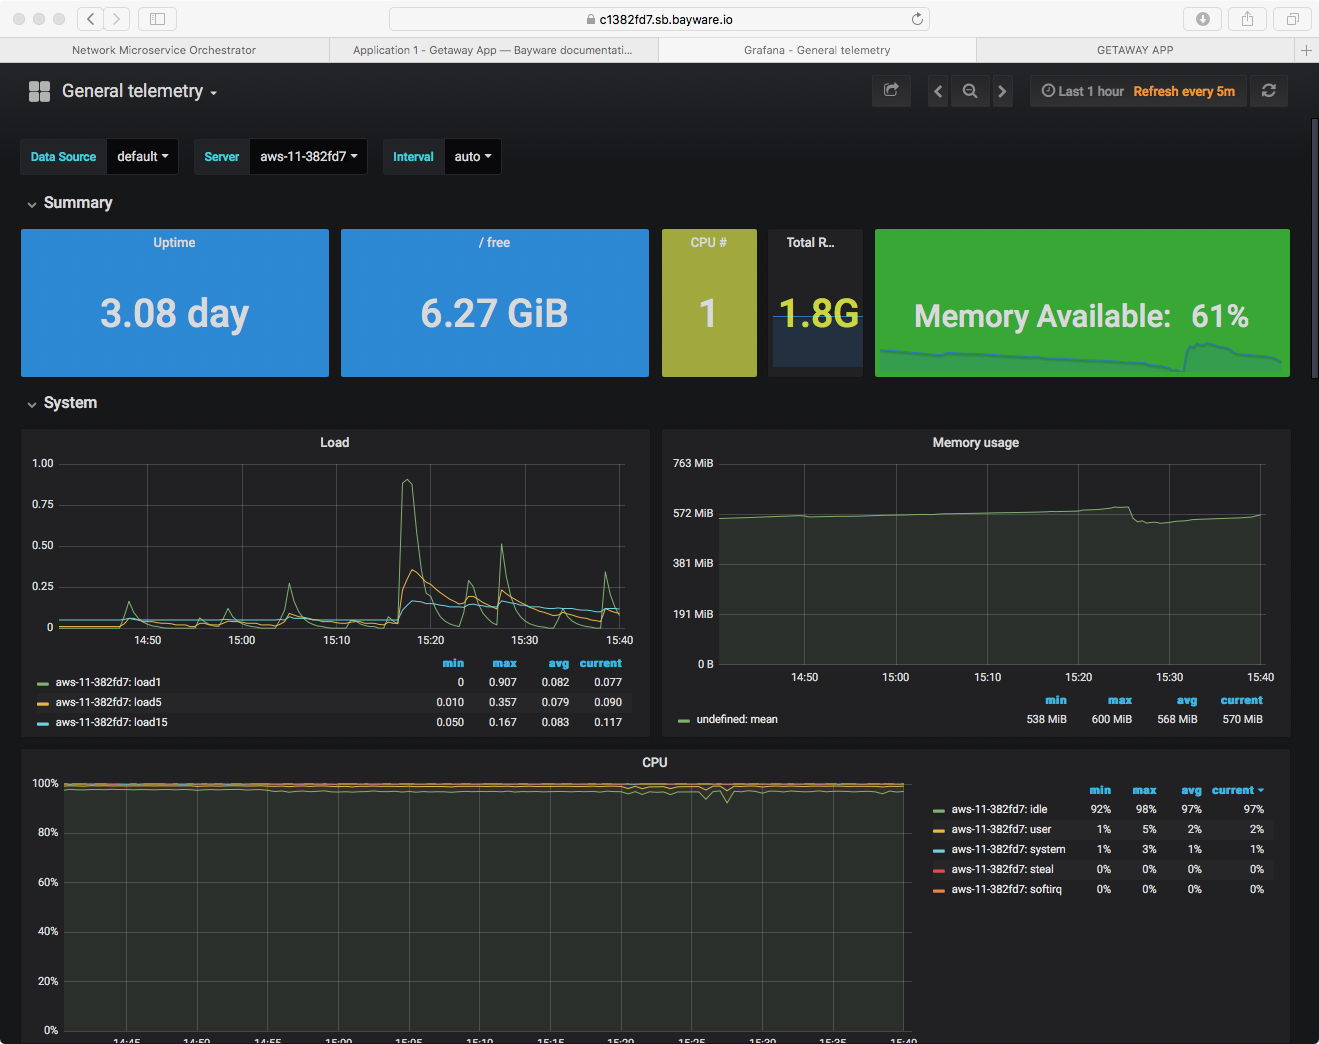
Fig. 38 Telemetry: Getaway App http-proxy Load
Go to the Grafana page by clicking on Telemetry in the left-side
navigation menu on the orchestrator. Grafana will open in a new tab in your
browser. Start by checking out server aws-11-382fd7, which is
running microservice http-proxy, as shown in Fig. 38.
Scroll down and you will be able to see both System and
Network dashboards.
Hybrid Cloud - Moving Microservices
So everything’s up and running along smoothly. All your Getaway microservices are deployed alongside an instance of the Bayware agent and interface, you can see your processor nodes and your workload nodes in the orchestrator Topology and you can be confident that security is in place and your policies are being enforced.
But you are still at the mercy of your public cloud provider. Maybe the cost will go way up or the level of service will go way down. It would be nice to know that you can easily have a backup microservice at the ready in another cloud provider or two and quickly direct traffic from the current provider to the new provider.
With Bayware you can.
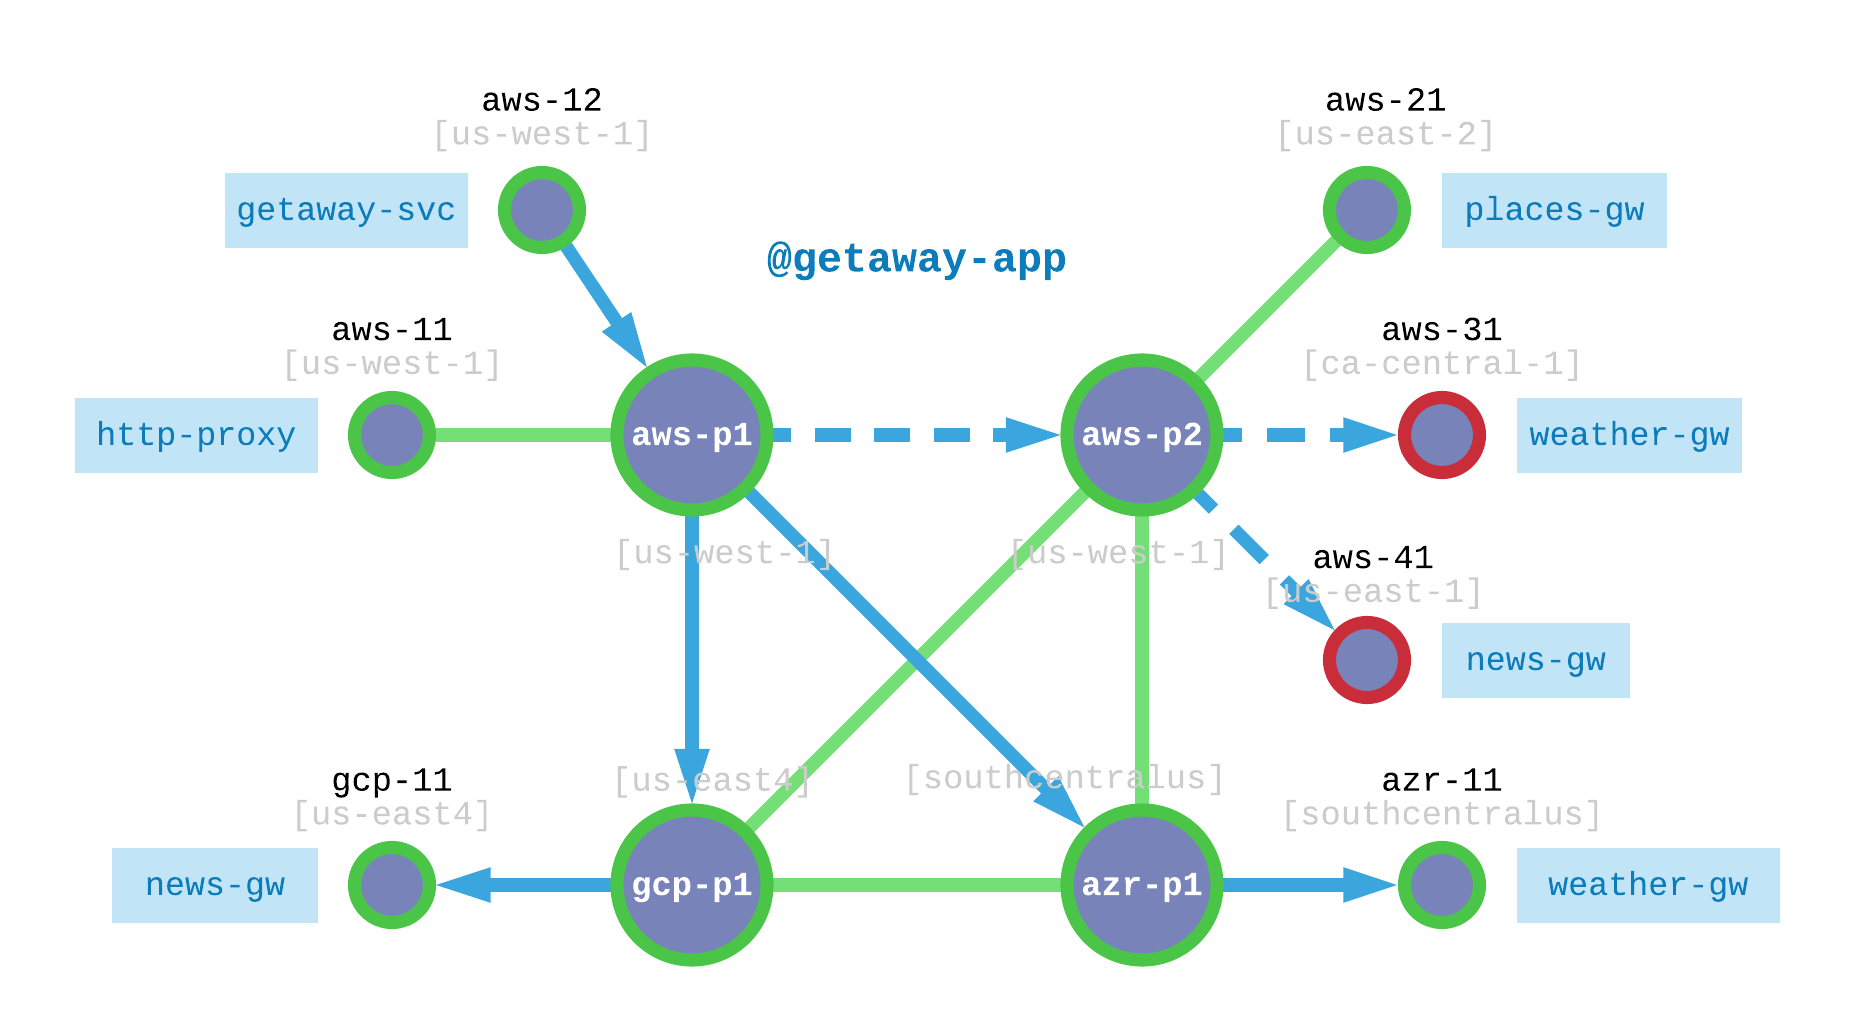
Fig. 39 Getaway App Utilizes Redundent, Hybrid-Cloud Microservices
Fig. 39 shows where we are and where we’re going.
Recall that all Getaway App microservices were deployed
in AWS. Let’s focus on weather-gw and news-gw specifically.
The dashed lines in Fig. 39 show how requests from http-proxy
are currently routed to aws-31 (for weather-gw) and to aws-41
(for news-gw). Again, both of these VMs are operating in AWS.
And then it happens. Some catastrophe befalls aws-31 and aws-41 and they
go offline. Time is money and the prepared devOps engineer already has backup
news-gw and weather-gw microservices operating in GCP and Azure, respectively.
Your customers won’t notice a thing.
The Setup
Here’s how will simulate such an event.
- Install
news-gwand agent ongcp-11- Install
weather-gwand agent onazr-11- Simulate failed
aws-31by shutting down agent- Simulate failed
aws-41by shutting down agent
Let’s get started.
Redundant Installation
Table 5 shows the microservices you need to set up on redundant VMs, the name of the new VMs, and the name of the application serivce unit.
| Microservice | VM | Service Unit |
|---|---|---|
news-gw |
gcp-11 |
getaway-news |
weather-gw |
azr-11 |
getaway-weather |
You’re likely a pro at this by now. As such, here’s another CHEAT SHEET to help you install agents and service units in GCP and AZR. If anything seems unclear, go back to the installation steps for review. Remember to find the credentials for news and weather on your SIS, rows 25 and 27.
CHEAT SHEET - GETAWAY APP MULTI-CLOUD

hint: use elements in the lists [] below for each iteration

]$ ssh centos@gcp-11                  hint: [ gcp-11, azr-11 ]
]$ sudo su -
]# yum install -y ib_agent
]# cd /opt/ib_agent/bin
]# ./ib_configure -i                   hint: [ news-gw, weather-gw ]
]# systemctl start ib_agent
]# systemctl enable ib_agent
]# yum install -y getaway-service      hint: [ getaway-news, getaway-weather ]
]# systemctl start getaway-service     hint: [ getaway-news, getaway-weather ]
]# systemctl enable getaway-service    hint: [ getaway-news, getaway-weather ]
]# exit
]$ exit
Go back to the Topology page in the orchestrator. You should see new small green
circles representing gcp-11 and azr-11 as shown in Fig. 40.
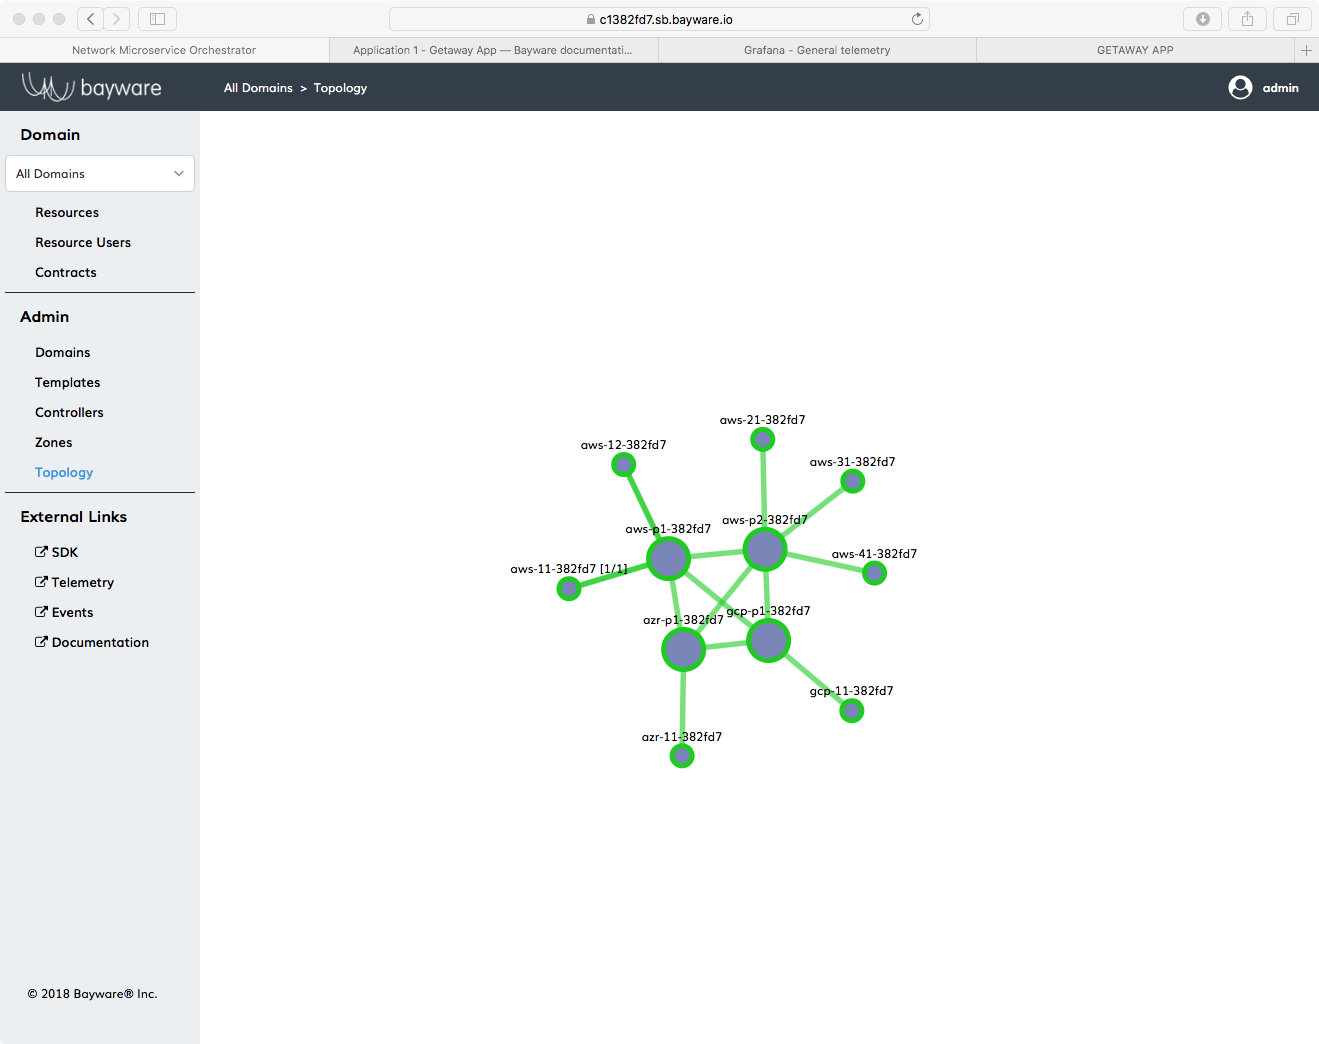
Fig. 40 Getaway App Topology with Seven Agents
Stop Systems
Now you’re going to take aws-31 and aws-41 offline. You’ll do this by
stopping the ib_agent service running on each of these virtual machines.
The service interconnection fabric will detect that news-gw and
weather-gw microservices operating on aws-31 and aws-41 are no
longer registered and traffic will automatically be re-routed to the new
microservice instances you just created.
Starting from your Command Center, login to aws-31 and become root just
as you did above.
Now execute the following
]# systemctl stop ib_agent
You will repeat these steps now on aws-41. First, get back to your CCC by exiting
out of the two shells you’ve opened on aws-31
]# exit
]$ exit
After you’re back at your CCC, ssh into aws-41, become root, and
stop the ib_agent running on that system.
Did it Work?
At the Orchestrator
Now go back to your browser tab that has the orchestrator open. Click on the
Topology link in the left-side navigation menu. You should see
your service interconnection fabric, but now two of the workload nodes are red,
aws-31 and aws-41, as shown in Fig. 41.
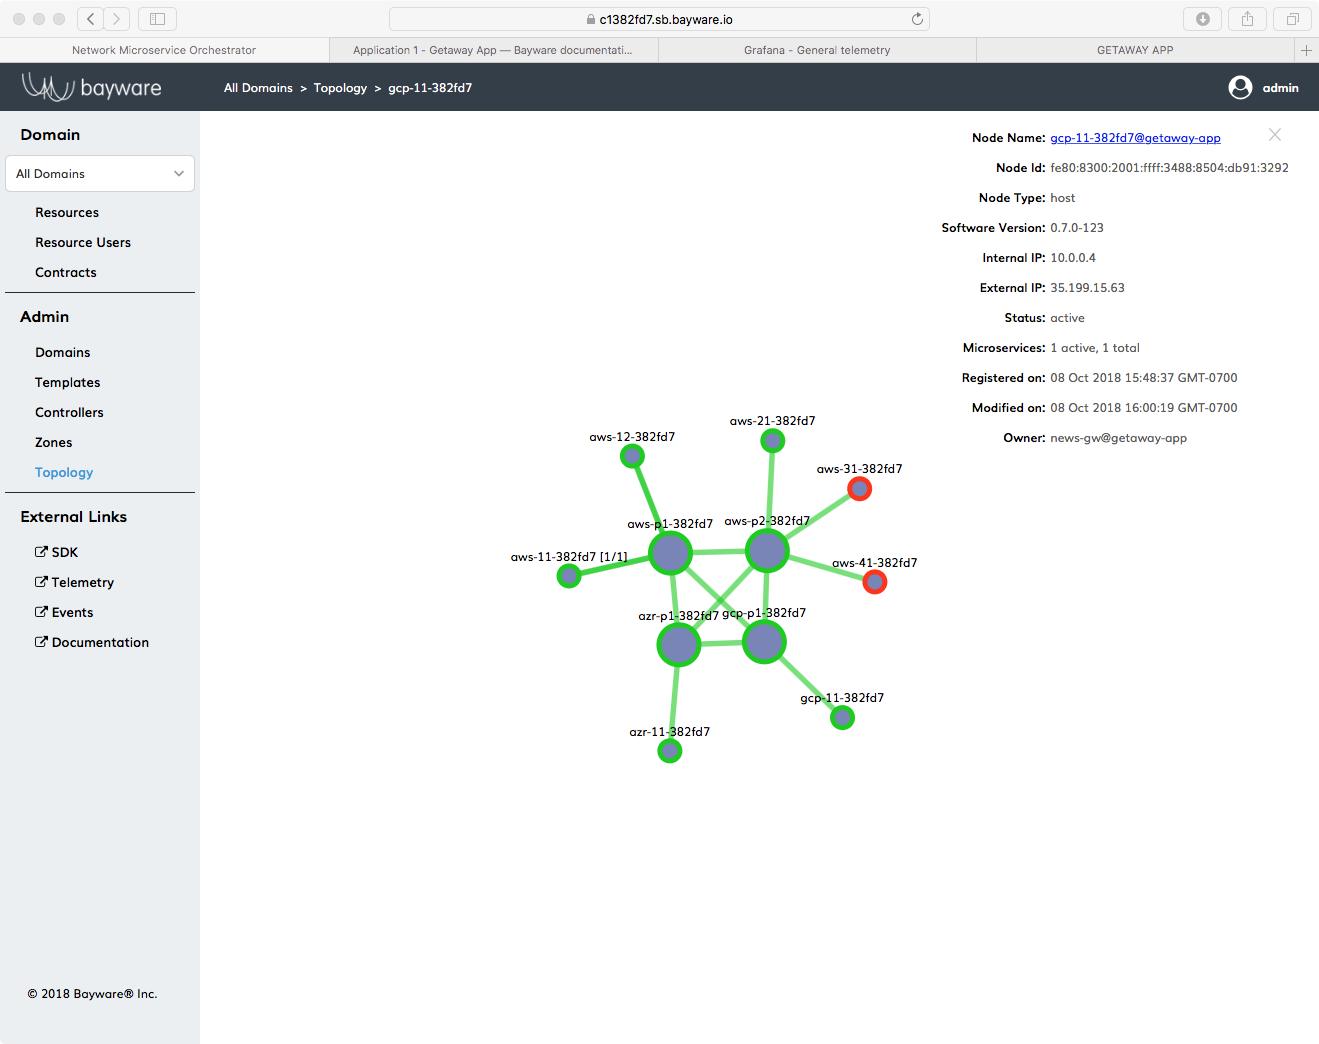
Fig. 41 Getaway App Topology with Two Red Workload Nodes
The orchestrator detected that the agents running on these two VMs were down and turned their circles red.
Now find the new workload node for news-gsw, gcp-11. Click on its circle in
the Topology window to show the overlay information as shown in
Fig. 41.
Note that the owner, shown at the bottom of the overlay information, is
now news-gw.
Verify that weather-gw now owns azr-11 by clicking on the
appropriate circle in the Topology and noting its owner.
On the App
If you still have Getaway App open in your browser, go back to that tab. Recall that you can find the URL for Getaway App at the top of your SIS.
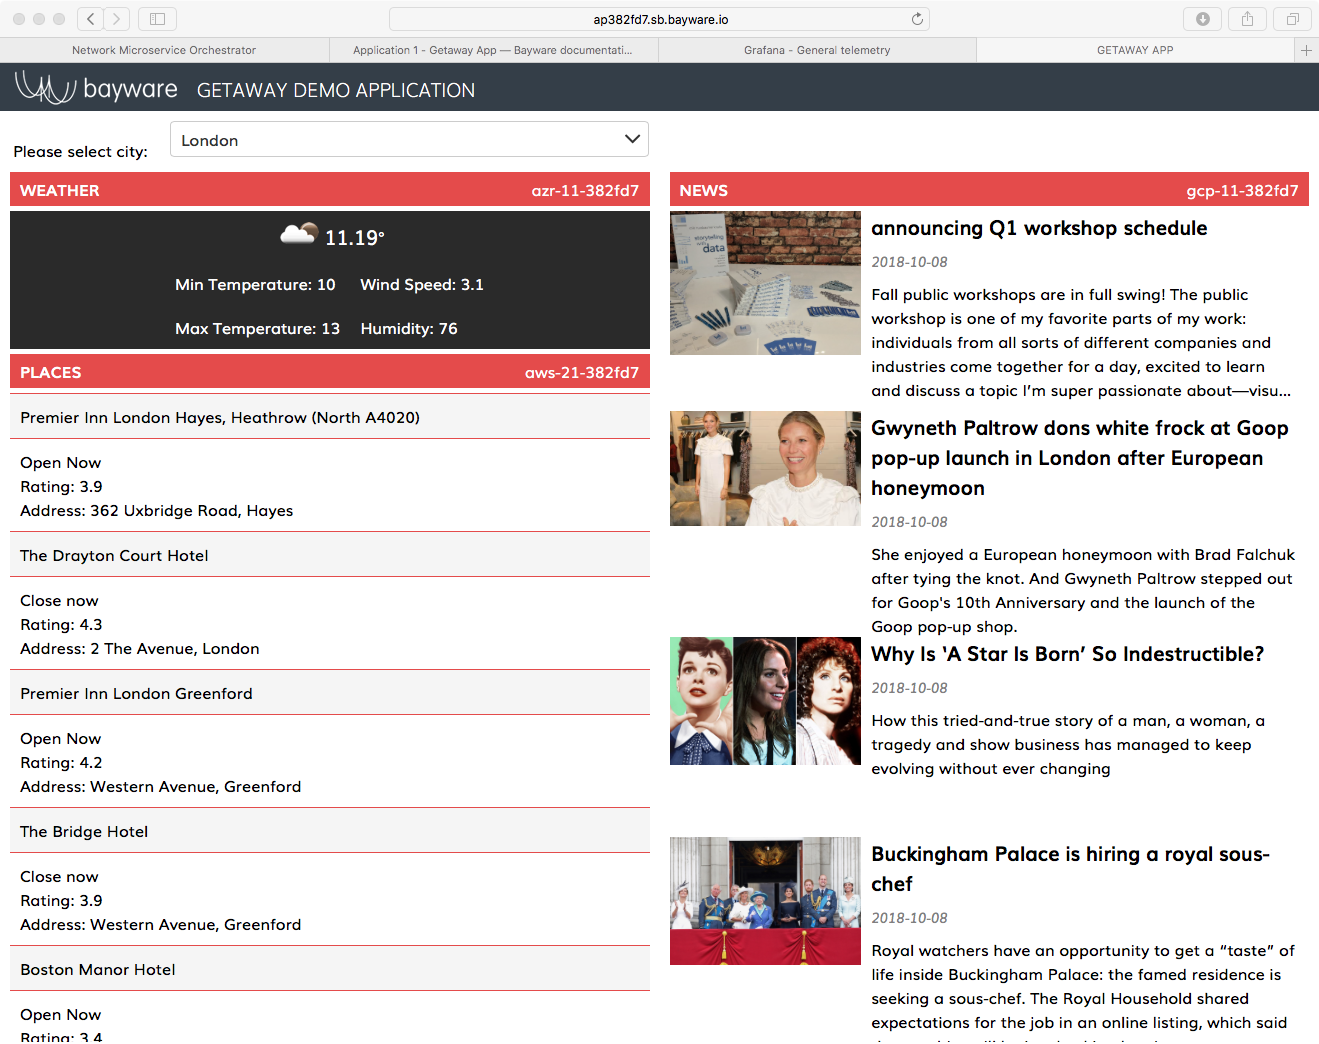
Fig. 42 Getaway App News & Weather On New VMs
The right end of each title bar shows the VM on which the particular
microservice is running. If all went well in the preceding steps, you should
see that NEWS running on gcp-11 and WEATHER running on azr-11 as
shown in Fig. 42.
Good (Secure) Housekeeping
There’s more work ahead and your CFO definitely isn’t going to approve a whole new set of virtual machines. So once you (and they) are done with Getaway App, let’s clean it up by removing agents and microservices. (Hold on to your service interconnection fabric processors, though. Those work quite nicely with any app.)
There’s a script for that.
Back on your Command Center, be sure you are logged in as centos and not
root. If you’re at your root prompt, simply type
]# exit
Ensure you are in your homedir by typing cd. You should now
be at a prompt that looks like
[centos@aws-bastion-382fd7 ~]$
Now type
]$ ./purge-apps.sh
But that’s not quite the end. All the workload nodes are now cleaned up i.e., ib_agent services and microservices have been stopped and deleted. But the orchestrator doesn’t forget so easily. If someone were to try to use one of your workload nodes for another microservice–even if he or she already had a new, valid set of orchestrator host owner credentials–the orchestrator would not recognize its credentials until the previous resource is deleted explicitly from the system.
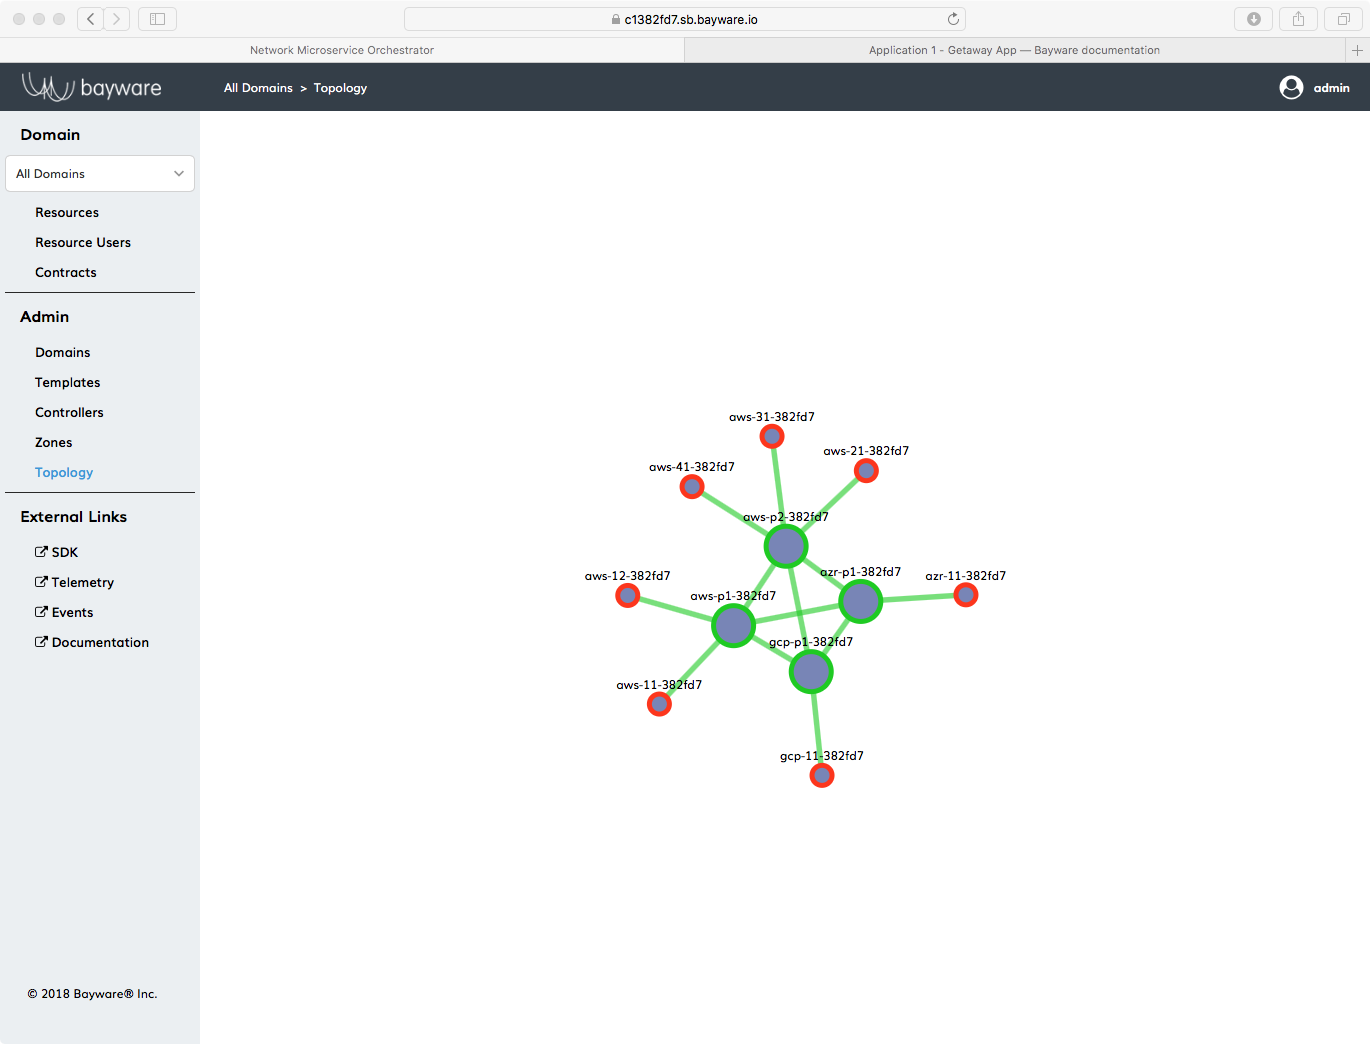
Fig. 43 Orchestrator Topology Showing Stopped Getaway App Workloads
Now go back to the orchestrator and click on Topology. You should see your service interconnection fabric with a bunch of red circles attached to it. Those are your stopped (deleted) agents from the Getaway App workloads as shown in Fig. 43.
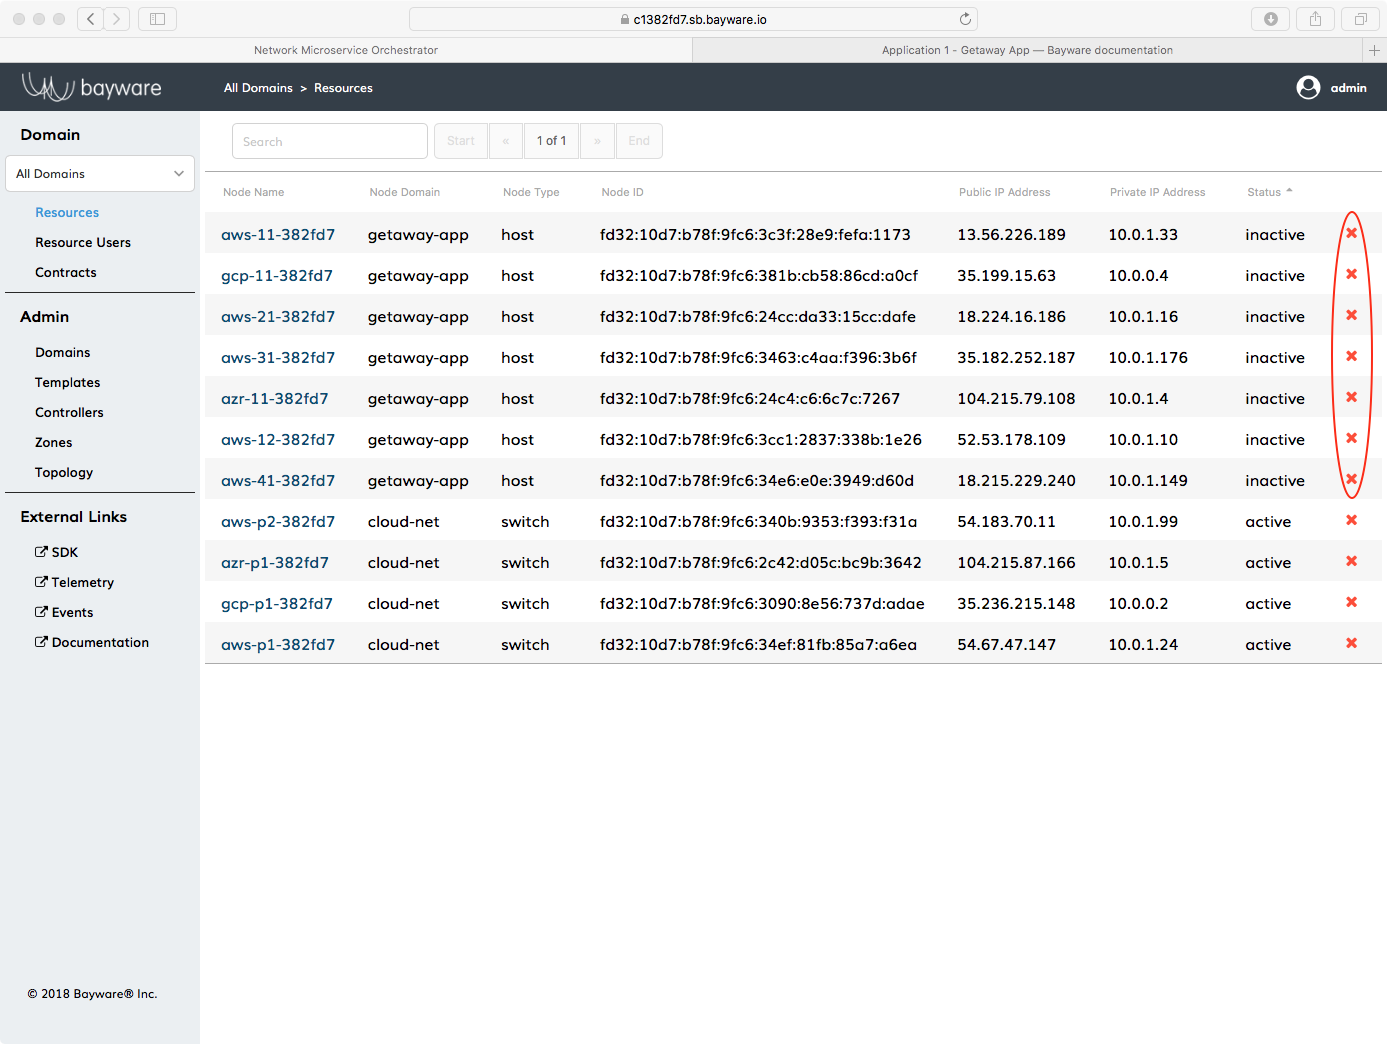
Fig. 44 Orchestrator Resources
You need to delete those red circles from the orchestrator. Do that by clicking
on Resources in the left-side navigation menu. Click on the column
header, Node Domain, to sort the rows and then click the red
x at the right end of each row that is part of the getaway-app
domain as shown in Fig. 44.
What you’re not deleting…
You are not going to delete resources of type switch. These refer to the four
processors you installed in SIF Deployment and can be
used with any app, including the Voting App coming up next.
You also will not delete any of the pre-populated configuration such as those under Resource Users and Contracts on the orchestrator. Recall that resource users and contracts simply describe your application’s service graph nodes and edges. If you decide to install your app again, that configuration will still be in place.
So as a final sanity check, navigate to the Topology page. It should look clean with only the original four processors in place.
Summary
In this section you learned how your application’s service graph maps to components in Bayware’s technology: service graph nodes map to host owners and service graph edges map to contracts. You went through the process of installing and configuring the microservices and agents required for Getaway App. With Getaway App up and running, you explored the Grafana telemetry UI. Finally, you created redundant nodes for news and weather and saw how Bayware technology automatically re-routed traffic when the original nodes became unavailable.
Next up: deploy Voting App using Ansible and insert a transit node into a contract…