Application 2 - Voting App
Containerized Microservices
Setting the Scene
So you’re developing a reputation within you’re company as the go-to DevOps engineer who can ensure quick and hiccup-free deployment of the company’s most important applications (the devs love this) and, yet, can respond quickly to changing pricing structures among the major public cloud providers (the CFO loves this). That super easy Getaway App deployment put you on the map.
But now the powers-that-be are upping the ante. The devs have written a quickie application to see if end users prefer working with Mesos or Kubernetes in their containerized environments. They call it Voting App. And true to its raison d’être, it’s containerized.
After the accolades of your last deployment, you decide Bayware is the way to go, containers and all. And the Voting App being a bit more involved, you decide to save yourself some typing by using Ansible for working with much of your hybrid cloud infrastructure.
A Word about Containers
Everybody’s doing it. And, they say, if they’re not doing it now, they will be doing it. Bayware knows this and that’s why our technology is designed with container support from the bottom up.
Just as a microservice running directly on a virtual machine may be composed of one or more packages (RPMs, say, in an RHEL environment), a containerized microservice may be composed of one or more container images. As long as the containers require the same roles and policy from the network, a simple, single Bayware daemon (the agent) attaches the containers to the Bayware service interconnection fabric through the Bayware interface just as it does for RPMs on a virtual machine.
Service Graph
Your devs have given you the following service graph so that you can get started setting up your host owners and contracts in the Bayware orchestrator.

Fig. 45 Voting App Service Graph
First, here’s how it works. There are two web pages that provide a GUI
interface to the Voting App. The first web page allows end users to vote for
either Mesos or Kubernetes as their preferred container management system.
Once the application is installed, it will be available on a URL similar to
https://ap382fd7.bayware.io/voting/vote. Recall that the URLs for your sandbox
are listed at the top of your SIS.
The voting web page is shown in Fig. 46.
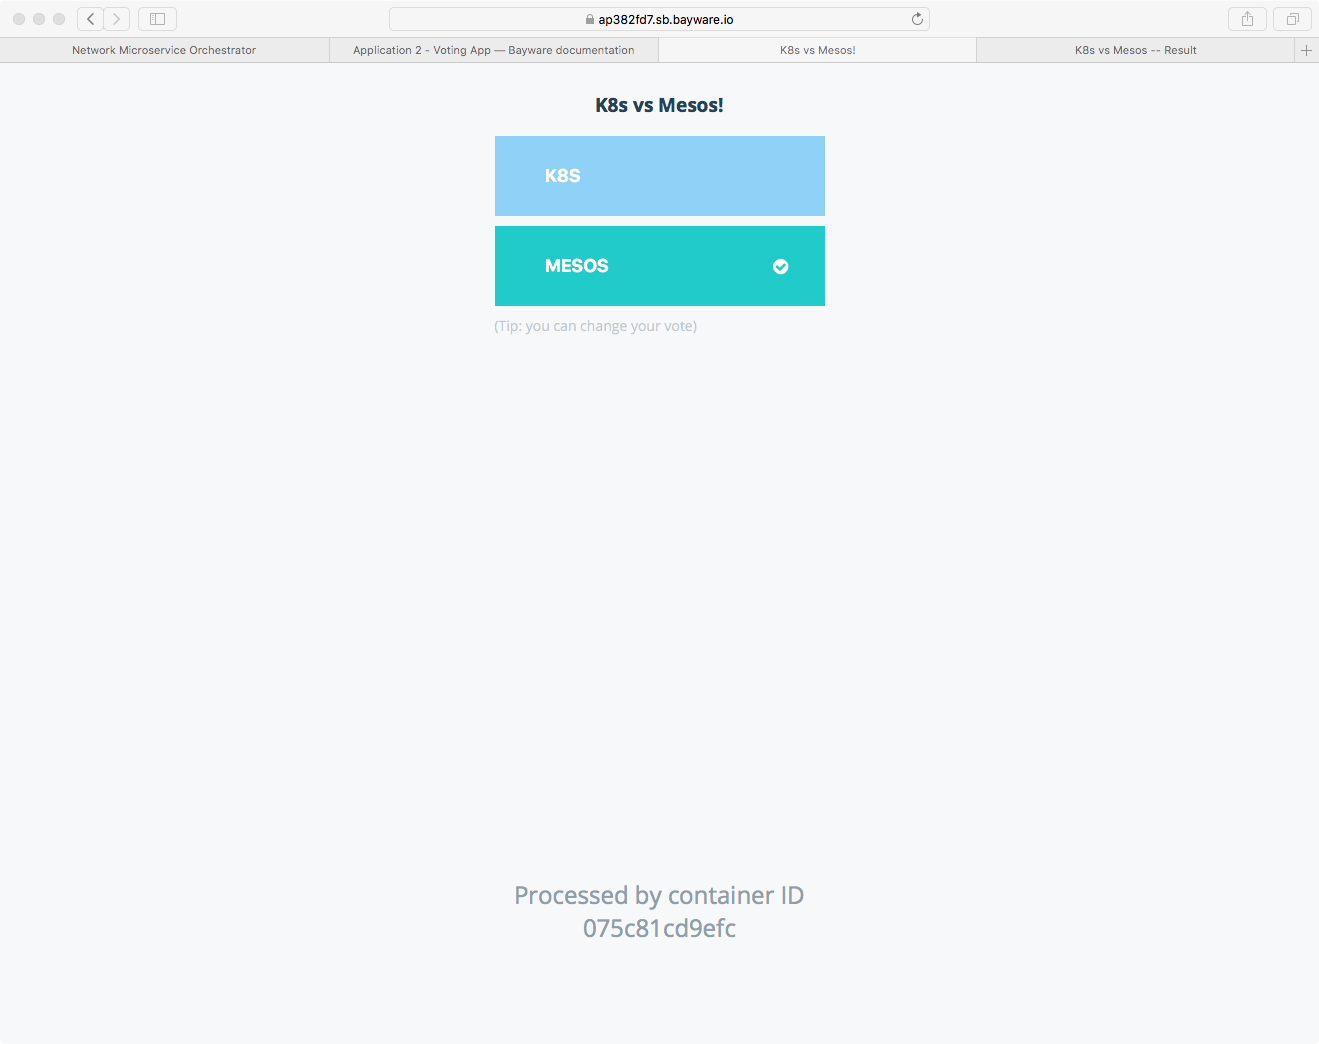
Fig. 46 Voting App Vote Interface in Browser
The second web page allows end users to see the aggregate result of all
previous voting. Once the application is installed, it will be available on a
URL similar to (https://ap382fd7.bayware.io/voting/result). Again,
check your personal SIS for the precise URL.
The result web page is shown in Fig. 47.
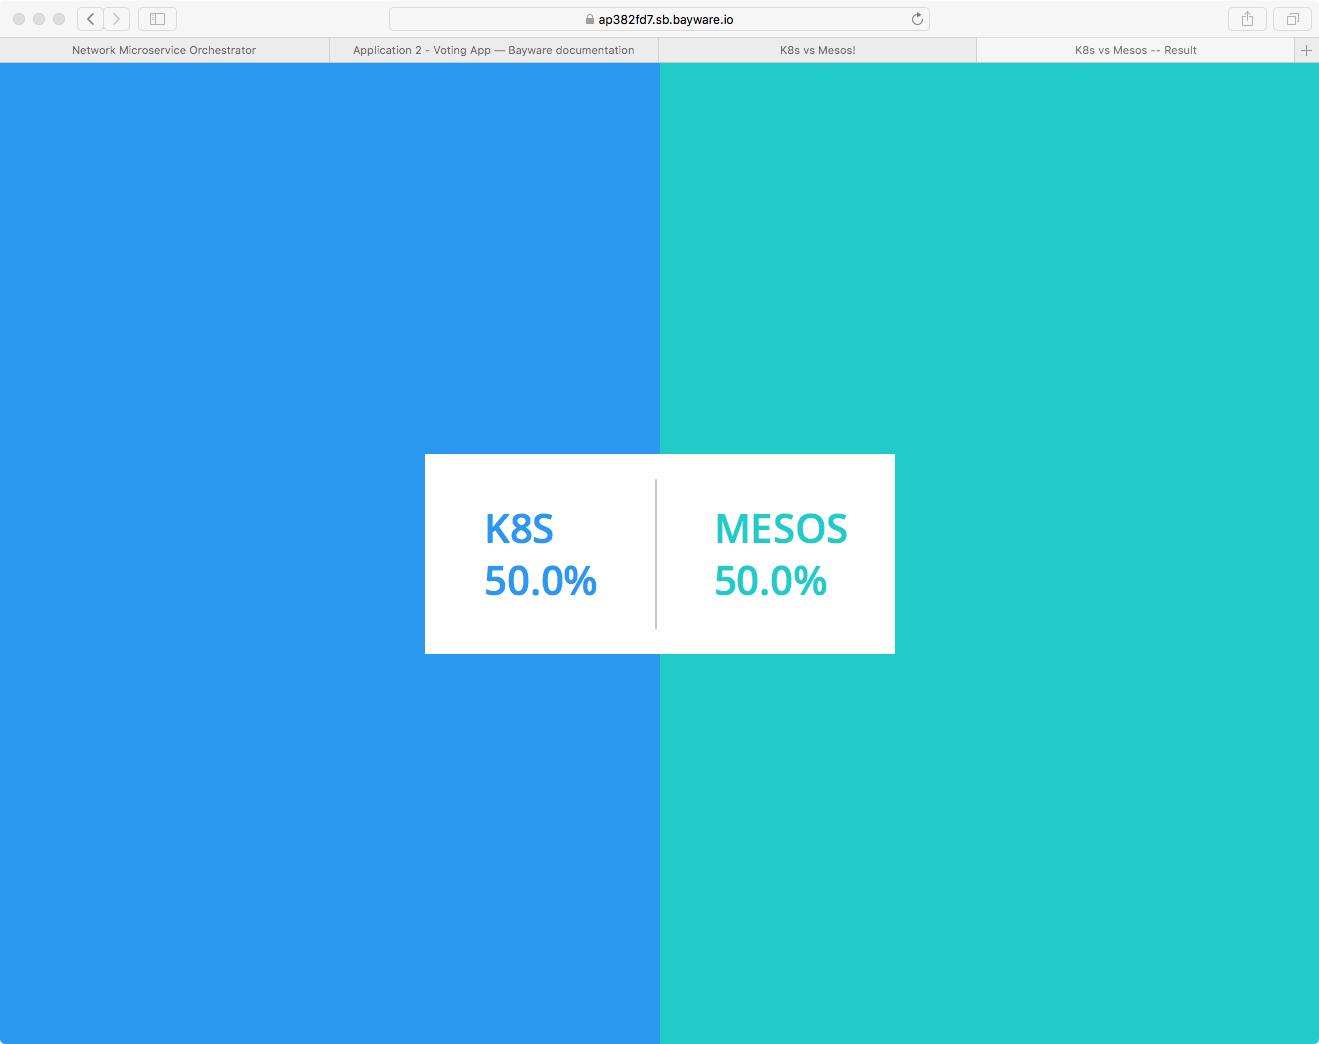
Fig. 47 Voting App Result Interface in Browser
Behind the scenes, the http-proxy microservice queries the voting-svc
and result-svc microservices to serve up the two aforementioned web pages
respectively.
On the back end, the voting-svc microservice writes cast ballots into the
in-memory database microservice called voting-db while the result-svc
reads tabulated results out of the postgres database microservice called
result-db. The worker microservice, meanwhile, reads the cast ballots
from voting-db, crunches the numbers, and writes the tabulated results to
result-db.
Nodes & Host Owners
Recall from the Nodes & Host Owners discussion in Getaway App that service graph nodes map to host owners in the Bayware service interconnection fabric.
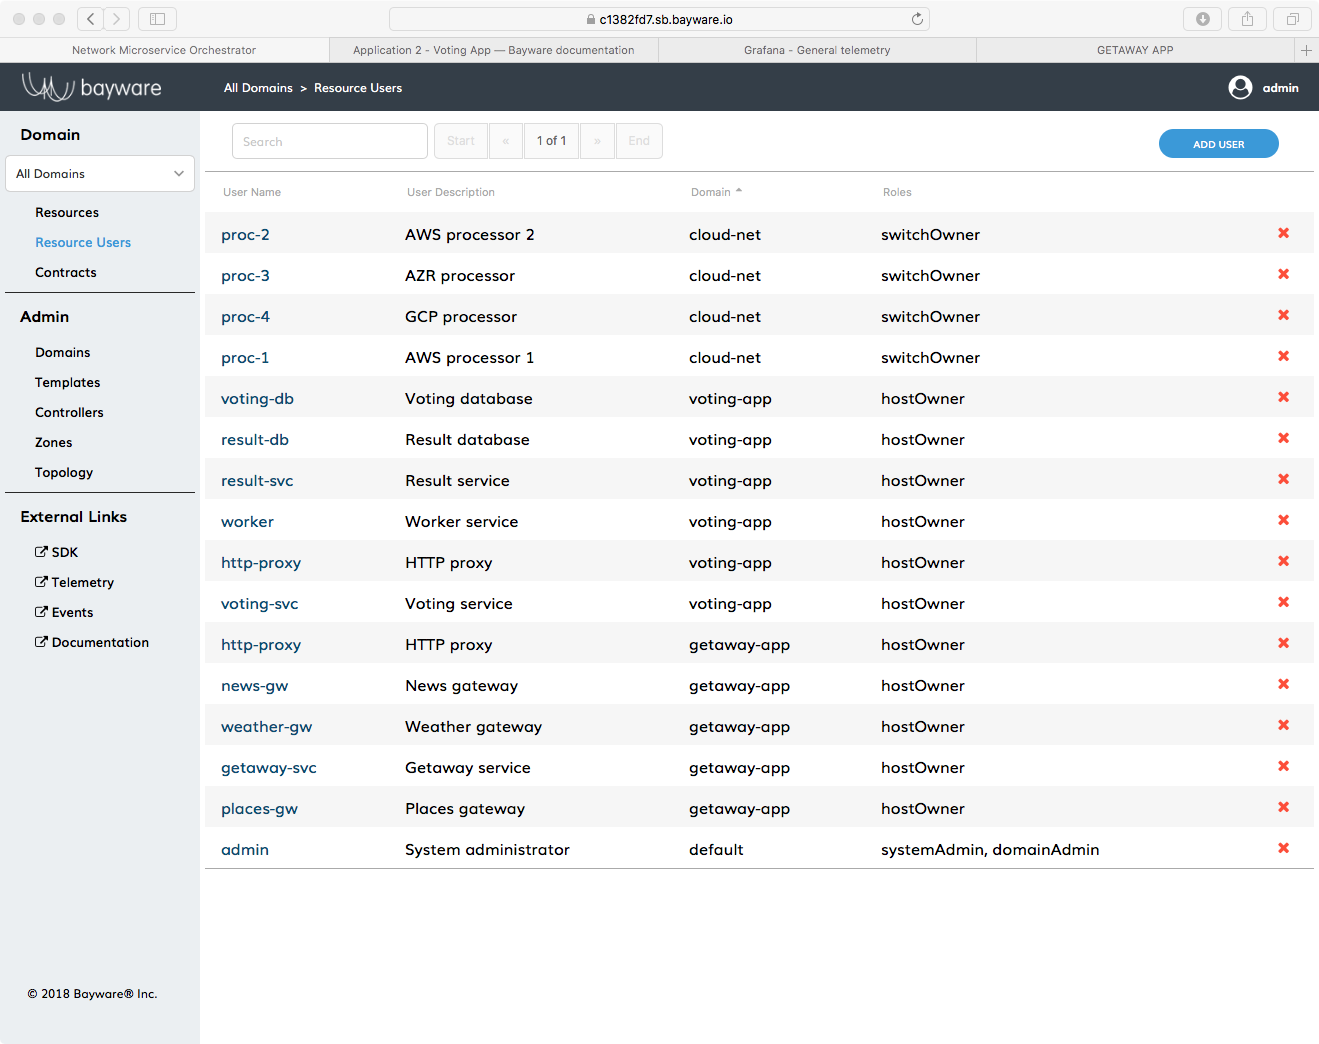
Fig. 48 Resource Users in the Orchestrator
Go back to the orchestrator tab in your browser and click Resource
Users in the left-side navigation bar. As shown in
Fig. 48, you should find six hostOwner
resource users pre-populated that are part of the voting-app domain. (Note
that Resource Users from other domains are also visible.) They
are
http-proxyvoting-svcvoting-dbresult-svcresult-dbworker
The six host owner names map one-to-one with the six microservices shown in Fig. 45. During the installation process described in the next section, consult rows 28 through 33 in the table in your SIS for the passwords associated with the host owner usernames shown above.
Edges & Contracts
In the Edges & Contracts discussion in Getaway App, we defined the communicative relationships (edges) between microservices (nodes) as Contracts.
From Voting App service graph shown in Fig. 45, note that there are six communicative relationships between microservices (six edges).
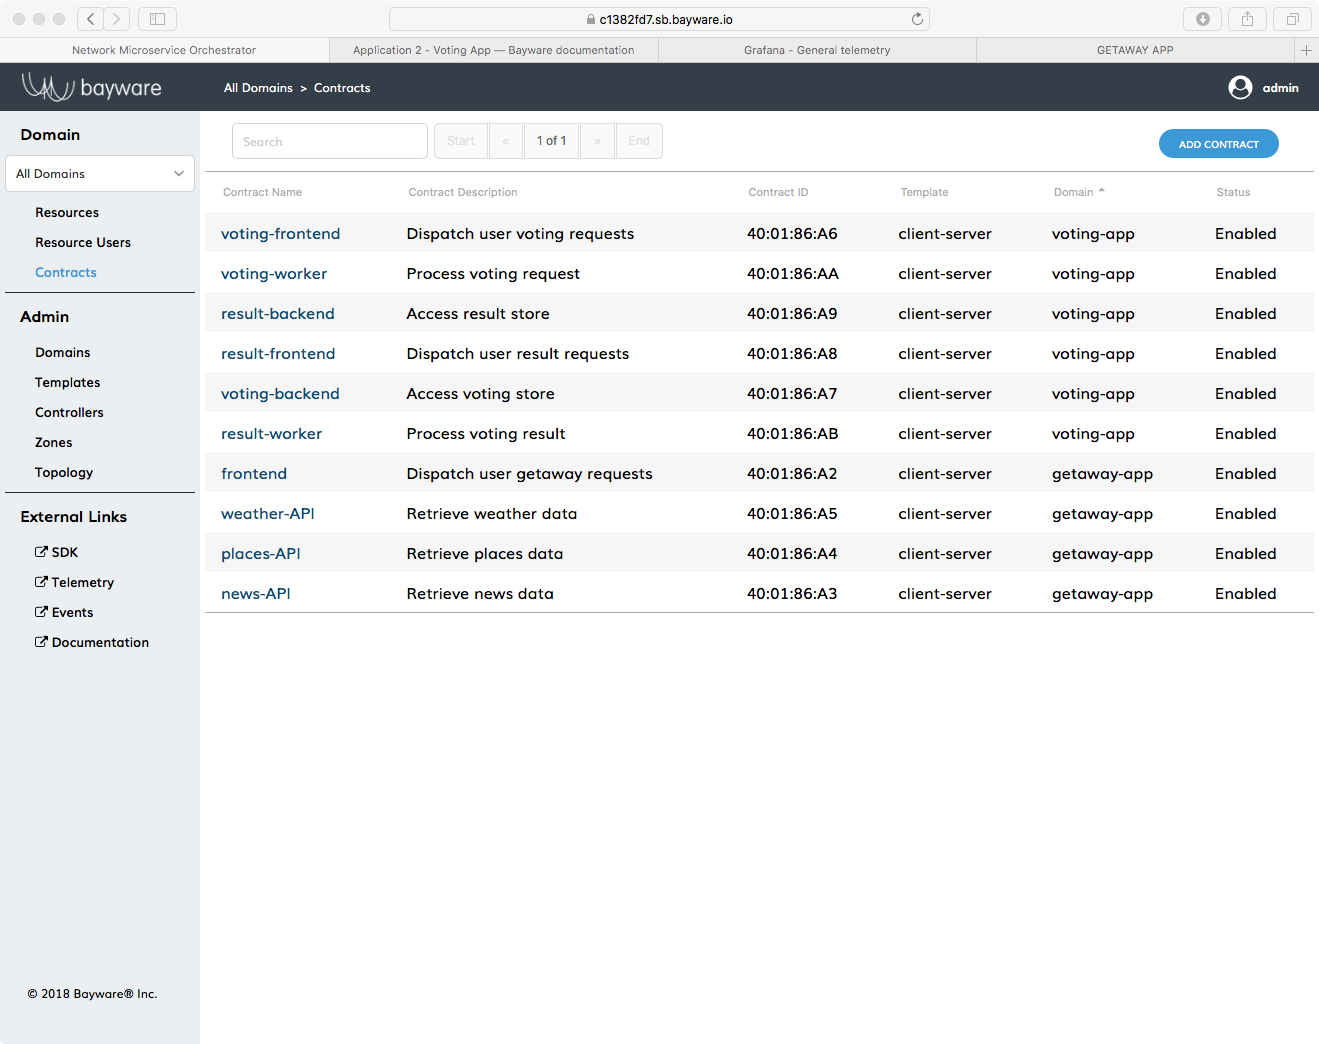
Fig. 49 Contracts in the Orchestrator
You can check out the contracts relevant to Voting App back on the orchestrator
(see Fig. 49). Return to the tab in your browser that has the
orchestrator GUI open and click on Contracts in the left-side
navigation bar. Look for the Contract Names that reside in the
voting-app domain. They are
voting-frontendresult-frontendvoting-backendresult-backendvoting-workerresult-worker
As with the Getaway App, you can explore the relationships between contracts and microservices (host owners) by clicking on a contract name in your browser and then on a Role Name in the list at the bottom of the Contract page that comes up. Among other things, the Role page’s User Access List shows connected microservices.
The contract roles in the Voting App are assigned as follows
| Contract Name | Client Role | Server Role |
|---|---|---|
| voting-frontend | http-proxy | voting-service |
| result-frontend | http-proxy | result-service |
| voting-backend | voting-service | voting-db |
| result-backend | result-service | result-db |
| voting-worker | worker | voting-db |
| result-worker | worker | result-db |
Authentication, Registration, & Microcode
One of the great things about Bayware technology is that you, the devOps engineer, do not have to fret the details. You simply set up your host owners and contracts in the orchestrator based off the service graph you get from your devs and then you’re ready for app deployment.
That is, all the behind-the-scenes details discussed during the Getaway App installation, like authentication, registration, and microcode applies equally here to the Voting App container environment. So feel free to go back and review and, when you’re ready, onward to installation.
Installation with Ansible
The Script
Fig. 50 shows a familiar picture of your service interconnection fabric with attached workload nodes. Microservices for Voting App are highlighted in red.
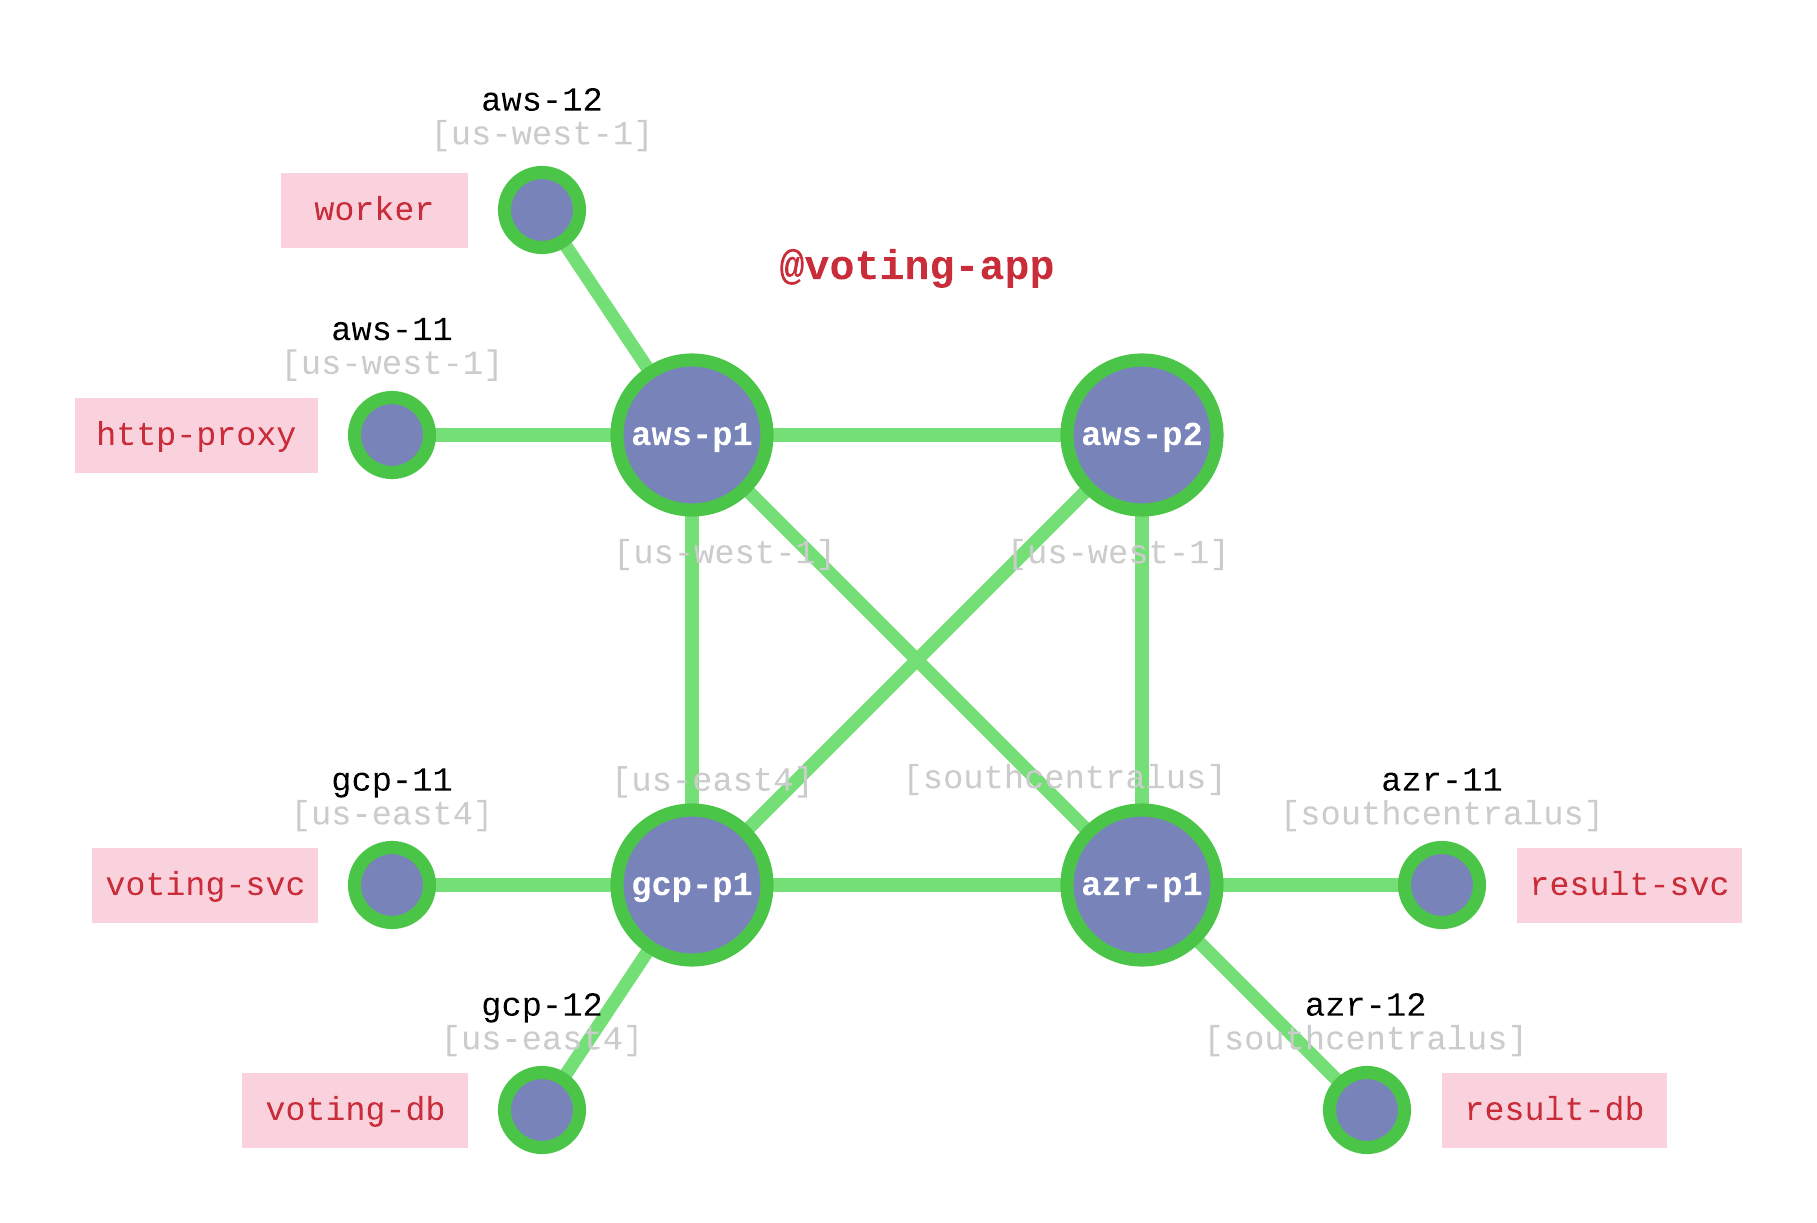
Fig. 50 Voting App Deployment on the Interconnection Fabric
Table 6 shows the VM on which each microservice will be deployed. Note that this table does not specify the service unit (microservice executable) as in Getaway App. The Ansible script knows those details so none of that typing is required.
| Microservice | VM |
|---|---|
http-proxy |
aws-11 |
worker |
aws-12 |
voting-svc |
gcp-11 |
voting-db |
gcp-12 |
result-svc |
azr-11 |
result-db |
azr-12 |
Microservice deployment and agent configuration all happen using a script that you can find on your Command Center. So start by opening a terminal window on your local computer and use SSH to log in to your Command Center.
You won’t need super-user privileges to run the Ansible script so you can do everything from
[centos@aws-bastion-382fd7 ~]$
Since you just logged in, you should be in the user centos home directory.
Ensure the script is present by typing
[centos@aws-bastion-382fd7 ~]$ ls -alt deploy-voting-app.sh
This should give you output similar to
-rwxr-xr-x. 1 centos centos 2343 Oct 4 20:46 deploy-voting-app.sh
Of course, the time stamp may be different. If you’re in the wrong spot or
the script has disappeared from your system, the ls command above
will respond with something that says No such file or directory. If that
happens, ensure you’re in your home directory by simply typing cd at
the prompt and then try the ls again.
Now that you’re on your control center and you’ve confirmed the presence of the script, you only need to repeat two steps for each Voting App microservice to get full application deployment.
- Run script specifying host owner and VM for one microservice
- Repeat 1 and 2 for remaining microservices
Step 1: Run Script
Let’s start by deploying http-proxy.
Table 6 indicates you should put this on
aws-11. Enter the following at your prompt
]$ ./deploy-voting-app.sh --hostowner=http-proxy --virtualmachine=aws-11
After you press return, the script will determine the correct domain
and password for http-proxy, install the correct container image on
aws-11, and register the agent with orchestrator.
Step 2: Repeat
Well, that definitely saved some typing. So give it a shot with the remaining
five microservices and the corresponding virtual machines listed in
Table 6. After you execute deploy-voting-app.sh
five more times, everything should be deployed.
CHEAT SHEET - VOTING APP INSTALL

hint:  use elements in the list [] below for each iteration

]$ ./deploy-voting-app.sh --hostowner=worker --virtualmachine=aws-12
    hint: [ ( worker, aws-12 ), ( voting-svc, gcp-11 ), ( voting-db, gcp-12 ), ( result-svc, azr-11 ), ( result-db, azr-12 ) ]
Back at the Orchestrator
Now go back to your browser window that has the orchestrator open. Click on the Topology button on the left-side navigation menu. You should see the four large, green circles that represent Bayware processors as well as smaller circles labeled with the host names of the workload nodes.
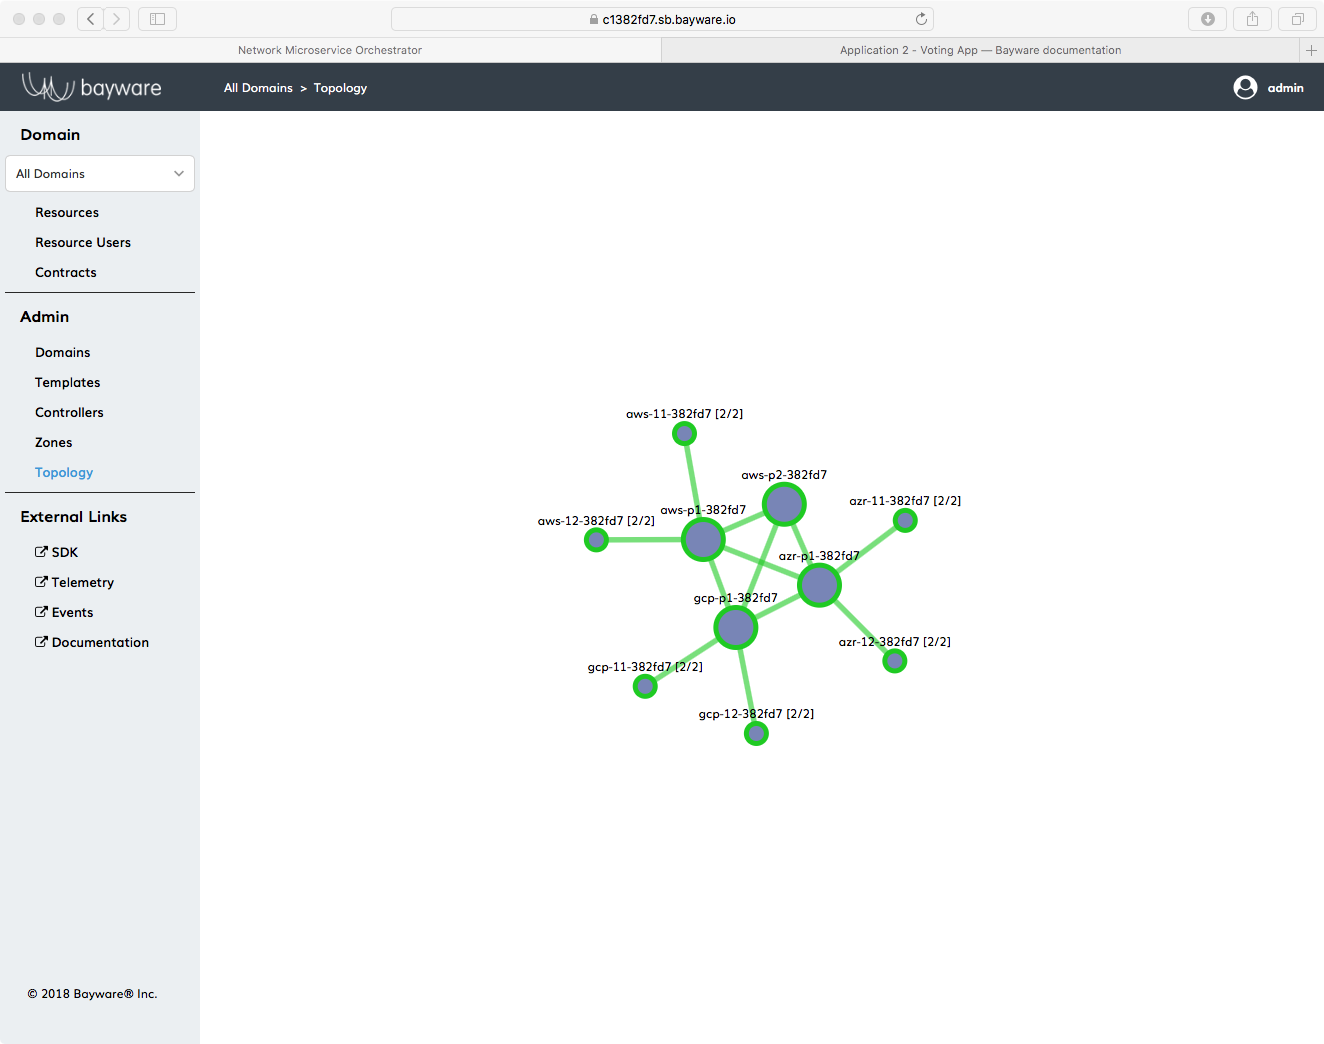
Fig. 51 Orchestrator Topology After Voting App Deployment
Find the host names used during Voting App deployment. If you click on a host
name, you’ll see overlay information about the node. The last item in the
overlay information is Owner. This should correspond to the host
owner of each microservice–which, in this setup is the same name as the
microservice listed in Table 6–and the
voting-app domain.
Service Graph Revisited
Just as you saw with Getaway App, the orchestrator generates a service graph based off the host owners and contracts that have been added to the system. That way you can sanity check that the information you entered matches the service graph given to you by your devs.
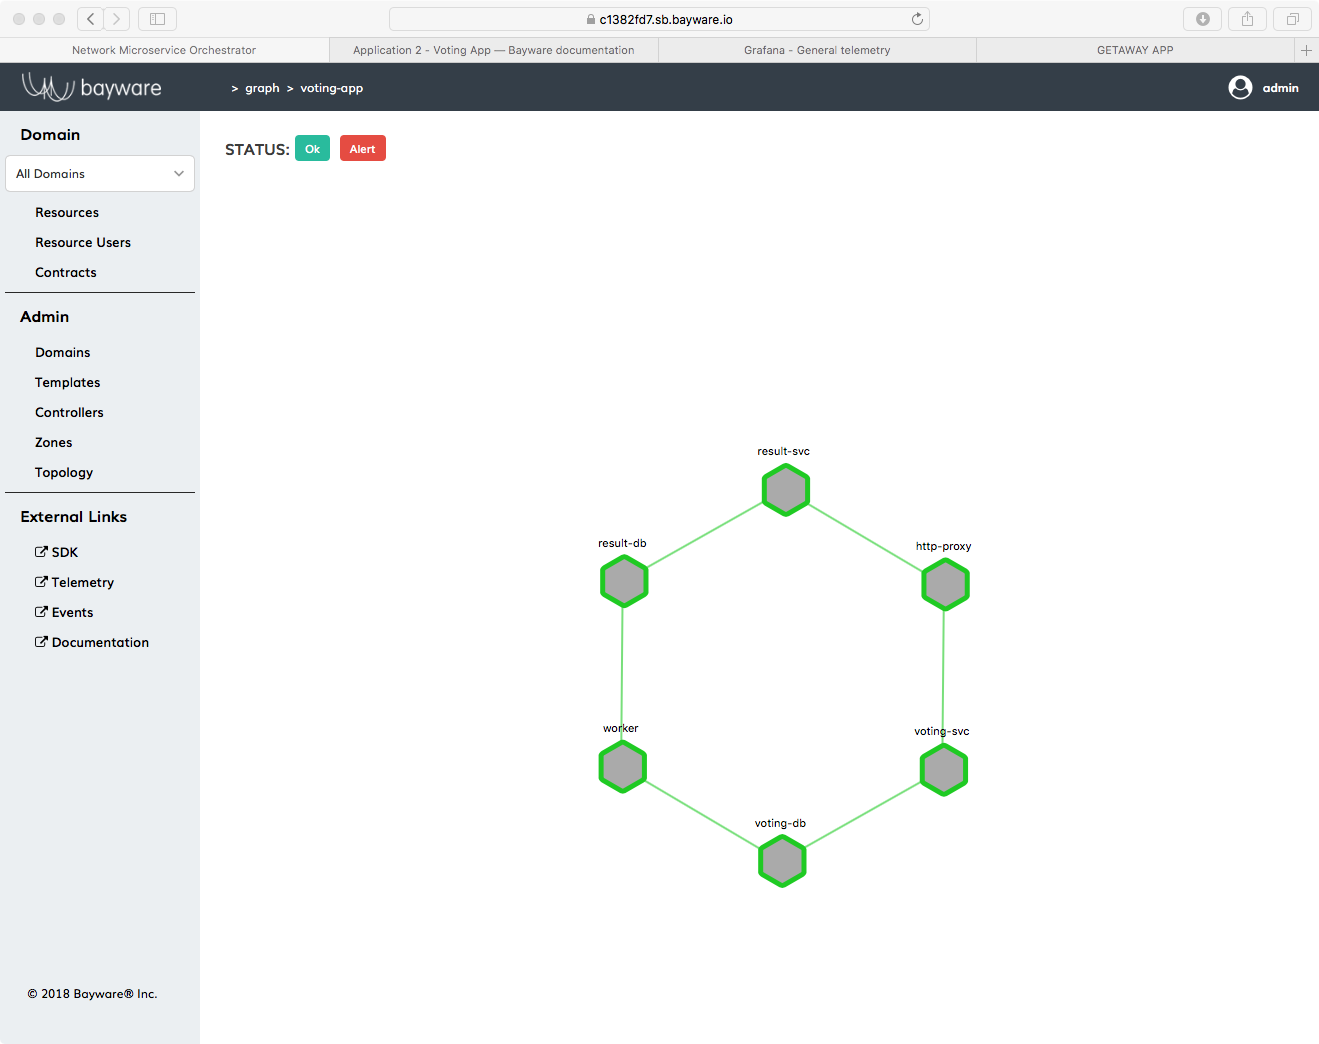
Fig. 52 Voting App Service Graph Generated By Orchestrator
Back on the orchestrator, click on Domains in the
left-side navigation menu. Of the four domain names that are displayed, now
click on voting-app. At the bottom of the voting-app domain window,
click on Domain Topology. You should see Voting App service graph
recreated by the orchestrator as shown in Fig. 52.
Vote
Before you go back to your devs and report on the successful deployment of Voting App, you should… VOTE!
You can find the URLs for the voting application at the top of your SIS. Open a new browser tab and type in the URL that ends in
/voting/vote. You should see a window similar to
Fig. 53.
Fig. 53 Voting App - The Vote Web Page
Choose your favorite container management system and then open another browser
window and type in the URL from your SIS that ends in
/voting/result. You should see the results of the voting similar to
Fig. 54.
Fig. 54 Voting App - The Result Web Page
If you don’t like the result, just go back to the vote page and cast your ballot again. The new tally is reflected on the result page.
Congratulations! You voted and–if you voted often enough–your favorite management system won.
That’s it!

Go back to your devs, tell them that Voting App is deployed in a hybrid cloud environment, and buttoned up with Bayware’s innovative security and policy enforcement tools. Just don’t tell them how easy it was. Anyway, rumor has it that they’re cooking up some new intrusion detection system to ensure one-person ⟶ one-vote and they’re going to ask you to deploy it.
Carry on.
Use Case - Transit Nodes
Once the higher-ups got the secOps team involved, everything went top secret. But
word came down that they had someone install something on aws-p2 and
they needed you to ensure that all traffic moving in either direction between
http-proxy on aws-11 and voting-svc on gcp-11 now go through
aws-p2 as a transit point.
Bayware’s got you covered.
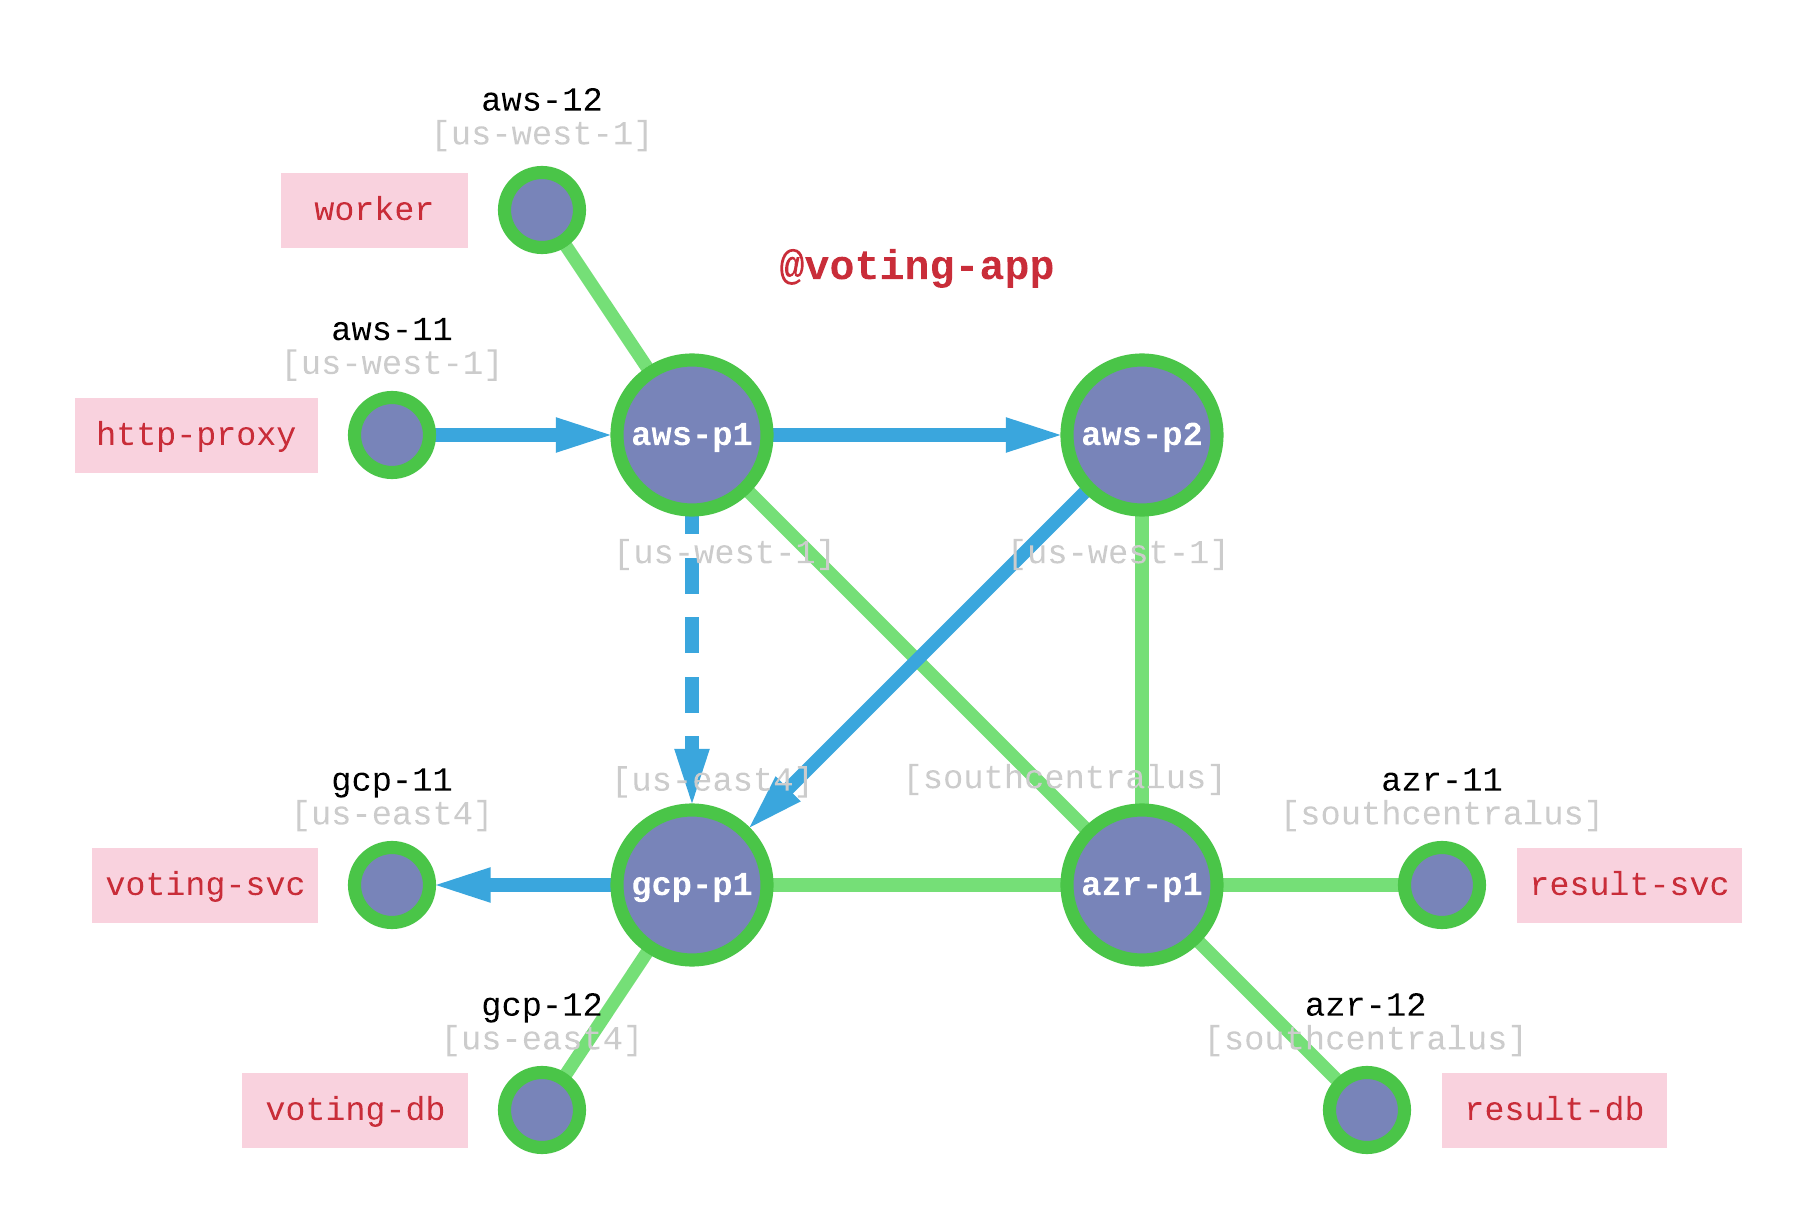
Fig. 55 Voting App Transit Node
Fig. 55 shows a dotted line between aws-p1 and gcp-p1 that indicates
the shortest path to move traffic from http-proxy to voting-svc. Without any
other restrictions, Bayware’s technology finds shortest paths between agents using
Dijkstra’s algorithm. Sending traffic through aws-p2 as a transit node between
these two point requires a slight modification to the communicative relationship between
http-proxy and voting-svc. Recall that in Bayware’s technology, communicative
relationships between nodes are represented by the edges in a service graph. Edges
are described with Bayware contracts. If you refer back to Voting App Service Graph, you will note
that the contract between http-proxy and voting-svc is called voting-frontend.
You will need to add a transit point into this contract.
But first, we’ll make sure that aws-p2 isn’t doing much right now. Without jumping
too far into the weeds, let’s take a look at a couple stats in Open vSwitch (OVS)
on aws-p2. Recall that a Bayware processor is composed of two pieces: the
Bayware engine (control plane) and OVS (data plane). When the engine processes
control packets, it updates rules inside OVS. OVS stores rules in tables.
- Two tables are relevant to this exercise
- Table 30: aggregates all non-control packets
- Table 50: filters all packets at the flow level
As shown in Fig. 55, your current Voting App installation does not
utilize aws-p2 at all.
Go back to your terminal window and be sure you’re logged into Command Center.
Now log into aws-p2 and become root:
[centos@aws-bastion-382fd7 ~]$ ssh centos@aws-p2
[centos@aws-p2-382fd7 ~]$ sudo su -
[root@aws-p2-382fd7 ~]#
Read OVS table 50
]# ovs-ofctl dump-flows ib-br table=50
You should see an empty result that looks like
NXST_FLOW reply (xid=0x4):
Table 50 is updated dynamically by the engine. When a new flow is introduced at this processor node, new rules are created in Table 50.
Now read OVS table 30
]# ovs-ofctl dump-flows ib-br table=30
You should see two entries similar to
NXST_FLOW reply (xid=0x4):
cookie=0x3066303030303537, duration=87124.231s, table=30, n_packets=0, n_bytes=0, idle_age=65534, hard_age=65534, priority=1500,ipv6,ipv6_dst=fd32:10d7:b78f:9fc6::/64 actions=resubmit(,40)
cookie=0x3066303030303537, duration=87124.231s, table=30, n_packets=57, n_bytes=11202, idle_age=3660, hard_age=65534, priority=1200,ipv6,ipv6_dst=ff3c::/32 actions=resubmit(,50)
Table 30 entries are created during node registration and act as a catch-all for all data packets.
The second table row is particularly important as it counts all IPv6 SSM packets, which just happens
to be how Bayware packets move around a network. In the example above, remember that n_packets=57.
Your number of packets will differ, but just remember whatever baseline is.
To convince yourself that nothing is happening on aws-p2, read Table 30 multiple times. The value
in the n_packets field should not change.
Now let’s bring aws-p2 into the equation. Modification of the
voting-frontend contract is all done at the orchestrator.
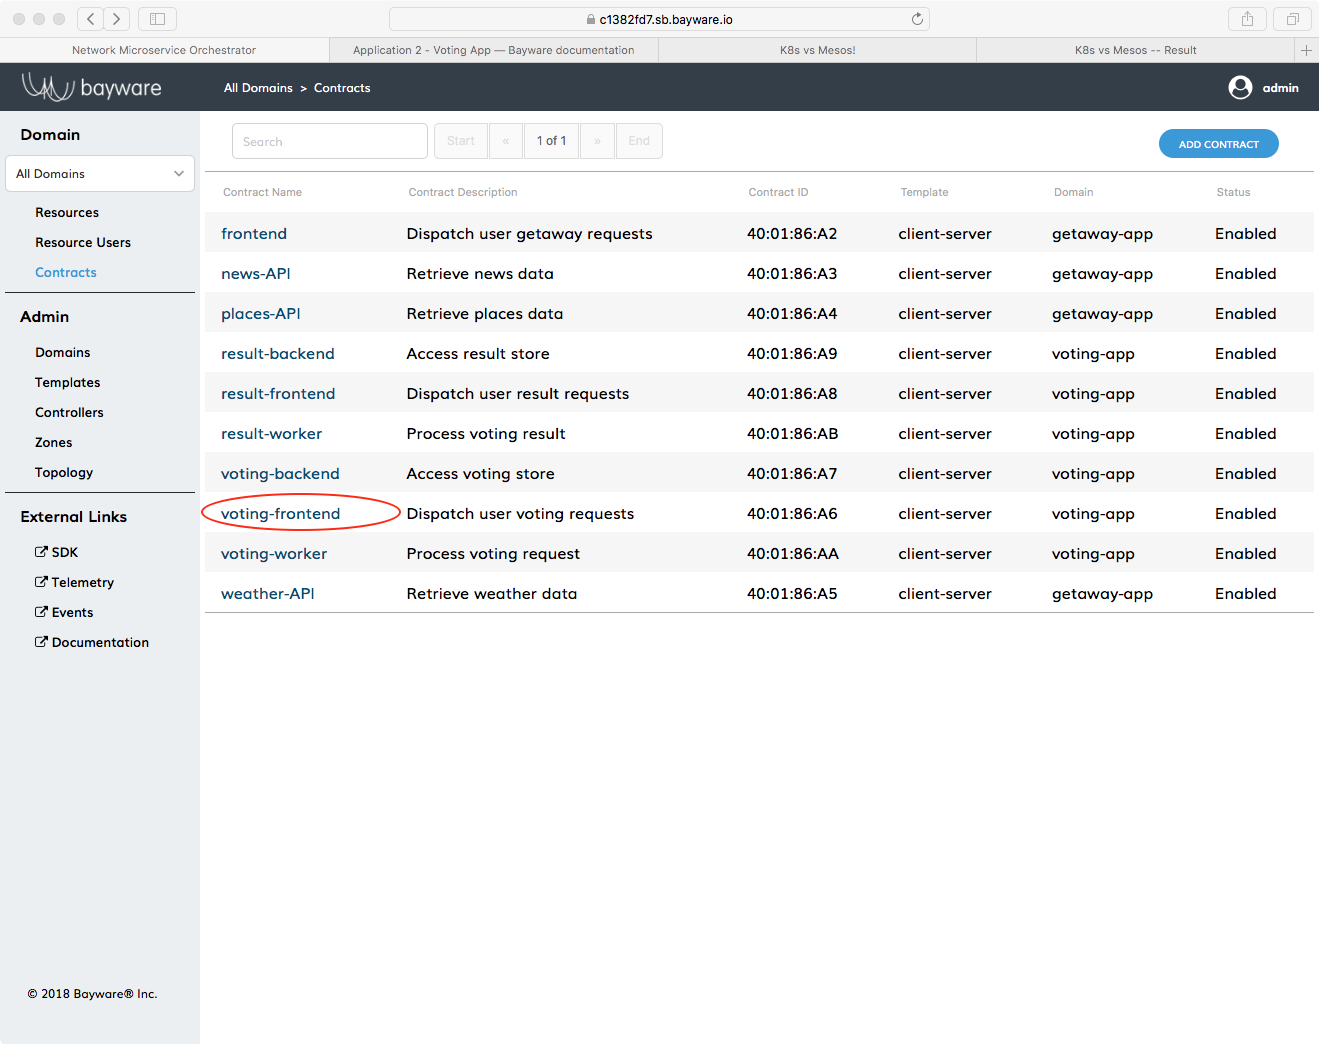
Fig. 56 Click on voting-fronted Contract
Start by clicking the Contracts button on the orchestrator and then click on the
voting-frontend contract as shown in Fig. 56.
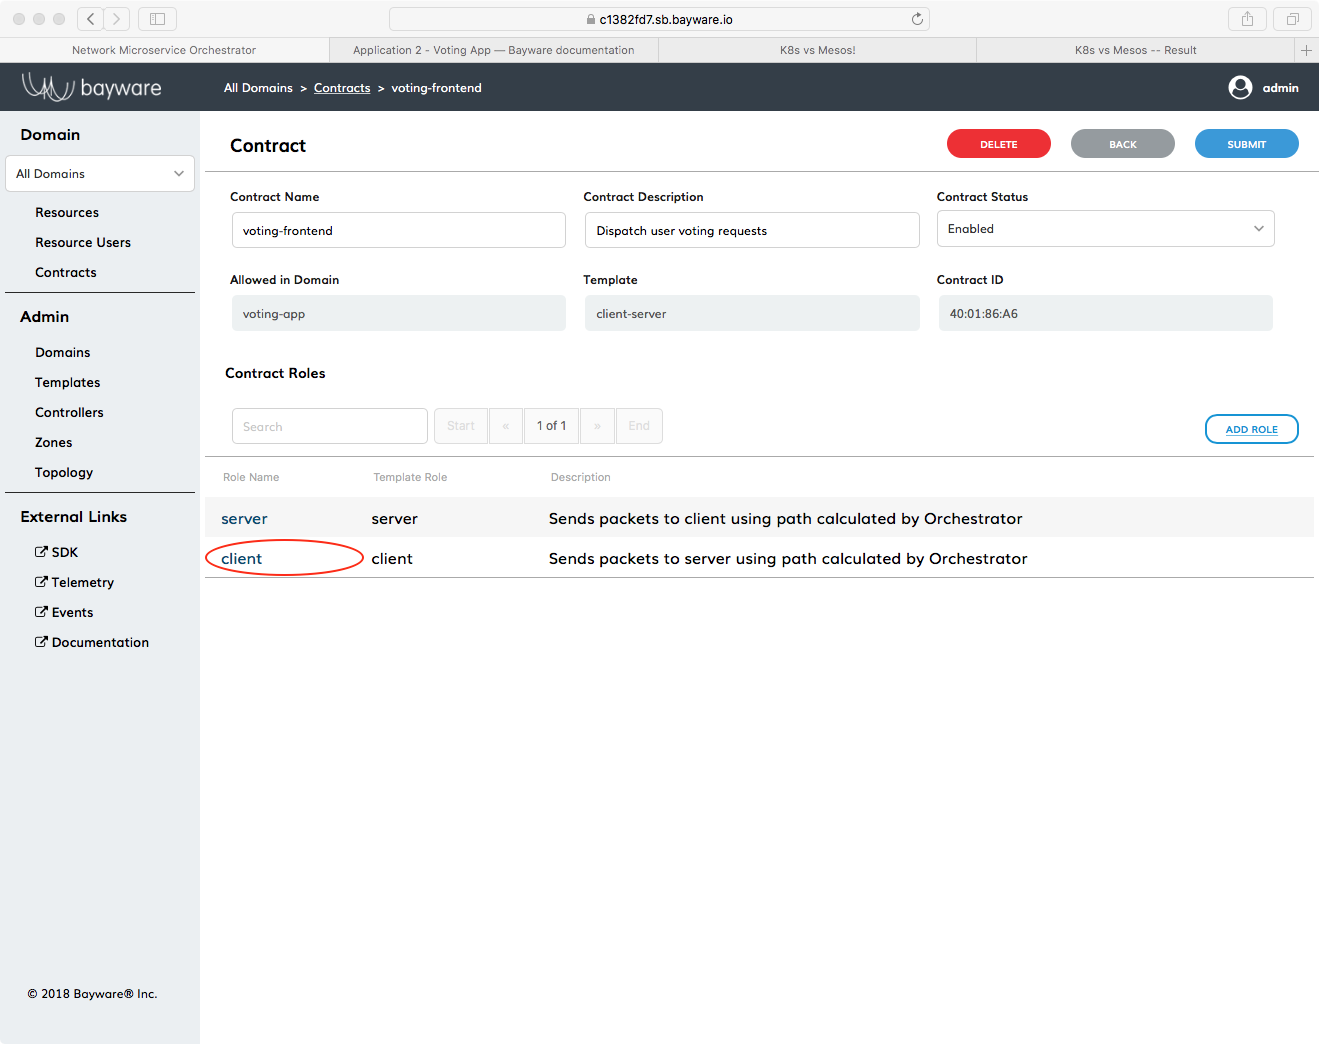
Fig. 57 Click on Client Role
First you’ll edit the contract’s client role–but pay attention because you’ll need to modify the server role later. Click on client under Role Name near the bottom of the window.
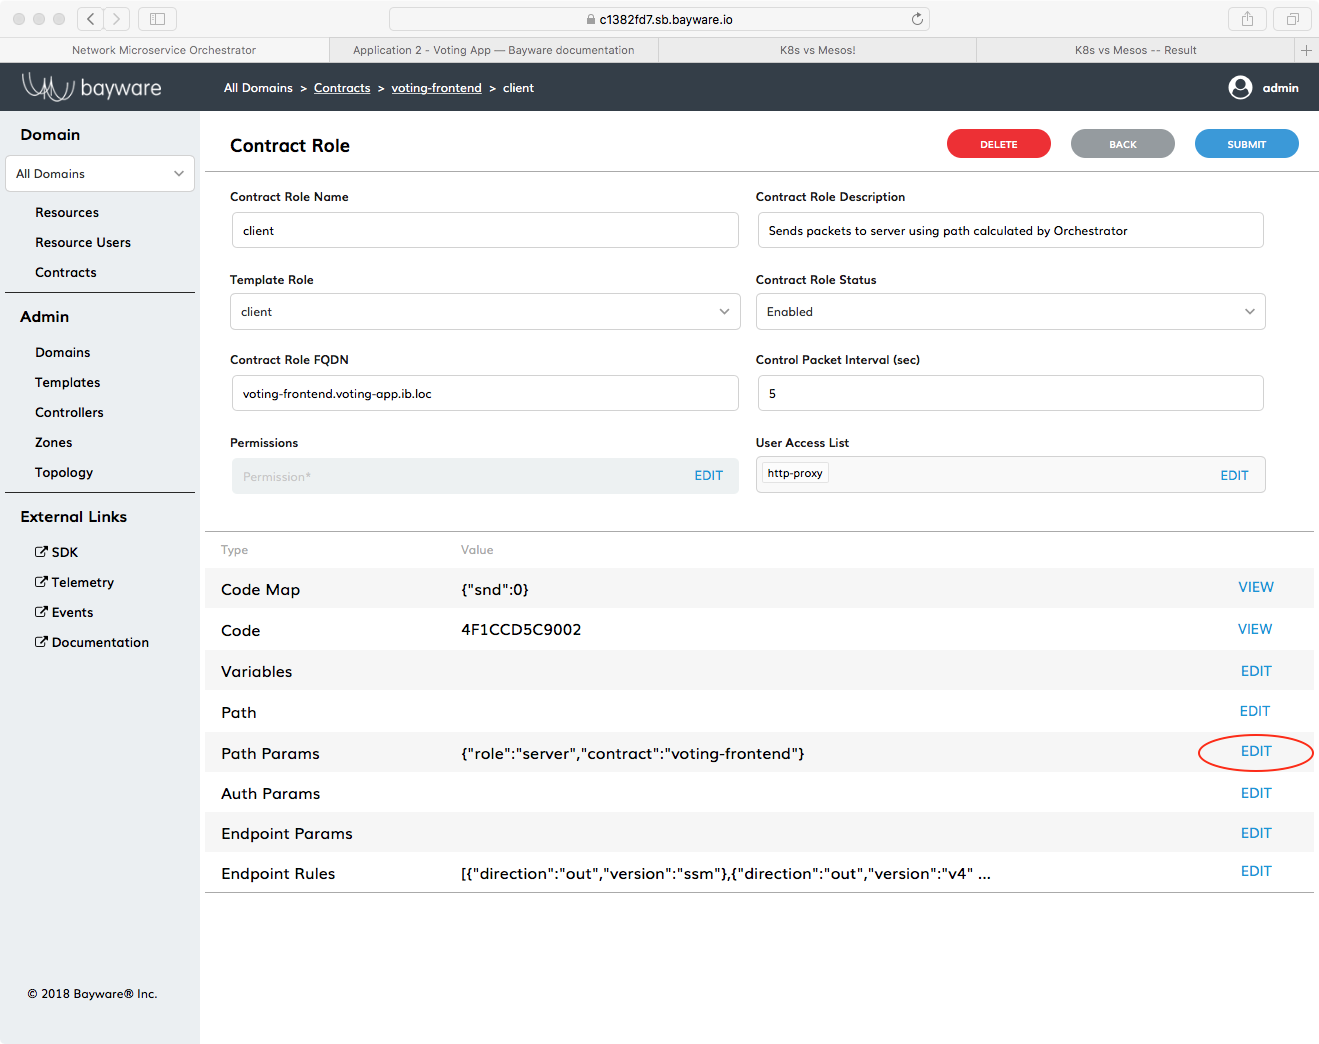
Fig. 58 Click on Edit Next to Path Params
Now click on EDIT in the Path Params row. You’ll be inserting the transit node into the path parameters.
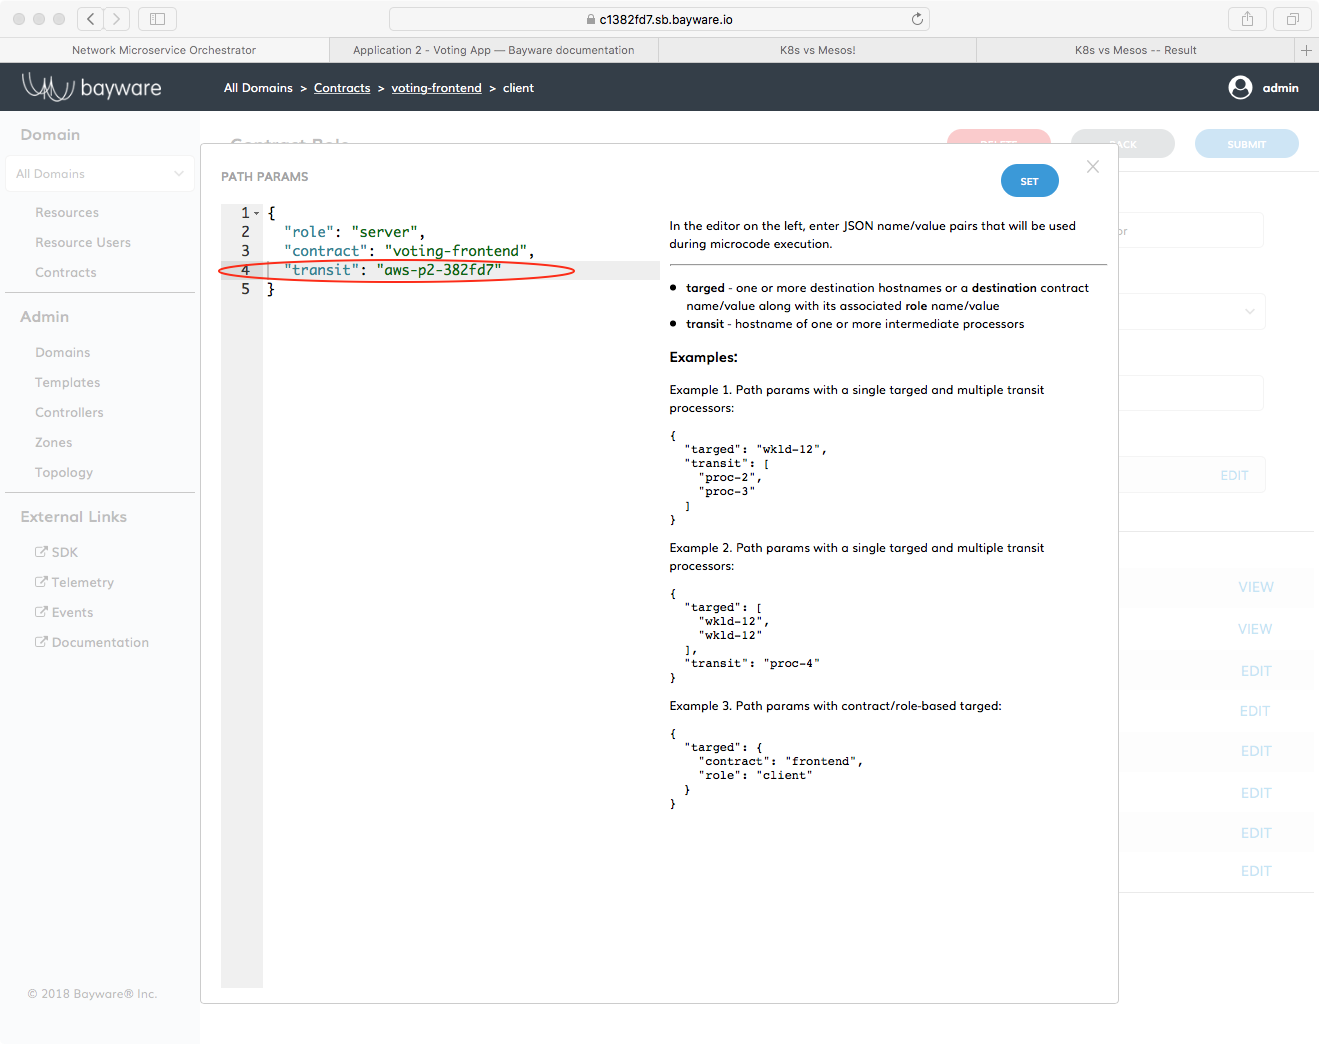
Fig. 59 Edit Path Params JSON Description
Your browser window should now be split between an editor on the left and some
examples and explanation on the right. Modify the JSON description of the path
parameters as shown in Fig. 59. Careful to use
your personal sandbox name when describing aws-p2-382fd7. The contents
of the JSON description in its entirety should read
{
    "role": "server",
    "contract": "voting-frontend",
    "transit": "aws-p2-382fd7"
}
Don’t miss the comma at the end of the contract line, either. Click SET in the upper-right corner. Then be sure to click SUBMIT after you are returned back to the Contract Role page.
Important
You need to click both SET and SUBMIT to get the new Path Params to stick.
Since the client role in frontend-contract is assigned to http-proxy,
traffic from http-proxy to the server will now go through aws-p2.
Now repeat the changes you made to the path parameters on the client role
to those on the server role. That will force traffic coming from voting-svc to
go to aws-p2 before going to http-proxy.
Once you have edited path parameters on both client and server roles of
frontend-contract, you can check if everything is working. Go back to the
browser tab that has the Voting App vote window open. The URL is similar to
https://ap382fd7.sb.bayware.io/voting/vote. Now vote.
Check out the OVS tables again to ensure traffic is routed
through the transit point, aws-p2.
Go back to your terminal window where you’re logged in as root on aws-p2.
Read Table 30.
[root@aws-p2-382fd7 ~]# ovs-ofctl dump-flows ib-br table=30
NXST_FLOW reply (xid=0x4):
cookie=0x3066303030303537, duration=88250.285s, table=30, n_packets=0, n_bytes=0, idle_age=65534, hard_age=65534, priority=1500,ipv6,ipv6_dst=fd32:10d7:b78f:9fc6::/64 actions=resubmit(,40)
cookie=0x3066303030303537, duration=88250.285s, table=30, n_packets=72, n_bytes=15301, idle_age=3, hard_age=65534, priority=1200,ipv6,ipv6_dst=ff3c::/32 actions=resubmit(,50)
See in this example that n_packets=72. So 72-57=15 packets have been sent through aws-p2 after modifying
both client and server roles and voting one time.
Similarly, take a look at Table 50.
[root@aws-p2-382fd7 ~]# ovs-ofctl dump-flows ib-br table=50
NXST_FLOW reply (xid=0x4):
cookie=0x3066303130343564, duration=2.857s, table=50, n_packets=0, n_bytes=0, idle_timeout=60, hard_timeout=60, idle_age=33, priority=1000,ipv6,in_port=3,ipv6_src=fd32:10d7:b78f:9fc6:240d:8cb4:1db0:4082,ipv6_dst=ff3c::4001:86a6,ipv6_label=0x63b71 actions=output:2
cookie=0x3066303130343631, duration=2.641s, table=50, n_packets=0, n_bytes=0, idle_timeout=60, hard_timeout=60, idle_age=18, priority=1000,ipv6,in_port=2,ipv6_src=fd32:10d7:b78f:9fc6:28a3:eea2:e22e:2103,ipv6_dst=ff3c::4001:86a6,ipv6_label=0x0c894 actions=output:3
Whereas the table was previously empty, now it contains two entries. Note that
n_packets=0 simply because the entry refresh rate makes it difficult to
catch a non-zero value. However, you can verify the relationship between the
table entires and your service interconnection fabric. Find the ipv6_src
address in each entry above and compare it with the Node ID column
on the Resources page in the orchestrator. One entry should map to
aws-11 and the other to gcp-11: the workload nodes running the
microservices between which the transit node aws-p2 was injected. Further,
the lower four bytes of the ipv6_dst address in each entry above indicate
the Contract used. Find this in the Contract ID column
on the Contracts page in the orchestrator.
Good (Secure) Housekeeping
If you’ve been following along, you know things change quickly around here: Getaway App was here and now it’s gone. Likewise, when the votes have been counted, you’ll want to scrub your infrastructure so you have nothing left but a pristine Bayware service interconnection fabric. That way, if you need a vacation after all the voting brouhaha, re-install Getaway App and start planning a week in Columbus or Frankfurt!
Back on your Command Center, be sure you are logged in as centos and not
root. If you’re at your root prompt, simply type
]# exit
Ensure you are in your homedir by typing cd. You should now
be at a prompt that looks like
[centos@aws-bastion-382fd7 ~]$
Now type
]$ ./purge-apps.sh
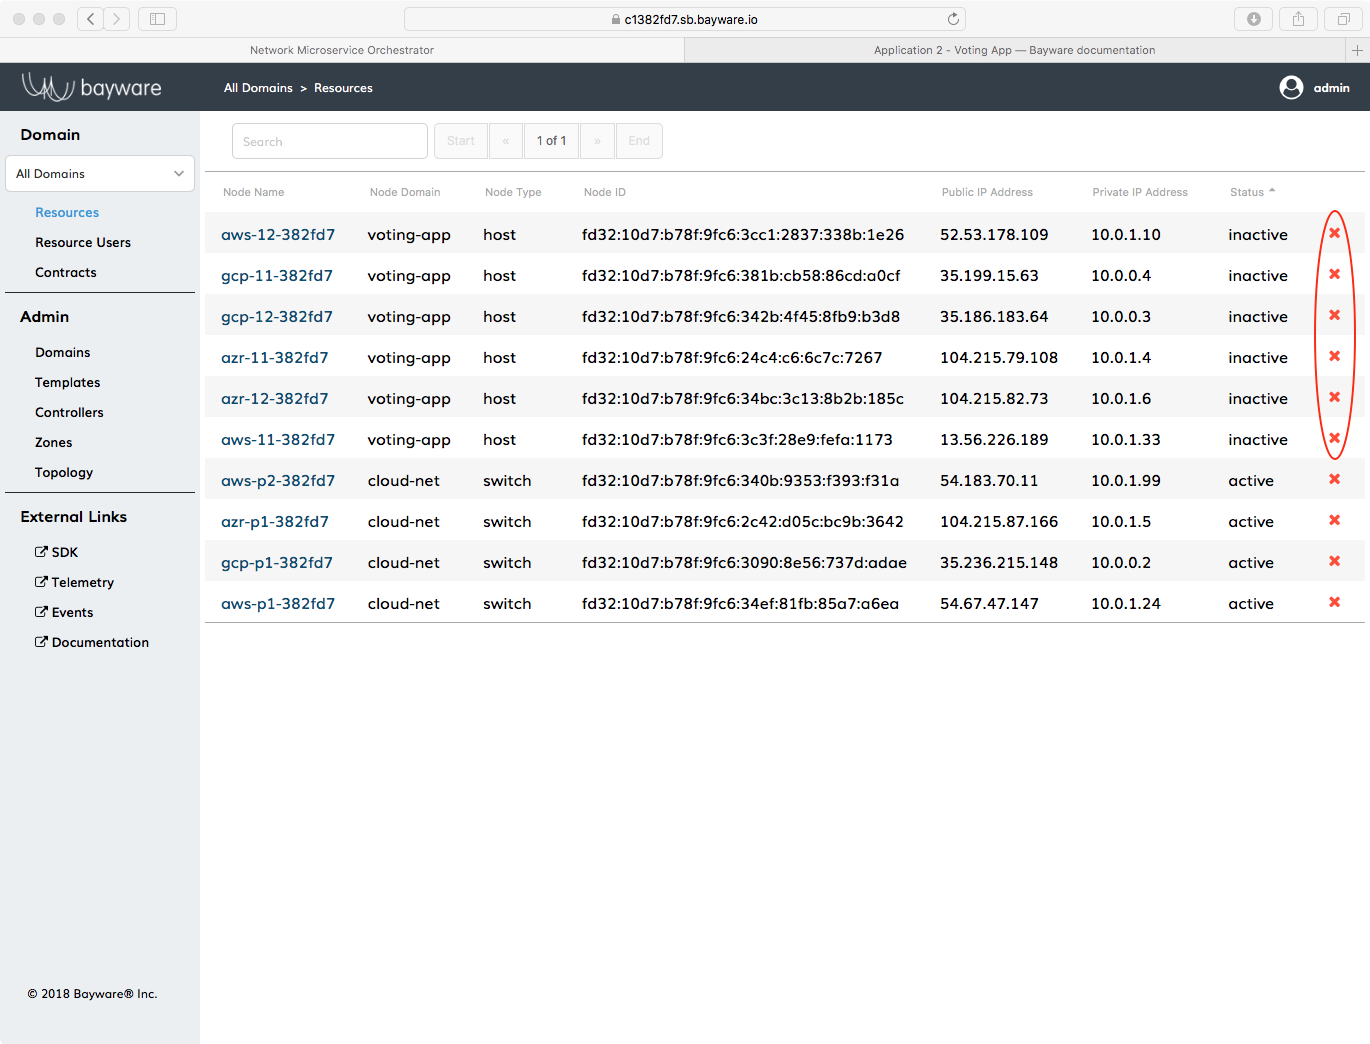
As with the purge of Getaway App, all workload nodes in your infrastructure are now disconnected from the orchestrator. They should appear red in the Topology window.

Fig. 60 Voting App Topology After Purge
For security reasons described in Getaway App, those red workload nodes
now need to be deleted from the orchestrator by clicking Resources
and then clicking the red x next to the hosts that
are part of the voting-app domain. Once you have deleted those, you
should only see your four processor nodes back on the Topology page.
Summary
In this chapter you learned that Bayware’s innovative technology works
natively with containers. You deployed Voting App, a containerized
application using Ansible. After interacting with the Voting App
in your browser, you easily modified voting-frontend contract’s
path parameters to insert a transit node between http-proxy
and voting-svc.